As I have mentioned in previous posts, I am working with our local community theatre, CAST. I am playing a part but in community theatre we do many things. We spent part of one Saturday painting sets. During the process it was discussed that the front door needs a window of some kind. Since yours truly has previously made a faux stained glass piece for a friend, I volunteered to do one for this. Of course, we are not cutting into the door. So there will be two pieces that are mirror images (or close) so that it can show on both sides of the door.
I am awaiting design approval from the director at this point. But in the meanwhile, it was a good idea to revisit my method. So, this sample serves as a check both for method and color.
In the actual piece there will be black "leading" lines between the colors. The colors will not run together like they do on this sample. I did this really fast and didn't let it dry between colors.
The design that I have submitted is a rough computer drawn image. I will have to draw it full-size for making the template I will need to paint it. Here is the rough draft design I have submitted.
The colors are not exact, but they give a rough idea of what we may do. The center will be left semi-transparent so that the ladies can get an idea of who is outside the door as that is part of the plot.
I am excited to be doing this for our production of Arsenic and Old Lace.
Comments are welcomed. I will reply when possible unless otherwise stated. Of course if you are a "No Reply Blogger"- I can not reply. Links in posts may be affiliate links for which I am compensated if you click through and purchase.
Wednesday, February 28, 2018
Wednesday, February 21, 2018
They Are Fermenting
What is fermenting? Well, several ideas are fermenting in my head. But there are four jars with ferments in my laundry room. There is also some Kombucha fermenting in the hall closet. Hmmm....I guess I am king of fermentation on my block!
A few days ago, I came across a recipe for Fermented Pickled Cranberries. Once the season is over, I grab a few bags at the markdown price and freeze them. Cranberries freeze beautifully -- there is no work to it. When you are ready to use them, pull the bag out of the freezer, rinse them and let them thaw unless you are going to cook them. These hung out in the refrigerator for a few days to thaw. My recipe improvised a bit one that is linked above. I didn't have honey, candied ginger slices, or an orange. I used turbinado (raw) sugar in place of the honey, grated fresh (frozen) ginger, and dehydrated orange peel. I also put some lime juice in place of the orange juice. They look really pretty sitting in the jar.
The small jar on top has water in it to weigh down the cranberries. This keeps them under the brine so that mold doesn't form. The big jar is sitting in a bowl in case of overflow when the ferment bubbles.
Today I made kimchi which is basically the Korean version of sauerkraut. It is much spicer -and in my opinion much tastier too.
I have three jars fermenting and one 2/3rd jar of fresh in the refrigerator.
I also ferment sauerkraut because I like it better than store-bought -and it is healthier. Another ferment I like to make is a quick ferment - yogurt. It takes about an hour to prepare (mostly waiting time) and approx 8-9 hours to ferment. It is so easy.
Have you ever tried making your own fermented foods?
Comments are welcomed. I will reply when possible unless otherwise stated. Of course if you are a "No Reply Blogger"- I can not reply. Links in posts may be affiliate links for which I am compensated if you click through and purchase.
A few days ago, I came across a recipe for Fermented Pickled Cranberries. Once the season is over, I grab a few bags at the markdown price and freeze them. Cranberries freeze beautifully -- there is no work to it. When you are ready to use them, pull the bag out of the freezer, rinse them and let them thaw unless you are going to cook them. These hung out in the refrigerator for a few days to thaw. My recipe improvised a bit one that is linked above. I didn't have honey, candied ginger slices, or an orange. I used turbinado (raw) sugar in place of the honey, grated fresh (frozen) ginger, and dehydrated orange peel. I also put some lime juice in place of the orange juice. They look really pretty sitting in the jar.
The small jar on top has water in it to weigh down the cranberries. This keeps them under the brine so that mold doesn't form. The big jar is sitting in a bowl in case of overflow when the ferment bubbles.
Today I made kimchi which is basically the Korean version of sauerkraut. It is much spicer -and in my opinion much tastier too.
I have three jars fermenting and one 2/3rd jar of fresh in the refrigerator.
Three jars fermenting. |
Have you ever tried making your own fermented foods?
Comments are welcomed. I will reply when possible unless otherwise stated. Of course if you are a "No Reply Blogger"- I can not reply. Links in posts may be affiliate links for which I am compensated if you click through and purchase.
Tuesday, February 20, 2018
Dye Bucket - The Results
The fabrics from my dye bucket playtime have been washed, dried and ironed. These are quite different from my usual dyed fabrics.
This one has a bit of interesting color play. The golden yellow took strongly in spots. Some of the blue from one of the purples mixed with it and made a grungy green shade, while some of the purple/red seemed to go more pink/fuchsia than I expected.
This one has a lot of white space but the central design is interesting. I turned the photo upside down since I wanted the design to go this direction. This seems a bit tribal to me. I like it.
These two also have a good bit of white space. I used them under a t-shirt that I was over-dyeing. But I forgot to get a photo of the t-shirt.
I like some of the shapes in the lower one.
This piece tended a lot toward green with some touches of blue, lavender and bits of yellow. It is surprisingly neutral - and that may be a very good thing.
This is the one that looked so vivid with the yellow fading into brown in the first rinse. The brown diminished quite a bit in the rinse/soak process. And frankly, I would rather lose color there than have it bleed later. It still has some interesting crystal shapes in the yellow section.
All of these will be fun and 'not too precious' to use in quilting or sewing. Only time will tell what they may become.
Comments are welcomed. I will reply when possible unless otherwise stated. Of course if you are a "No Reply Blogger"- I can not reply. Links in posts may be affiliate links for which I am compensated if you click through and purchase.
Monday, February 19, 2018
Playing in the Dye Buckets
This morning I had an urge to put some fabric in dye and just PLAY with it. Mixing up two different purple hues and one golden yellow, I started to play. The fabrics gathered are white quilting cotton, a cotton dishtowel and a t-shirt that had previously been dyed just a bit. The t-shirt was pale, so I wanted to "up the intensity" on it.
All three colors were used on every piece of fabric. Of course colors do run and blend in the dye bath so some interesting variations occur. Two purples was probably not the best plan, but that is what the muse wanted. 😊😊
The final fabrics are now in the soak bath that I do to prevent bleeding, I will change it out at least once this evening. Tomorrow morning it will be done soaking and I will wash it in the washing machine. Then there will be a full array of results to see.
For now, here are two photos that I snapped while getting them into the bath.
I am loving the colors that appeared from the dye "breaking" and from the colors bleeding together.
A bit late, but here is a link to the Craftsy Class on Fabric Dyeing.
Comments are welcomed. I will reply when possible unless otherwise stated. Of course if you are a "No Reply Blogger"- I can not reply. Links in posts may be affiliate links for which I am compensated if you click through and purchase.
All three colors were used on every piece of fabric. Of course colors do run and blend in the dye bath so some interesting variations occur. Two purples was probably not the best plan, but that is what the muse wanted. 😊😊
The final fabrics are now in the soak bath that I do to prevent bleeding, I will change it out at least once this evening. Tomorrow morning it will be done soaking and I will wash it in the washing machine. Then there will be a full array of results to see.
For now, here are two photos that I snapped while getting them into the bath.
The red/orange in this is because the dye "broke" or separated into the colors that it was mixed from. |
In this case the purple and yellow made a rich warm brown. I love it. |
A bit late, but here is a link to the Craftsy Class on Fabric Dyeing.
Comments are welcomed. I will reply when possible unless otherwise stated. Of course if you are a "No Reply Blogger"- I can not reply. Links in posts may be affiliate links for which I am compensated if you click through and purchase.
Wednesday, February 14, 2018
All Quilted - But Still in Progress
The Wonky Nines quilt is finally all quilted. It is not my best quilting, but it is d-o-n-e. I had started piecing this quilt in 2013 and when I started quilting it, I decided to use an inexpensive poly batting. That was my big mistake. I hate quilting on poly batting. From now on, I will use cotton or a cotton/poly blend. I have some "blend" battings in my stash from a great sale I found a while back.
So anyway, here is the photo of the three pieces laying across my bed.
It is a queen bed, so this is a pretty large quilt. The back is pieced also. Here is a surprise that I found when I turned one of the sections over.
Another thing that I finally remembered to photograph is my bobbin storage. My Janome 6600 has two vertical spool pins - but I typically just use one of them for a cone of thread. So I decided that I could put filled, spare bobbins on the other one. It is very handy to have them easily reachable when one runs out.
As you can see, I have six sitting on there all ready to press into service as needed. If I took the spool cap off the bottom, I could add one more.
Does anyone else have a trick/hack for their machine to share?
Comments are welcomed. I will reply when possible unless otherwise stated. Of course if you are a "No Reply Blogger"- I can not reply. Links in posts may be affiliate links for which I am compensated if you click through and purchase.
So anyway, here is the photo of the three pieces laying across my bed.
It is a queen bed, so this is a pretty large quilt. The back is pieced also. Here is a surprise that I found when I turned one of the sections over.
I love that positive/negative in complementary colors. |
Another thing that I finally remembered to photograph is my bobbin storage. My Janome 6600 has two vertical spool pins - but I typically just use one of them for a cone of thread. So I decided that I could put filled, spare bobbins on the other one. It is very handy to have them easily reachable when one runs out.
As you can see, I have six sitting on there all ready to press into service as needed. If I took the spool cap off the bottom, I could add one more.
Does anyone else have a trick/hack for their machine to share?
Comments are welcomed. I will reply when possible unless otherwise stated. Of course if you are a "No Reply Blogger"- I can not reply. Links in posts may be affiliate links for which I am compensated if you click through and purchase.
Saturday, February 10, 2018
A Little Vitamin FMQ
My vitamin FMQ level was running low - so I pulled out a section of quilt that needed work to get my dose of FMQ (free-motion quilting.)
This quilt was started in late 2013. Yikes.... it is way overdue for a finish.
Perhaps I shouldn't mention that two thirds of it has been quilted for some time. But you see, I used a poly batting in this and quilting it is just not all that enjoyable for me. I think it will look okay once finished, but the loft of that batting is harder to quilt on a domestic machine. I will say it is a lesson learned.
The good news is that now another sixth of the quilt is quilted. (That is half of that final third of the quilt --errrrr, if I got my fractions cyphered correctly -so that means that I have 5/6 finished and 1/6 left to quilt---next week.)
I am still watching things on Craftsy Unlimited. If you haven't tried it yet, click the banner for a free trial.
I may try knitting again. I am watching a class on Portuguese knitting taught by Andrea Wong. I haven't picked up my needles yet, but just watching it, I think it will be much easier to switch between knit and purl stitches. The class is on sale now for $24.99 OR you can watch it and many other classes in the free trial of Craftsy unlimited.
Comments are welcomed. I will reply when possible unless otherwise stated. Of course if you are a "No Reply Blogger"- I can not reply. Links in posts may be affiliate links for which I am compensated if you click through and purchase.
Thursday, February 08, 2018
Ukulele Update
Okay, so here is my rough attempt at accompanying myself on the ukulele. So far, I am pretty terrible at playing it. But I can form a few chords. I really need a lot of work on strumming technique.
I recorded just the audio, but to post it on YouTube video is required - so I used a few photos to fill in the space.
This is an old Elvis Presley song that was covered by a LOT of people - so I am now covering it too. Ha ha.
Be warned - this is not great music - I am very much a beginner.
Comments are welcomed. I will reply when possible unless otherwise stated. Of course if you are a "No Reply Blogger"- I can not reply. Links in posts may be affiliate links for which I am compensated if you click through and purchase.
Wednesday, February 07, 2018
No Quilting, No Weaving - but Having Fun
A few posts ago, I mentioned that I am rehearsing for a Community Theater play. So that is taking up some of my time. But then this wild hare ran by and all the squirrels said "what was that?"
You see, for some time I have considered getting a ukulele and learning to play it at least enough to sing along with. Since there is a precedent of buying something and deciding it is "too difficult" or there is some other reason - and I set it aside, I got an inexpensive instrument.
This Kmise Ukulele came from Amazon where the reviews were pretty good. It has a mahogany body (or so it said in the description.) A gig bag (seen above,) a tuner and a strap came with it. So I have been playing around learning chords on it and just having fun with it. Here is another photo with my hand around the neck for size reference.
This little baby is 21 inches long. It is a soprano ukulele which is the smallest standard size. The next size up is a concert, then a tenor and the largest is a baritone. There are an amazing number of tutorial videos on YouTube and other sites that have really been helpful in starting to learn to play.
When I get better - and really brave - I will do a small video to share with you. For now, I am just enjoying the journey.
No fears, I will be back to quilting and weaving and even painting soon.
Comments are welcomed. I will reply when possible unless otherwise stated. Of course if you are a "No Reply Blogger"- I can not reply. Links in posts may be affiliate links for which I am compensated if you click through and purchase.
You see, for some time I have considered getting a ukulele and learning to play it at least enough to sing along with. Since there is a precedent of buying something and deciding it is "too difficult" or there is some other reason - and I set it aside, I got an inexpensive instrument.
This Kmise Ukulele came from Amazon where the reviews were pretty good. It has a mahogany body (or so it said in the description.) A gig bag (seen above,) a tuner and a strap came with it. So I have been playing around learning chords on it and just having fun with it. Here is another photo with my hand around the neck for size reference.
Of course I had to put a quilt in the photo! |
When I get better - and really brave - I will do a small video to share with you. For now, I am just enjoying the journey.
No fears, I will be back to quilting and weaving and even painting soon.
Comments are welcomed. I will reply when possible unless otherwise stated. Of course if you are a "No Reply Blogger"- I can not reply. Links in posts may be affiliate links for which I am compensated if you click through and purchase.
Monday, February 05, 2018
Finish #2 : Anita's Arrowhead and Old Italian Blocks
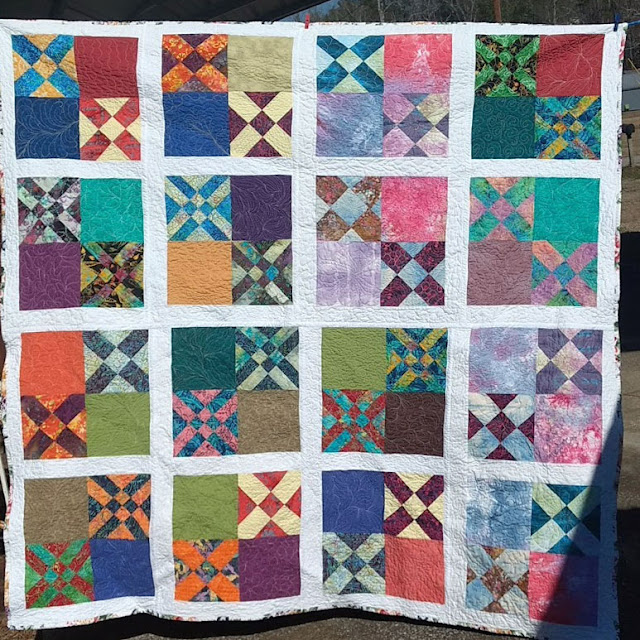
Wow! I am on a roll here. Last night, just before bedtime, I finished my quilt made with Anita's Arrowhead and Old Italian Blocks. These blocks are from the book "Rotary Cutting Revolution" by Anita Grossman Solomon. I also used some "plain" blocks of hand dyed fabrics and solids to calm it down just a bit.
This quilt has been in progress since April of 2015. So I am very happy to have it finished. My method for this one was quilt-as-you-go. I did eight sections that I quilted and then joined together to make one bit quilt. A close look shows that some days my free motion quilting mojo was amazing. Here are a few close-ups of sections that make me happy.
And the back shows the sections as each section has a different fabric for the backing.
Those two blues on the bottom kind of blend in the photo - but in actuality there is a nice contrast.
I am loving my new quilt.
If you like these blocks, you can take the Craftsy Class "Traditional Blocks Made Simple"
OR you can Join Craftsy Unlimited, here, and take the class and many others for a monthly fee. (and you can stop at any time, but you do not get to keep the classes forever.)
Both of these are affiliate links so if you click on one of these links, I get paid, but you still get the same great price. So we both win.
If you would like to be an affiliate, you can sign up here. Craftsy Affiliate Sign Up.
Comments are welcomed. I will reply when possible unless otherwise stated. Of course if you are a "No Reply Blogger"- I can not reply. Links in posts may be affiliate links for which I am compensated if you click through and purchase.
This quilt has been in progress since April of 2015. So I am very happy to have it finished. My method for this one was quilt-as-you-go. I did eight sections that I quilted and then joined together to make one bit quilt. A close look shows that some days my free motion quilting mojo was amazing. Here are a few close-ups of sections that make me happy.
From the back |
Same as above from the front of the quilt. |
Some simple paisley shapes with an occasional curl. |
A large section from the back using square flowers and various other designs. |
Those two blues on the bottom kind of blend in the photo - but in actuality there is a nice contrast.
I am loving my new quilt.
So nice, I showed it twice! |
OR you can Join Craftsy Unlimited, here, and take the class and many others for a monthly fee. (and you can stop at any time, but you do not get to keep the classes forever.)
Both of these are affiliate links so if you click on one of these links, I get paid, but you still get the same great price. So we both win.
If you would like to be an affiliate, you can sign up here. Craftsy Affiliate Sign Up.
Comments are welcomed. I will reply when possible unless otherwise stated. Of course if you are a "No Reply Blogger"- I can not reply. Links in posts may be affiliate links for which I am compensated if you click through and purchase.
Saturday, February 03, 2018
Heading toward a 2nd Finish?
My Arrowheads and Old Italian block quilt has been languishing in the pile since I last worked on it June or July of 2017. But the quilt was started (gasp!) in 2015. Gracious me, how did I let it go that long? I suppose I was off chasing different "squirrels."
Today, Saturday February 3, I pulled out the five pieces of it and started joining it together. It is now in two big pieces. Here they are laid across my bed.
I took the picture from two angles hoping that you could see most of the quilt.
I was really happy to see that it will fit my bed nicely when it is finished. I have only to cut the two LONG joining strips and get it joined into one piece. Then I can bind it and have finish #2 for this year. However, I am taking the rest of today and possibly all of tomorrow off - so it will be next week before I get it joined etc.
This past week I did my volunteer ushering job again. Our guest entertainer was billed as "The Illusionists present Adam Trent." Adam Trent is an illusionist or a magician who has a rather elaborate stage show. He was kind enough to sign autographs and take photos with the crowd after the show. Of course, I jumped right in with the children of all ages and got my photo made too.
This is a cellphone photo and the lights didn't play well with the lens -so the picture is a bit blurry.
Things on the calendar for this week include of course finishing this quilt; rehearsing with community theater for our upcoming performance of Arsenic and Old Lace; a doctor's office visit; and the usual chores and exercise classes.
Craftsy is still offering a seven day free trial on the Unlimited plan. As you know, I am a Craftsy affiliate so if you click on one of these links, I get paid, but you still get the same great price. So we both win.
If you would like to be an affiliate, you can sign up here. Craftsy Affiliate Sign Up.
Comments are welcomed. I will reply when possible unless otherwise stated. Of course if you are a "No Reply Blogger"- I can not reply. Links in posts may be affiliate links for which I am compensated if you click through and purchase.
Subscribe to:
Posts (Atom)