Saturday, October 30, 2021

One "Chunk" Joined

Sewing along on the strip sets Saturday morning, it occurred to me that I could do some cutting and adding to the sections to make them fit together easily.  Two of the sections were close in size along one edge.  Cut a strip off of the longer one and made them match.  Then I took three smaller sections and played "puzzle" with them until I had a piece that was the same length as the section I had joined. That new section was sewn on to make one good-sized chunk. 


The play of colors and visual textures from the batiks, hand-dyes, and prints - with a few solids added for a calming effect really make me love this.

I have loads of scraps left so I will start some new sections with the "seeds" that were left from "playing puzzle" (trimming to make it fit)  and other small sections I have sewn and not added yet.  This is a totally joyous process. 
Seeds

*Scrappy Pro Tip: Always save trimmings that are at least an inch wide. Those are your scrappy seeds.


Until Next Time,  
Stay Creative 


Comments are welcomed. I will reply when possible. Of course if you are a "No Reply Blogger"- I can not reply. Links in comments will result in the entire comment being deleted.

Thursday, October 28, 2021

Playing with Pieces -Strip Sets

The strip sets have been sitting on my cutting table patiently.  Well, not totally patient, I heard them call to me a few times. I have added a few strips.  I even sewed two sections together (lower center, right side on the photo below.)    There is still no plan.  I just wanted to do a layout and see what it looks like "so far." 


The piece of deep blue hand dyed fabric is a single piece that I used to fill the hole. If I sewed it this way, I would have to do some partial seams.  They are not as hard as you might think.  The trick is to make a plan before you start sewing it.  In fact, looking at it, I quickly realized that it would be pretty easy.  At first I thought it would require at least 2 partial seams, but I see now that I can do it with just one.  (Uh, I think....lol.) 

There are some more strip pieces left.  For now they are just two or three strips sewn together.  But I could use them to fill in that bottom left "hole."  However, this isn't that large. I may add some big pieces of whole cloth fabric to make it bigger and add a somewhat "modern" vibe to it.  Ha ha...only time will tell. I can change my mind faster than you can imagine. 

Until Next Time,  
Stay Creative 


Comments are welcomed. I will reply when possible. Of course if you are a "No Reply Blogger"- I can not reply. Links in comments will result in the entire comment being deleted.

Monday, October 25, 2021

Twisting To the Side

After making the last set of blocks,  I realized that the strip blocks are not the best thing to use for the freeform curve blocks.  I pulled out some more fabrics and added to the pile. I had some hand-dyed fabrics that have been in my stash a long time.  A lavender/purple and a green called to me. So I used those to mix with one simple block made of strips.  Oops!  Only using three "fabrics" meant that I got three blocks. So some more of the purple and green fabric made a fourth block to go with it. 
These work like Drunkard's Path blocks.  You can rotate them in so may directions and combinations that it is difficult to make a decision.  Plus, I took the piece from the last post and added it to really confuse the issue.  I put it in three layouts.  One of these I really like. 
#1

#2

#3

I probably tried more layouts,  but you can futz with those forever.  I made a discovery as I was taking the photos.  I use my phone for most photos. The discovery is that seeing the design smaller (condensed to a thumbnail size) really helps me to make design decisions. 

So now, I ask you - Which of the three do you like?

I also pulled out four fabrics - because that is the way it was demonstrated. (Ha ha) With those four fabrics, I made four more blocks.  I suspect they will be a different project.  Here are those layouts. 
#1

#2

#3

Lets call these "the OTHER" blocks - which layout do you like for these blocks?


Until Next Time,  
Stay Creative 


Comments are welcomed. I will reply when possible. Of course if you are a "No Reply Blogger"- I can not reply. Links in comments will result in the entire comment being deleted.

Sunday, October 24, 2021

Adding a Twist to the Strip Blocks

After making a number of strip blocks,  the thought of "what to do with these" was strong. So they sat for a day.  Then I watched the latest episode of The Quilt Show featuring Cindy Grisdela.  She showed freeform curves as part of the presentation.  Now, you probably know that it wasn't a new concept to me.  What it did was to reinforce the idea and wake up the muse.   

I took the smallest rectangle that I thought would work and paired it with a chunk of fabric that was handy. It was a scrap of a print fabric that I had over-dyed.   That followed my scrap/dyed theme with these pieces so it seemed like "kismet."  Curves were cut and sewn. Here is the result.  You may be seeing more of these in the next week or so. 

The photo is slightly crooked but the piece is 10.5" by 6.25"
Remember what I said "if it is too small, you can sew on more fabric." 
A chunk or a couple of strips could be added to the top (or bottom) to make 
this "block" 10.5 inches square.  With fabric, the possibilities
are almost endless. 
Allow yourself to play!

Until Next Time,  
Stay Creative 


Comments are welcomed. I will reply when possible. Of course if you are a "No Reply Blogger"- I can not reply. Links in comments will result in the entire comment being deleted.

Monday, October 18, 2021

Lots of Strips

The strips in this pile were left over from the last quilt.
The pile was on my cutting table begging to be used.
I know that some people toss out those scraps from trimming a quilt.
Most of the time, I just can't do that. I paid good money for those strips.
(except of course for the fabric that I won.)


So,  I grabbed a bunch and started sewing strip sets. 
As long as the color didn't match and the size was close
They got sewn together.  Then I trimmed the ends.
None of these are the same length. 
Does that bother me?  NOPE.
Fabric can be cut. 
Fabric can have pieces sewn on to make it longer. 

Worry is the enemy of spontaneity.  
Joyous creation can be spontaneous and free.
My muse is happy with these strip sets.

What will they become?
Who knows? 
They will become and that is what counts. 


Until Next Time,  
Stay Creative 


Comments are welcomed. I will reply when possible. Of course if you are a "No Reply Blogger"- I can not reply. Links in comments will result in the entire comment being deleted.

Friday, October 15, 2021

Another Finish

When I got to Mom's on Friday afternoon, Mom told me that she had "put a few more pieces in the puzzle"  - I said "Okay" - "You better check them." she said.   Going into the dining room I looked and the puzzle had less holes in it than the day before.  

Now, let me explain that sometimes Mom will put pieces in the wrong places because "It ought to fit there!"    

But, when I started checking, I couldn't find a single piece that seemed to be in the wrong place.  Mom told me that I had to do the rest of it.   So, I sat and started putting in the last 15-20 pieces.  I got down to 3 pieces and said "Oops!"  there was room left for four more pieces.  I placed those last three pieces in and the puzzle looked like this:

We thought that perhaps that piece had fallen to the floor.  We searched diligently but to no avail. Over an hour later Mom went in the kitchen to make herself a cup of coffee.   I heard her say "Look!  Here is that piece of the puzzle."  She picked it up off the floor and tried to hand it to me.  I said "Oh, no! You found it, you get to put it in."  (Of course I forgot to take another photo.) 
All we could figure is that she had somehow leaned on the pieces and one stuck to her and rode into the kitchen unobserved.  Or maybe it was an early Halloween goblin playing tricks on us.   Who knows?!?!

Until Next Time,  
Stay Creative 


Comments are welcomed. I will reply when possible. Of course if you are a "No Reply Blogger"- I can not reply. Links in comments will result in the entire comment being deleted.

Wednesday, October 13, 2021

Totally Tubular - A Finish

    Yes,  the Totally Tubular quilt is finished and ready to share. First, of course is the front.  You can see that I decided on a fabric that I hand dyed for the binding. It is a mixture of blue and green. I think it works well for this quilt.

The quilt front is made with a combination of shirting fabrics (light blue, blue/white stripes, pale yellow) with the focus fabrics of some special hand-dyed fabrics that I won in a giveaway from Vicki Welsh. These are her "waste" fabrics.  (They certainly are NOT being wasted here.) 


The back is made of some batik fabrics that I bought several years ago from a shop in another town in Alabama.  I decided to stop hoarding them and use them for this quilt. I think they go so nicely on this quitl. 


Now I will need to decide on another project. I may work on finishing one of my other UFOs or I may start something new.   This quilt was a UFO from March of 2014.  Essentially, it was seven years in the making.  It is possible that I have older UFOs.  


Until Next Time,  
Stay Creative 


Comments are welcomed. I will reply when possible. Of course if you are a "No Reply Blogger"- I can not reply. Links in comments will result in the entire comment being deleted.

Saturday, October 09, 2021

It is One Piece

Yes indeed.  The Tubular quilt is now one piece.  All that is lacking is the binding. But I have given myself the rest of the weekend off.  Also, I have a "chore" Monday that may prohibit me from working on it then.   Meanwhile here are pictures in the glorious sun today. 
And since a picture of the back was requested, here it is my friends. 


Until Next Time,  
Stay Creative 


Comments are welcomed. I will reply when possible. Of course if you are a "No Reply Blogger"- I can not reply. Links in comments will result in the entire comment being deleted.

Friday, October 08, 2021

Putting It Together

All of the pieces of the Tubular quilt are quilted and I have started putting it together.   In the photo the center section is already joined.  The top and bottom sections are still each three pieces.  A lot of joining strips are cut - but I may need to cut more as I go along.  

I think that it looks great.  I love the quilting on it. 

Once all the sections are joined, I will need to choose a fabric for the binding.   At this point, I have no idea what I may use for the binding.  The backs of all these pieces are batiks.  I don't know if I will choose a print, solid, batik, or perhaps, a hand-dyed fabric for the binding.  

One thing is certain!  I love it already. That is a true rarity.  I am proud of the process.  I am proud of the digitized embroidery quilting too.   Does that mean I would never sell it?  Of course not.  That would mean I could buy more supplies or upgrade my embroidery digitizing program.  Or maybe just do something fun with the money.   I have had all the joy in making this, that will remain the rest of my life - whether I have the quilt or not. 

Until Next Time,  
Stay Creative 


Comments are welcomed. I will reply when possible. Of course if you are a "No Reply Blogger"- I can not reply. Links in comments will result in the entire comment being deleted.

Tuesday, October 05, 2021

Fall - yes it Fell

We have had rain all week - Fall started and the rain Fell.  So, I have not had decent weather to take good photos of the quilt panels.  

I have pieced the six end pieces to enlarge the quilt before I join it all together.  I need to layer those with batting and backing and get them quilted.  I have digitized a couple more quilting designs that I plan to use.  I also took one that I purchased and added a bit to it.  You will see those as I quilt them. 

I have been working on a puzzle with Mom.  My brother purchased this one.  I think I would have seen some aspects of it that would have had me saying "I don't think so."  But, it was a gift to Mom, so we are working on it.   

We have the border and some other sections pieced together.  This photos shows the border on my old "painting board" that we have repurposed as a puzzle board.  You also see some pieces of mat board that have pieced sections on them. 

Let me show you closer views of the pieced sections.  First up is the man in black with a tan coat and a fence.  The pieces to the left side are a cat in a chair.  I try to use the boards as fully as possible. 
I need to find the rest of the man's legs so I can join him together. 
Next up is the man in the red shirt.   He is still missing the left side of his leg, but he his largely finished. 

Mom wanted to do all the "words" on the puzzle, so I gladly let her have that part. 
I do like to see her have success with sections.  


There are a few other boards with pieces that are sorted according to appearance. And there are LOTS of pieces still in the box that we keep rummaging through. 

     Here is the cover of the box with the photo. 

You may notice that blue sign on the right side of the photo....Mom completed that sign also.  It is attached to the border.  You can see it in the first photo but it is slightly cut off in the photo. 

I have a feeling the wisteria above the gate may be one of the more difficult parts. 


Until Next Time,  
Stay Creative 


Comments are welcomed. I will reply when possible. Of course if you are a "No Reply Blogger"- I can not reply. Links in comments will result in the entire comment being deleted.

Sunday, October 03, 2021

Update and Quilting Designs

I have finished quilting the three panels of the Totally Tubular quilt. However, we are having a rainy day -so I have not attempted a photo of them.  The texture really shows up nicely with  morning or afternoon sun shining on them at a low slant.   

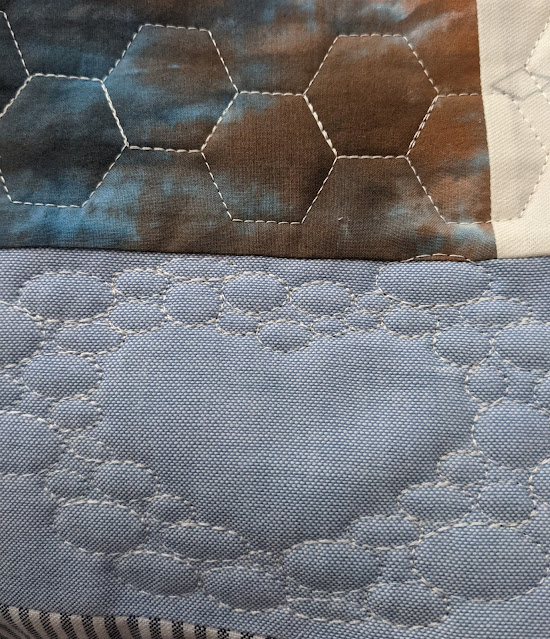
I do have a photo to share of a couple of the designs I digitized. These are quilted on the quilt.  I get quite "brazen" and test them right on my quilt.  


At the top of the photo are the "Nested Hexies."  I have no desire to sew "hexies" by hand.  But, I love this Hexie quilting pattern. 
The lower section of the photo shows an un-quilted heart shape that is formed by the pebble-type quilting surrounding it.   I used a freeform outside shape to make it more interesting.  I also digitized a 4" by 4" version that can be used for quilting square areas.  

By digitizing quilting designs and sewing them out on a quilt,  I have learned so much more about using my embroidery machine. I am much better at aligning the design on the desired area. I have also learned a lot about digitizing - and ways to make it so much easier by starting to learn everything each tool can be used for. 

At this point, if I join the three sections,  the quilt will be 37 1/2" by 57" --I am debating whether I want to add to the length of each section to make it more square.  Or perhaps, I want to join these sections and add a long narrow piece to each 57" side to make it  at least 45" wide. 

My other option is to make two of the pieces into a table topper and the other piece into a table runner.  I think I would prefer making a quilt of all three.  

What are your thoughts?


Until Next Time,  
Stay Creative 


Comments are welcomed. I will reply when possible. Of course if you are a "No Reply Blogger"- I can not reply. Links in comments will result in the entire comment being deleted.