What defines art? hmmm....it is a good question with no definitive answer.
So I am going to say that I have been working on an art project.
I am not saying much about it at this point. There is machine work as well as hand work in this. Yes, really! I am doing some hand work. Even more amazing it has been enjoyable. Now I think I could put on a movie and do this for a while. Time certainly flies when I am working on this piece.
More later!
Thursday, May 31, 2012
Monday, May 28, 2012
More Stamped Fabric - And Memorial Day
Later in the day Saturday, I did stamp another piece of fabric with just the leaf stamp. Again I can't decide which picture I like best so you get to see them both!
I can't get them to line up side by side. If you know an easy way to do that in Blogger, let me in on the secret.
In honor of Memorial Day I am continuing to support the Quilts of Valor. Iowa Public television has filmed a show on Quilts of Valor and there is a clip. My thanks to Marjorie for sharing it. Now I am sharing it with you . I confess I wiped my eyes once or twice.
I happen to be in the age range of Mary Lou Metzger (I think I am several years younger.) I do still remember knowing people who were drafted and sent to Vietnam. So that part got to me.
Hug a Veteran today and tell them "Thank you for my freedom."
Saturday, May 26, 2012
Weekend Fun - Stamping Fabric
Last weekend I carved a couple of stamps and made a video to show you how. This weekend I finally got to stamp some fabric. I think I "wasted" an hour doing this. I have to say I love the results and will probably do more. However, next time I will do an entire piece with one stamp.
So, how do you do this?
Gather the materials and tools:
Stamps - your own hand carved (preferred) or purchased stamps. I carve my own.
Cloth to stamp, this should be washed and pressed with steam only. Do not use fabric softener Do NOT starch it. The idea is to get the cloth clean and remove all sizing so the paint/dye will stay. I bought some heavy muslin and washed and pressed it.
Something to apply the paint to the stamps. You can use small foam brushes. Soft watercolor/acrylic paint brushs, or you could squeeze the paint onto a glass surface (a piece of window glass or a smooth ceramic floor tile) roll it out with a brayer and use that like a stamp pad. I used the soft brush.
Oh yes, and if you are using several colors, you will need a vat of some kind to rinse the brushes in. (then dry them with paper towel so they don't dilute the paint.) I had a paint bucket. You can use an old coffee can or a disposable plastic cup.
You will also want to put down something to protect your surface. I used cardboard. You can put down newspaper (a few layers) or just work on a surface that you don't mind getting paint on. You may want to put something on the floor too. Accidents can happen and the paint will wreck your carpet and may stain your other flooring.
Something to use as a paint palette to squeeze your paint onto. A foam disposable plate works well. A paper plate will absorb the paint. A sheet of wax paper or freezer paper will work also.
Apply paint to the stamps, not too much, so have a "practice piece" to work on the first time.
Stamp it onto the fabric
And you have made your own fabric designs.
I can really see making a piece that is all leaves or maybe all trees. Here is a close-up of part of the leaf section.
Notice that you can combine colors on one stamp. This is a "try it and play" option . So again, use your practice piece. Some practice pieces turn out as good at the planned piece. So save it a few days and see if you like it.
The paint package says that these paints are permanent after heat setting. So I will let this dry and then iron it, with a press cloth over it to set the paints.
I have no idea what I will just this fabric for just yet...but I will certainly use it in something.
I hope your weekend is fun and creative.
P.S. If you are on a septic system, do not wash your brushes and tools in the sink, use a container and pour the water and paint residue outside. The fine acrylic particles can clog your septic system.
So, how do you do this?
Gather the materials and tools:
Stamps - your own hand carved (preferred) or purchased stamps. I carve my own.
Paints that are made for textiles. I got these Jacquard Textile paints in an "exciter" pack so I could try them and see if I like them.
Photo taken AFTER use. The package makes a great storage container. |
Something to apply the paint to the stamps. You can use small foam brushes. Soft watercolor/acrylic paint brushs, or you could squeeze the paint onto a glass surface (a piece of window glass or a smooth ceramic floor tile) roll it out with a brayer and use that like a stamp pad. I used the soft brush.
Oh yes, and if you are using several colors, you will need a vat of some kind to rinse the brushes in. (then dry them with paper towel so they don't dilute the paint.) I had a paint bucket. You can use an old coffee can or a disposable plastic cup.
You will also want to put down something to protect your surface. I used cardboard. You can put down newspaper (a few layers) or just work on a surface that you don't mind getting paint on. You may want to put something on the floor too. Accidents can happen and the paint will wreck your carpet and may stain your other flooring.
Something to use as a paint palette to squeeze your paint onto. A foam disposable plate works well. A paper plate will absorb the paint. A sheet of wax paper or freezer paper will work also.
Apply paint to the stamps, not too much, so have a "practice piece" to work on the first time.
Stamp it onto the fabric
And you have made your own fabric designs.
I can really see making a piece that is all leaves or maybe all trees. Here is a close-up of part of the leaf section.
Notice that you can combine colors on one stamp. This is a "try it and play" option . So again, use your practice piece. Some practice pieces turn out as good at the planned piece. So save it a few days and see if you like it.
The paint package says that these paints are permanent after heat setting. So I will let this dry and then iron it, with a press cloth over it to set the paints.
I have no idea what I will just this fabric for just yet...but I will certainly use it in something.
I hope your weekend is fun and creative.
P.S. If you are on a septic system, do not wash your brushes and tools in the sink, use a container and pour the water and paint residue outside. The fine acrylic particles can clog your septic system.
Friday, May 25, 2012
QOV Posted
I suppose some of you have wondered what I am doing this week. One evening was Mom's birthday, so I was out later than usual and didn't get any sewing done.
The other evenings, I worked on getting my Quilts of Valor blocks finished. I decided that I would never make it to get the quilt completed in time. So I opted to send in blocks. That meant that I had to up the size of the blocks to 12.5" by 12.5" No problem, just time consuming.
I got them all done. Yesterday, this stack of 25 blocks:
consisting of Stars, Wavy bars, and a few embroidered star blocks went into a Priority mail envelope and they are winging their way to the Linharts for the QOV challenge. I really hope they send me a picture of the completed quilt, but I am not holding my breath. They have lots to do without satisfying my whims. The important thing is that some soldier, active or retired, will get a warm quilt that was made with love.
I hope you have a great Memorial Day weekend.
Sunday, May 20, 2012
Two Sides to Every Story
This is my entry into the Bloggers Quilt Festival.
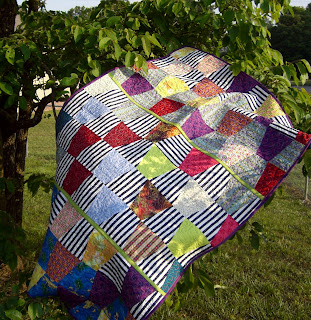
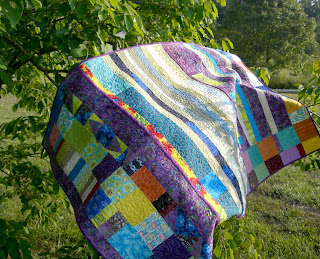
This quilt started out as Tumble 4Ya. However, after putting it all together and seeing both sides. I see that there are Two Sides to Every Story and every quilt. Before I put it in to wash and dry, I took it out for a little photo shoot.
Here are my pictures just so you can see both sides of the story.
Yes I did put up two shots of the Tumbler side in the tree. I couldn't decide which picture I like best.
The tumblers were intended to be the front of this quilt. Ha! I am siding with the scrappy pieced side. It is the front now. This a large lap quilt.
Saturday, May 19, 2012
Carving a Stamp - video
As promised, I have recorded and uploaded a video showing how I carve rubber stamps.
Here is the video:
It has also been added to my Video page (see tabs under the blog title.)
While the video was processing in the computer, I completed carving the Flower stamp that I showed in the video.
Here is a stamped image from that stamp.
Don't be surprised if this image shows up on some fabric.
Later I plan to do a picture and words tutorial on using rubber stamps to embellish fabric.
Thursday, May 17, 2012
Stamp Carving - Tools and Supplies
In preparation for the video on carving stamps to use on fabric, I am going to show you the tools and supplies I use.
First of all you will need some carving tools.
My favorite is a Speedball Lino Cutter. I bought it with a blade assortment, but I typically only use two of the blades.
This is the larger of the "V-grooved" blades. This blade is great for removing sections. The smaller blade like this is my choice for getting into corners and tight spots.
My friend who carves cypress knees says that these are useless for wood. However, they are good for carving stamps.
First of all you will need some carving tools.
My favorite is a Speedball Lino Cutter. I bought it with a blade assortment, but I typically only use two of the blades.
This is the larger of the "V-grooved" blades. This blade is great for removing sections. The smaller blade like this is my choice for getting into corners and tight spots.
Another tool you can use is an exacto or hobby knife.
I have the cheapo version from a discount store. It came with two handles and several blades.
Another option is to find some cheap wood carving tools.
My friend who carves cypress knees says that these are useless for wood. However, they are good for carving stamps.
You will also need something to carve into a stamp. My favorite is the MasterCarve block. It comes in several sizes.
There are other options such as "SpeedyCarve and SpeedyCut" by SpeedBall.
Or you can carve a rubber eraser. The white ones do pretty well.
I have carved many stamps over the years. Here are some of mine:
Notice the self portrait stamp, I sometimes use that on envelopes just for fun. The tree stamp, near the middle, was used in the painting in the previous post. (you can see the stamped version fo the self portrait HERE)
I have also used these stamps to imprint polymer clay for making jewelry.
Of course, since we will be printing on fabric, we will need some type of textile paint or dye.
I bought this pack of Jacquard Textile colors.
There are of course other options. You can just search for textile paints or even use acrylic paints if you thin them with textile medium. However, I find those to be just a bit stiff in the finished product. I did a test piece with the Jacquard colors shown above and was VERY happy with feel of the fabric after it dried.
As soon as I can, I will record the carving video and post it.
Tuesday, May 15, 2012
Dreams and Daisies
Hi, welcome to a glimpse at some of my past work. I thought that today I would show you a couple of paintings that I sold during my painting days.
First is an abstract that I painted with soft washes. I added images from hand carved stamps (that I carved) and then added more color washes over it to add depth to the image. I also used a masking technique to add color spaces such as the "pink doorway" on the left. I call this painting "Soft Summer Dream." It was sold via my website - Art by Gene Black
Next up, for those of you who just don't like abstract (Pat!) is a painting called "Daisy Dance." This painting is acrylic (my personal favorite painting medium) on a synthetic paper called Yupo. This paper has a smooth texture that allows the paint to "slide around." This results in a much look that is much more free and less contrived.
This painting was donated to a fundraising auction and sold nicely. I have another version of it hanging in my bedroom. I guess you could say I painted a short series of two.
I have learned that it is possible to use my hand carved stamps for fabric painting also. Hopefully I will have time in a few days to show you some fabric I have embellished with my personal stamps.
Is anyone interested in a video tutorial on carving stamps?
First is an abstract that I painted with soft washes. I added images from hand carved stamps (that I carved) and then added more color washes over it to add depth to the image. I also used a masking technique to add color spaces such as the "pink doorway" on the left. I call this painting "Soft Summer Dream." It was sold via my website - Art by Gene Black
I have learned that it is possible to use my hand carved stamps for fabric painting also. Hopefully I will have time in a few days to show you some fabric I have embellished with my personal stamps.
Is anyone interested in a video tutorial on carving stamps?
Next up, for those of you who just don't like abstract (Pat!) is a painting called "Daisy Dance." This painting is acrylic (my personal favorite painting medium) on a synthetic paper called Yupo. This paper has a smooth texture that allows the paint to "slide around." This results in a much look that is much more free and less contrived.
This painting was donated to a fundraising auction and sold nicely. I have another version of it hanging in my bedroom. I guess you could say I painted a short series of two.
I have learned that it is possible to use my hand carved stamps for fabric painting also. Hopefully I will have time in a few days to show you some fabric I have embellished with my personal stamps.
Is anyone interested in a video tutorial on carving stamps?
Saturday, May 12, 2012
Quilted in Pieces
I am working on the Tumble 4 Ya quilt again. I have now quilted all three sections. Here is the layout with all the Tumblers together. The blue lines are where the joining strips will be.
Then if you turn this over, here is the other side. I find it hard to call it the back.
This part was made with leftovers - bits left from other quilt projects, trimmings, etc. I sometimes use test blocks in the pieced backing. I think these are so fun and totally unexpected. It is two, two, two quilts in one!
Of course while it is still in sections, I had to try flipping the middle section just to see how it would look.Side one
AND
Side two.
Now I just need to cut the joining strips, sew it all together and bind it.
In other news, I was tired of sewing on my friend's dining room table when I am visiting. It is a bit too high and makes my shoulders get tight too fast. So, I ordered an Arrow Gidget sewing table to put at his house so I have a place to sew when I am visiting. This is a sturdy little table.
Due to the bed height of this machine, I had to make a little alteration. I cut a piece of drywall (In the South we call it Sheetrock, which is a brand name - and yes we call all sodas "coke" because we are delightfully quirky! heeehee)
I was thinking I might need to get an insert to fit the hole around the machine but I found out that I don't need it. It is perfect for me to sew and quilt on just like it is. PLUS the table folds up and will slip under a bed or stand in a closet without taking up much room.
Wednesday, May 09, 2012
Mark It, not Market
A lot of bloggers are posting about quilt market. With my full time job, that is just not something I can handle now. So instead of Market, I am posting about "Mark it" as in "mark your spot in that book you are reading.
The last couple of weeks have been interesting to say the least. I have been helping a friend who had surgery and then went back into the hospital after a sudden scare with his heart. Good news there, he is doing well. There are still a number of things he simply can't do, as he cannot bear weight on his foot. So I am helping. Of course this falls on top of my regular duties helping Mom and just "visitin'" with her. Last evening we went out to supper and did a little shopping.
I am not complaining at all; just trying to explain why my usual posting has changed. I am enjoying caring for them both. (Hey, I like feeling needed!) However, when I have some down time, I do like to just have some being time, time to rest and refresh. Hence, not much else gets done.
However, I did take an hour to sew out two little book marks (see I did get back to that!)
These are the same design, just a different color. I love the open rose design. This free standing lace reminds me of cutwork.
Anyway, one of these is a "semi-surprise" for a friend -said friend sometimes reads this blog. The other was made with a thought in mind. I haven't done any swaps in a while. So here is my proposal:
If you have something you would like to offer to swap for the extra one, tell me what it is (and if you can, a picture would be nice.) Tell me which of these you would prefer to get. ( the surprise can wait a bit, and I don't care which I send to the surprisee.) Due to postage this is USA only.
I will leave this open a day or so and post the results when it is closed.
CLOSED! I decided to trade with Donna for the book. I love the idea of trading a bookmark for a book. Ha ha. It has a certain irony to it that I find amusing.
The last couple of weeks have been interesting to say the least. I have been helping a friend who had surgery and then went back into the hospital after a sudden scare with his heart. Good news there, he is doing well. There are still a number of things he simply can't do, as he cannot bear weight on his foot. So I am helping. Of course this falls on top of my regular duties helping Mom and just "visitin'" with her. Last evening we went out to supper and did a little shopping.
I am not complaining at all; just trying to explain why my usual posting has changed. I am enjoying caring for them both. (Hey, I like feeling needed!) However, when I have some down time, I do like to just have some being time, time to rest and refresh. Hence, not much else gets done.
However, I did take an hour to sew out two little book marks (see I did get back to that!)
Rose bookmarks each is 1.33"(w) x 3.87"(h) |
Anyway, one of these is a "semi-surprise" for a friend -said friend sometimes reads this blog. The other was made with a thought in mind. I haven't done any swaps in a while. So here is my proposal:
If you have something you would like to offer to swap for the extra one, tell me what it is (and if you can, a picture would be nice.) Tell me which of these you would prefer to get. ( the surprise can wait a bit, and I don't care which I send to the surprisee.) Due to postage this is USA only.
I will leave this open a day or so and post the results when it is closed.
CLOSED! I decided to trade with Donna for the book. I love the idea of trading a bookmark for a book. Ha ha. It has a certain irony to it that I find amusing.
Sunday, May 06, 2012
Saturday Afternoon Sewing
Saturday morning I went to a Floriani Event and met Beth Moon who is one of their educators. She talks Southern, being from Alabama, so we had a great time. I learned a few new things and brushed up my stabilizer knowledge.
Then I spent the afternoon and evening sewing on my Tumbler quilt. I did two more sections -which will complete the top.
I also used up some scraps and extra strips and charms to "make cloth" -i.e. piece the back. Funny thing is I like the back piece as much or better than the front.
My buddy said " Hey! That tan strip has a problem- it gets skinnier toward the end" I said "Yes I know, but the green one next to it does too. They just face opposite directions so it works out."
LOL...there is always a critic! (just kidding)
The nice part about this is that I had very little cutting to do - the tumblers were already cut and I still have spares! So it was nice mindless sewing for the most part. I am still helping the buddy that had surgery. A week or so after the surgery, he (probably) threw a small blood clot and went into atrial fibrillation. After a few days in the hospital and numerous scans, he was sent home on a blood thinner. He is currently doing well, but still needs help occasionally. (so I am zoinked - I need a vacation.) If the posts are sparse for a bit, or I don't comment on your blogs, forgive me .
I am thankful for all my friends and readers. Today in church one of our sopranos and I sang a duet. I am told we did well. It is a real joy to sing praises. Have a great week, y'all (you folks, people, you'se guys, etc)
Friday, May 04, 2012
Side Trip - Shopping Trip
I had to go on a trip to rescue a friend who was in the hospital and was being released. But on the way, I stopped by a store that is not really a quilt shop or fabric store. Another friend had scored a nice fat quarter bundle (at a great price) in the chain store near her home. I must say I had a bit of longing to find such a deal Ha!
I hit the store just as the doors opened for the day. I went up and down a few aisles and found some shower curtain hooks that were much needed. Then I spied one lonely fabric pack, so I picked it up. At the end of that aisle there was an end cap that was a gold mine for me. Yikes! what to get???
When in doubt, buy it all. LOL Not really but I was shocked at how much I had spent when the cashier rang it up. Just over fifty dollars. My planned budget was "no more than $30." Oh well! I didn't go over that much.
Here is what I got - minus the shower curtain hooks ($6)
Uh, just ignore the ironing board cover.....
Let's see: I got three 12 packs of fat quarters, one 15 pack of fat quarters, three stacks of 100 five inch squares and one roll of 24 jelly roll strips. The 15 pack of fat quarters is Free Spirit by Westminster. The are all as pretty as the one on top- big vivid florals.
The 5" square packs are:
100 red/black/white; 100 pastel blenders; and 100 grey/black/gold. The grey/black/gold is unusual for me. I almost never buy grey so I am trying to stretch.
The roll of strips will be offered to a co-worker if she is interested. were purchased with a co-worker in mind. I gave her a jelly roll that I bought and decided that I would probably never use. She used it to make a lap quilt - then I wished I had kept it. LOL.
I think I made a great purchase at Tuesday Mornings. Thanks for the heads up Barb.
Wednesday, May 02, 2012
An Explanation and a Painting
First is the explanation. I have been quiet for a few days. The fact is I have nothing made from this time to show. Life has gotten in they way of sewing. I did get an email telling me that I won a nifty ruler called "Angler 2" so I will tell you about it when I get it.
As many of you know, I was once a very active painter. I have numerous canvases and paintings on watercolor paper adorning my home. I have even more paintings in stacks and boxes. Ha ha..maybe in years to come (after I am gone) I will get discovered and they will sell for millions. (just kidding)
I am going to share this painting that I named "Herewith"
This is a somewhat abstract night scene landscape with the moon peeking out from a smoky blue cloud. The moon is reflected several times on the "watery" surfaces in the landscape. To me, the mood of this painting is somewhat mysterious and romantic. One of the things I love most about this painting is the color scheme and intensity. Is it any wonder that I like to use batiks, brights and hand dyed fabrics?
Subscribe to:
Posts (Atom)