Wednesday, August 29, 2018

Coins Quilt - Progress

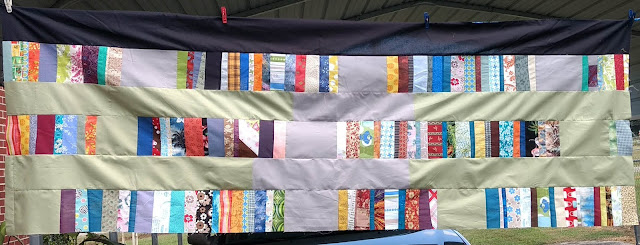
Some "let's sew" mojo came to call and there was progress made on the Coins Quilt. 
This will be one section that will be quilted and then joined to the other sections once they are all three quilted. For me, quilting this way makes it much more manageable.  Even though this is a long strip (and it still needs top and bottom borders added - oops,) it will be easier to move through the domestic machine as there will be less weight and less drag.


So, now to add those black top and bottom borders.  Then I will work on the center section which will consist of a gray strip, a coin strips, a green and gray strip, a coin strip and another gray strip.

Meanwhile, I am also working diligently on my Spanish lessons as well as working not as diligently on my ukulele playing. Life is busy, but full and happy for me.

Comments are welcomed. I will reply when possible. However at this time Blogger is not notifying me of comments. Of course if you are a "No Reply Blogger"- I can not reply. Links in comments will result in the entire comment being deleted.

Tuesday, August 21, 2018

A Bit More Canning

Today I thought I would take pictures of some of the canning process and share them with you.  I feel very accomplished because I had six jars in the boiling water bath before 9:15 a.m. (And that included taking photos.)

The very first thing I did was pull the prewashed, cut up figs out of the freezer and put them in the microwave for a minute and a half so that they break apart easily.  I always prep them and then freeze them unless I am using them that day. Some of these are from last week and some from yesterday's picking.  I have frozen figs for a year and used them  whenever I wanted to make more preserves.

Once semi-thawed, I put the figs, water and sugar into the cooking pot. (You can find the full recipe here - FYI: I guesstimate the amount of figs.) Then I stir that up and get it heating on high.
Then, if I haven't already, I choose the jello flavor(s) I will use. Today I chose to make a mix of Raspberry and Lemon.  I am thinking "Raspberry Lemonade" as the flavor.
You may find large six ounce packages and you can use just one of those.   This is poured on top of the ingredients in the pot.
 I dripped some of the juice on the lemon jello so you could tell it wasn't the sugar.   Then this is stirred into the ingredients in the pot.
Next up you need a lemon or a lime.  I really prefer a lime as sometimes they are seedless.
I slice the lime in half and use that wooden reamer to get the juice and pulp into the pot next.  Yes, I use the entire lime. I LOVE the wooden reamer as it does a beautiful job and washes up quickly and easily.
Everything is stirred well and it looks something like this.

You can see that it is very chunky.  For  a jam-like preserve that just won't work. So, I grab out another tool that I find indispensable in my kitchen - The stick blender!
I can put it right into the hot pot of cooking figs or for that matter, any other thing I wanted to puree.
Using the high speed and keeping the head submerged, I blend away until it is nice and smooth.
What a difference, huh?  As you can see it is starting to bubble away. I have the water and my jars in my canner pot and it is starting to boil also.  After the fig mixture reaches a full boil, I turn it to medium and let it cook for about 20 minutes.  Meanwhile, the jars in the canner are sterilized so I take them out and sit them on a folded towel on the table where I will fill them as soon as the 20 minutes have passed.

Because I am working alone and things get "fast" after the figs are cooked, there are no pictures here.  The jars are filled, rims cleaned, lids and rings put on and they go into the boiling water bath for 10-15 minutes.  I don't skimp on canning/boiling time because I did work in Public Health and worked with some food borne disease investigations.
Once out of the boiling bath the jars go back on the  folded towel to cool - and the lovely sound of "plink plink" as the lids seal.   Some of them seal before I even get the last one out of the bath.  Almost always, mine are sealed within an hour.
The finished product?


Isn't that a lovely red?  Surprisingly the red overpowers the yellow coloring in the jello, so they are a brilliant red and not an orange.  From this batch I got six 8 ounce jars.  That brings my total to twenty-eight jars at this point.  The fig tree is still producing - there are lots of green figs on it. There are more figs in my freezer from last year too.   What flavor will I do next?

Here are some possibilities:
The classic where I learned about this method is Strawberry, but I did a batch of that yesterday.
How about Spiced peach - peach jello and spices like you would put in pickled peaches.
Another favorite is chocolate covered cherry - Cherry Jello and add cocoa to taste.  (yuummmmy) Lemon and ginger
Zesty orange (add spices like the old tang tea mix stuff: cinnamon and clove.)
Grape and lime jello mixed is good - but it looks like axel grease - just so you know. I have also made plain grape - and it is wonderful on a PBJ.
The fun part is exploring the jello/gelatin desserts and thinking "what could I add to this?"
I think I need some pineapple jello - and do they even make a mango flavor????

Comments are welcomed. I will reply when possible. However at this time Blogger is not notifying me of comments. Of course if you are a "No Reply Blogger"- I can not reply. Links in comments will result in the entire comment being deleted.

Saturday, August 18, 2018

A Different Project


As you may know,  I don't ever just stick to one project until it is finished.  So today - and probably a couple of days next week - I am working on my special summer project.  Back in 2011, I made this project for the first time.   Today as I have done every year since, I made fig preserves.  After making the first batch or two using the strawberry jello trick, I realized that I could use pretty much any flavor of jello and even add spices if I wanted to do so. 

Today's jars are already sealed. They sealed within minutes of removal from the boiling water bath.

Did you count them?  Yes!  There are seven - plus I had about a quarter cup left for tomorrow's breakfast. Excellent. 

I know that you can not tell by looking at the pictures just what flavor I decided to use this time.  But one flavor that I have used and don't have to add any spices to "jazz up" is this one.
It is also really nice when I want to make a PBJ for lunch.  One thought I had as I was cooking it down was this: "Some real grape juice added to this might punch it up a bit."
As you may have noticed I like to play with my food when I am cooking/canning/baking.  That creative spirit always loves to play.  I think that is how my best recipes evolve. 

I have done a little bit on the coins quilt but not really photo worthy at this point. I will get back to it soon though.

Comments are welcomed. I will reply when possible. However at this time Blogger is not notifying me of comments. Of course if you are a "No Reply Blogger"- I can not reply. Links in comments will result in the entire comment being deleted.

Saturday, August 11, 2018

Stripping and Stacking Up My Coins

I want you to know that stripping is a lot of work.  Wait, WAIT!  Calm Down! I didn't take my clothes off.  LOL.
I have been tearing the long strips for the coin quilt today.  After an email chat with A Left-Handed Quilter about tearing the strips, I decided to tear the strips instead of having to try to cut on grain for longer strips.  On my own, I decided to use the length of the fabric -not selvage to selvage - for the strips since they would already be longer - so less piecing.  The added bonus is that the lengthwise grain doesn't stretch as it is the "warp" threads of the fabric. (Sorry - geeky weaving reference.)

Also several more groups of coin sections were constructed.

While looking for additional fabrics to add in with the jelly roll strips, I found an abandoned project. I had sewn a "jelly roll race" quilt top and really didn't like it. So I had cut it into 12 1/2" squares. A few of those got cut up and used as parts of the coin sections. Extra bonuses: pre-sewn strips and there are some angled pieces in the mix.

The picture of the strips is not nearly as exciting. But it does show that I used some organizational skills.


The green strips are cut to the correct lengths and are all ready to go.  The two longest gray strips are cut to length and labeled. The other gray strips are just torn and ironed.
Still this is some nice progress on the coin quilt.
Although I don't have a photo, there is also one looo----ooong strip of coins with the gray joining pieces and ends sewn.  Now I can add the long gray and green strip to the side of it Monday and really feel accomplished.

A side note:  When I created the quilt in Electric Quilt 7, I didn't think about the lengths of the strips perhaps needing to be in standard measurements.  I used the ruler tool to guesstimate lengths that I then wrote on my printout of the quilt image. I may think about sizing more carefully in the future. Ha ha.  But as in business math, numbers can be rounded up or down.  Then I can just make it work. I can always trim off bits as necessary.
Comments are welcomed. I will reply when possible. However at this time Blogger is not notifying me of comments. Of course if you are a "No Reply Blogger"- I can not reply. Links in comments will result in the entire comment being deleted.
Thursday, August 09, 2018

An Interlude


Not a lot of quilting going on right now.  I did start making the strips to go between rows on the coin quilt.  I have also joined together one long coin strip that will be at the left side of the quilt. But no pictures at this point.

So I am going to share a bit more of  my ukulele journey with you.  Feel free to skip this if you aren't interested.
The song is Gone at Last by Paul Simon. I think it was on his Essential Paul Simon CD. 
There isn't any real "video" but it is easier to share by way of YouTube so that is how I did it.


Comments are welcomed. I will reply when possible. However at this time Blogger is not notifying me of comments. Of course if you are a "No Reply Blogger"- I can not reply. Links in comments will result in the entire comment being deleted.

Tuesday, August 07, 2018

A New Plan - Fresh Bread

First let me tell you that I made a second loaf of the Artisan Bread.  The first time, I followed the directions exactly and got a good loaf of bread.  So, I knew that the recipe works.

Take Two:   Now, I can play with the recipe.  For this version, I used one cup of plain white flour, one cup of "Better for Bread" flour, and 3/4 cup whole wheat flour -and just to be a bit crazy- and 1/4 cup of Buttermilk Cornmeal mix. (You know I am a Southern guy, right?)  I used some extra yeast - basically all that was left in the packet after making the other loaf. It was more than I expected to be in there. Ha ha. 
I put the full amount of water in the big liquid measuring cup and added about a cup of it first and then slowly added the rest. It took it all and maybe 3 or 4 tablespoons more.  This was due to the changes in flour and addition of the cornmeal mix. 
I also added some oregano and some Garlic and French herbs blend seasoning into the dough.  I let it rise overnight probably 14-16 hours - until it was convenient for me to bake it off.

I had already cut a piece before I remembered that I needed a photo.  That piece is now in my stomach. YUMMMMM.  This was a huge success.  Definitely "repeat worthy" in my opinion.

The coin quilt plan has been altered once more to allow my quilt-as-you-go plan to work without showing. 
There is the possibility of some green applique on the two gray lengthwise strips just to add another layer of design.  Time will tell.


Comments are welcomed. I will reply when possible. However at this time Blogger is not notifying me of comments. Of course if you are a "No Reply Blogger"- I can not reply. Links in comments will result in the entire comment being deleted.

Sunday, August 05, 2018

Baking and Planning

Yesterday,  I decided to try making the Artisan Bread with only four ingredients.  I learned about this bread from Debbie at Stitchin' Therapy.  The recipe is here. This bread is surprisingly easy although I think the author left out a bit of the instructions that she assumed most bakers would know.  I mixed the dough using the exact ingredients on the list.  My dough was almost soupy. So, having baked bread years ago, I added flour to get it to the "shaggy dough" stage.  (I probably should have added a bit more. )   Here is what  I think she forgot to tell us: The recipe calls for 1 1/2 cups of water.  However, flour varies because of many things.  Also your altitude, weather and probably something else I am forgetting can affect the dough. So, add the water in stages.  Next time I will start with one cup of water and stir, then gradually add water until I get the "shaggy dough" that is needed.
My dough rose beautifully.  After 5 hours it was almost doubled.
There is no before picture (sorry) but this is my large mixing bowl and it is almost to the top of it. Before rising it was a little less than half full.  This was allowed to rise/stay in the bowl for 8 hours.

I confess that I baked this for supper with a beef dish that I improvised. I was cooking supper for a friend and forgot to get a finished photo of the bread - and, well, we ate almost all of it. 
I didn't have a Dutch oven, so I used a cookie sheet lined with parchment.  I placed two small metal containers with water in them to create steam while it was baking. The crust was very crisp and chewy.  It stood up nicely to being soaked in the meat juices and retaining a crunch.  I am proclaiming this a win!

Meanwhile, the coins quilt hit a snag yesterday. I pulled out my gray fabric and realize that it is just under two yards. According to Electric Quilt 7,  I would need just over 4 yards to make it with the previous plan.  So,  early this morning I sat at EQ7 and played with an idea that I couldn't figure out earlier.  I  realized that I could make the solid gray divider strips into "pieced strips" in EQ7 and use one color at the top and the gray at the bottom. 

 But.......  what if........

I played with the idea and added color at the top and bottom.  The green is close to a solid green that I have in my stash.


Oh yes, this is a fun plan! My finished product will not match this, but it will be similar and will really be fun.  Of course this totally messes up my plan for making the quilt in sections and joining it together. 
Now what will I do?????


Comments are welcomed. I will reply when possible. However at this time Blogger is not notifying me of comments. Of course if you are a "No Reply Blogger"- I can not reply. Links in comments will result in the entire comment being deleted.

Wednesday, August 01, 2018

Stacks of Coins


Famous last words:  I will not be rushing through this quilt.
Yes, I wrote those words and I meant it.  Really I am not rushing, but this is going quickly because my process is to cut a bunch of strips and then sit down at the machine in odd minutes and sew strip sets.  I was planning to put all the strip sets in one photo.  Then I started laying them on the floor to photograph.... Hmmm, this is going to take two photos.


The shortest stack set in the photos is more than 24" in length. These sets are not actually joined together. (and this is not the way it will be laid out.)  Some of the stacks are as many as four sets laid together.  And while they look crooked in the photo, each small set is actually straight.  In fact keeping it straight is the main reason for working in short sets.  Then there is the other reason - I am planning a layout something like the mockup below:
Of course, it will be a bit more random. Chances are good that none of the stacks will match in length to the one next to it.  I will make this in three or four long strips: left side, middle section(s) and right side.  This will allow me to quilt each section and then join them to make the final quilt.  It is much easier for me to quilt it on my domestic machine this way.

Another interesting thing that I want to share with you is about fabrics.  When I was cutting these strips I was reminded that fabric has two sides and sometimes each side has merit. It is quite okay to use the 'back' of the fabric as the front.  Early in my quilting journey, I bought some fabric that was put on the bolt with the wrong side facing out. It had been placed in the clearance bin and was a great bargain.  I didn't realize that the wrong side was out, but I liked the dreamy quality  that was displayed.  I still have some of that fabric and I am using it in this quilt.  I am also using a "woodland scene" fabric that is quite nice on the reverse side.

Fabrics A and B are the same fabric but seen from different sides.  A is the back and B is the front. There is no purple apparent in B, but in A it shows nicely.
C and D are the fabric that I bought looking at the back side.  While the back side is softer in color and has a dream-like quality,  the front is bolder and is accented with a metallic overlay on the clouds.
The takeaway lesson is this - look at the back side of your fabric and see if you can use the "other" side.  For scrappy quilts, this increases the number of fabrics you can use.  If you don't put them close together it will rarely be noticed.

Another fun thing to do is - if you have a stripe fabric is to cut strips going both ways.  I used this with one of my stripe fabrics in the above strip sets.
Comments are welcomed. I will reply when possible. However at this time Blogger is not notifying me of comments. Of course if you are a "No Reply Blogger"- I can not reply. Links in comments will result in the entire comment being deleted.