Tuesday, July 30, 2013

A difference

Last night I managed to get this quilt top backed and basted.
So tonight (Tuesday) I got it under the arm of my machine and started quilting it.  I have to say that it is harder to do fancy FMQ on an entire quilt. There is a DIFFERENCE!  I started simply and still had (and have) some issues.  I clearly need to get an extra table or two to hold the excess quilt so it doesn't drag.  I did manage to get a bit quilted.

 I even used some pebbling.
I am thinking that this will be a real challenge to quilt. But I am hoping I am up to it.  Even if it isn't perfect, it will be fun- and I will learn even more.


Comments are welcomed. I will reply when possible unless otherwise stated. Foolishly posted "hate speech" comments will be swiftly removed.

Monday, July 29, 2013

Streak of Lightning - Book Review

Penguin books offered to give me a copy of Clare O'Donohue's short book, Streak of Lightning to review.


I have to say that I enjoyed the book although it ended way too soon. The Amazon.com description says it is 68 pages.  In writing this book, Clare  stayed true to the "Someday Quilts" characters and even threw in a slight curveball by having the State Police take over the investigation.  This put the Police Chief, Jesse, at odd ends when he was told that it was not his investigation.
I read through the book rapidly because the story line moved just as rapidly.  There were several suspects and none of them were obvious.
This is a fun read and a great short mystery to read easily in an evening.  Meanwhile, Clare O'Donohue is busy writing and editing the next full length book in the Someday Quilts series.  I can hardly wait!


Comments are welcomed. I will reply when possible unless otherwise stated. Foolishly posted "hate speech" comments will be swiftly removed.

Sunday, July 28, 2013

Goals Met -and then some!

Saturday morning started with two goals for me.

  1. I wanted to finish two notebooks that I had quilted the covers for the past week - DONE (and shown on yesterday's post) 
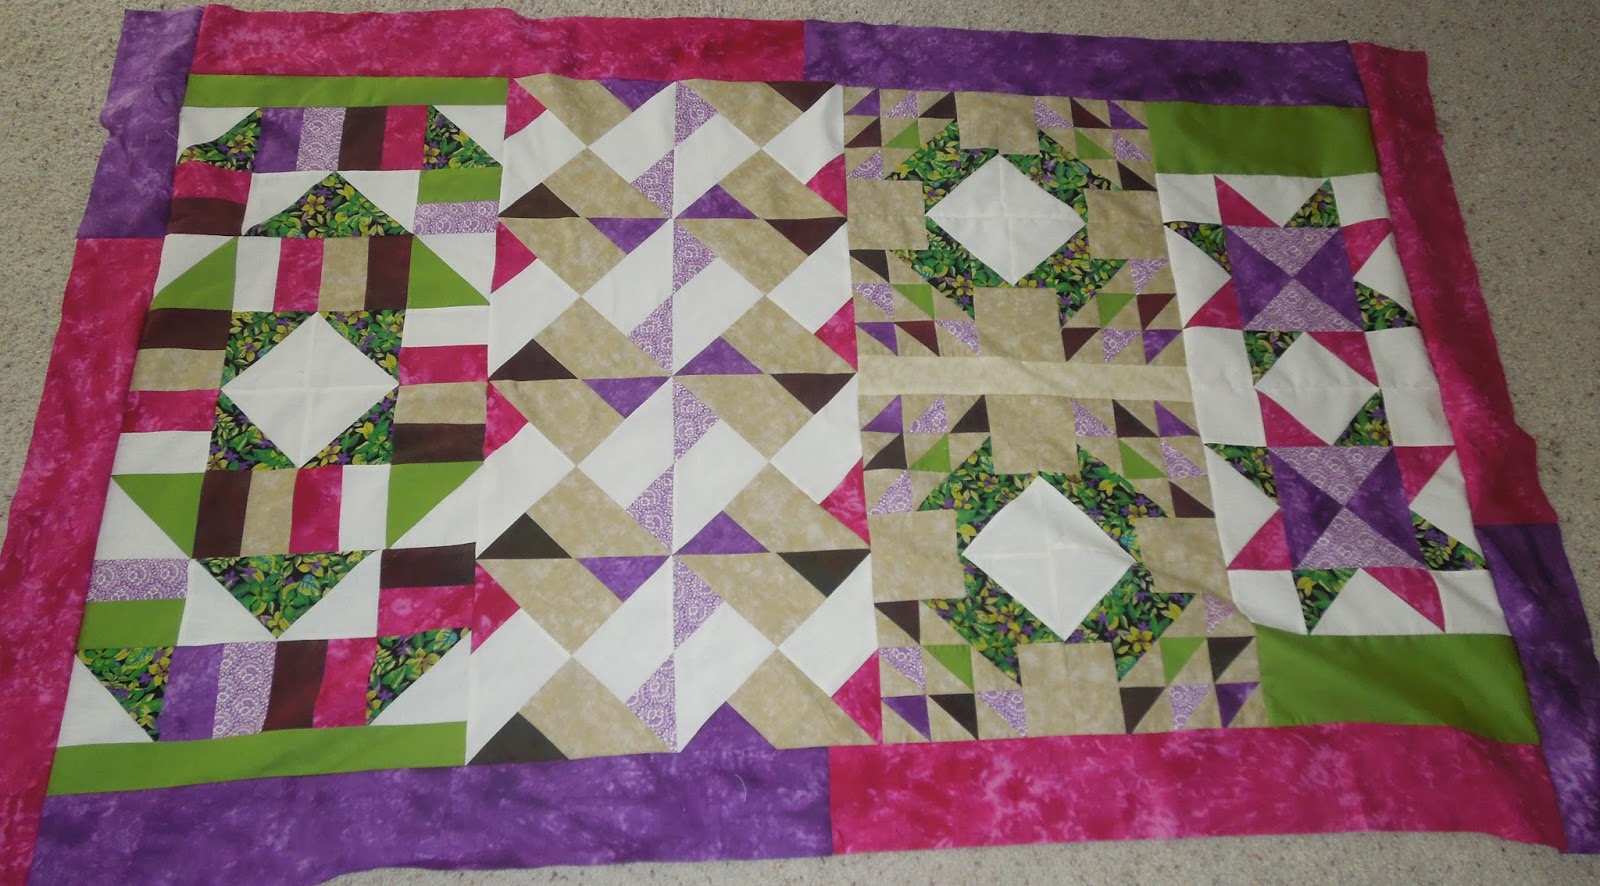
  2. Take some old quilt along blocks from March of 2011 - that I had abandoned - and make them into a quilt top. DONE
Here is the quilt top:
Draped over the loveseat

Tossed in the floor - and not straightened out - OOPS
The funny thing I have discovered about Free Motion Quilting is that it is a lot like CRACK to a quilter, at least once you start "getting" it.  I had to have a fix. There was too much jumping around in my brain and I needed to play with it to exorcise it so I could relax. 
So -two squares of plain fabric, one piece of quilt batting some fun thread and my machinger gloves AND of course my trusty machine, then it was off to the races! 
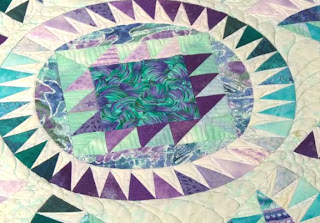
 I call this a pebbled feather design.  I did NOT plan this out ahead of time, I just let the muse have a party with my hands. We danced out one bobbin of 50 weight thread and part of another.  The thread matched the back better than I expected.  I was planning on a contrast, albeit a low contrast. 
However, you don't really see the thread on the back, just the design.  The really cool thing, for me, is that it is starting to look like I know what I am doing. 
One of the things that I learned in Cindy Needham's Craftsy Class - Design It, Quilt It, is that you can make an open spine for a feather and fill it with a small design. This one is called "pearls"
Yes I know you can see some of my bobbles there but even the really great quilters have bobbles.  The bobbles are so insignificant that in the grand scheme of things, they are practically invisible. 

Do you play with free motion quilting? If  you get into it, it really is addictive. 

(A little addition)

you could do this!  I remember when it seemed impossible- I oohed and ahhed  over so many other peoples work. For me there was no "moment" -it was so gradual - yesterday when I was doing this, I kept being amazed.  I confess that one feather in there is a hot mess. I started to rip it out.  But I followed Leah Day's wisdom and kept going. that "hot mess" is now just a part of the overall design and *I* have to hunt for it.
Remember - this is that guy that sent two quilts out to be quilted with a big stipple.  Anyone can learn this. You just need to take some classes and practice, practice, practice.

Comments are welcomed. I will reply when possible unless otherwise stated. Foolishly posted "hate speech" comments will be swiftly removed.

Saturday, July 27, 2013

Summer Lazies - But I did something!

I confess that I have a case of the "summer lazies."  The heat this year seems to be affecting me worse than usual.  That just means that I have been a little less productive.  However,  I have not been idle.  I have been watching classes on both Craftsy and The Quilt Show.

For a couple of evenings this week, I watched Design It, Quilt It - with Cindy Needham as the instructor.  I have had this class for some time.  The truth is, I watched the lessons on basting and starting.  When she said you have to ditch quilt ESS (every stinkin' seam)  I stopped watching. Yikes!  I hate doing ditch quilting.  But this week I just skipped forward, choosing a lesson of feathers. I liked it.  I really liked it!  So I watched more lessons in the evenings while I was decompressing from my work day. There is a technique she calls scribbling. It really compresses the surface so that the other elements pop forward.
Then I watched some various background designs. Cindy does lots of wholecloth quilts. They are amazing.  I haven't got to amazing with my quilting just yet.  But I continue to work on it.

I had made these two notebook covers, so I used them as practice pieces. I showed my doodles on one in a previous post. Thursday night, after making some food for a work celebration for a co-worker who just got her doctorate, I quilted on the second one.  I had already done some of it.  the machine was still loaded with the lovely Aurifil 50 wt thread that I used on both of them.
I had a big "loose" flower that needed some extra quilting to make it lay flatter and look more interesting.
I added both wavy lines and straight lines.
I also added the circles in the echo space around the applique.
Another really cool fun quilting technique is scribbling.  So I scribbled a bit to surround the flower.

Then this morning, Saturday, I constructed the covers for a couple of fun finishes!

I couldn't decide which picture I liked best so - I am posting both of them.

I am linking up with Richard and Tanya for Link-a-finish Friday.  (I am only a day late!)

Oh yes!  Did you know that Craftsy has supplies?  Through the 28th there is a sale on supplies.  Twenty percent off  AND free shipping (USA) for orders over $75.  There is also 20% off shipping for Canadian residents - and that is in addition to the 20% off the supplies!


Comments are welcomed. I will reply when possible unless otherwise stated. Foolishly posted "hate speech" comments will be swiftly removed.

Wednesday, July 24, 2013

New classes

From Ann Petersen's New Class Video
If you are as intimidated by curves as I am, maybe WE should take this class!


I just thought I would tell you that Craftsy has some new classes starting today, July 24, 2013.
        • Quilting:
Playing with Curves by Ann Petersen
Knitting:
New Directions in Lace by Romi (Rosemary) Hill
Sewing:
Fashion Draping: Bias Design by Paul Gallo
Cake Decorating:
Classic Car, Timeless Techniques by Mike McCarey

They seem to be adding new classes on a regular basis.  This is a great learning platform. 

Comments are welcomed. I will reply when possible unless otherwise stated. Foolishly posted "hate speech" comments will be swiftly removed.

Monday, July 22, 2013

Fun with doodles

Monday night here and I had only a little time to sew.  I had the notebook covers pieced.  I had watched a bit of video on Sunday night on Free Motion Quilting on Craftsy.  So I decided to layer one of them with batting and just doodle on it. I put on some Aurifil 50 wt thread and I just had fun playing and soon it was all quilted.

I also took a few detail shots.  I tried whatever struck me in each section knowing that a wild variety would make for a fun notebook. 

In the dark section on this I turned it sideways.  Do you see that those are flowers  on stems?
My clamshells aren't so great but the pattern on the batik disguises it.

I put in some pebbling and some wavy lines.  I did a strange version of an iron cross and there are even a few feathers, but you are not getting a close up of them! ha ha. We will file feathers under "needs more work."


Comments are welcomed. I will reply when possible unless otherwise stated. However, foolishly posted "hate speech" comments will be swiftly removed.

Sunday, July 21, 2013

A Bit More from Saturday (and a winner)

My muse wasn't done with me even after two posts yesterday.  So I kept playing with fabric and sewing pieces. together.
I finished tops for two more Composition Book covers.
I even did an applique with machine buttonhole stitch  on one of them.

I also pieced some tiny scraps together then framed them with blues and then black and made this tiny jewel -the entire block is only 6 1/2" square.
I love the "moon in the sky" created by a dot on the batik fabric.

Surprise! The Craftsy Sweet Summer Sale has been extended through Monday, 7/22. All classes are now on sale!

Now, the winner of the giveaway who wins her choice of a fabric from the Shibori section of Vicki Welsh's Etsy shop AND a Goddess pressing sheet is -  Holee who said


 Holee said...
What a wonderful piece. I've been to Holland. It took me right back there. I can see the man coming out the door with his pants rolled up and his metal bucket in hand. The fabric's are really wonderful.

I'm trying to get out of my comfort zone of neutrals and pastels. I do love red though!

I think I'm drawn to Nogata because it looks icy. With the coming of winter I usually go for the strikingly cool colors and this is one. Thanks for the give away...I'll be visiting often since I found you on Ravelly's blog.
Holee, I will be getting you in touch with Vicki so you can get your prize..or you can email me your choice and mailing address and I will send it to Vicki.

I hope you all have a glorious Sunday.

Oh yes,  I have a quilt in the Quilters Gallery -  Scrappy Quilt show this weekend.  If you want to vote (for me, I hope) go to Quilters Gallery and vote for your choice. Mine is 99 Keys.

Comments are welcomed. I will reply when possible unless otherwise stated. Foolishly posted "hate speech" comments will be swiftly removed.

Saturday, July 20, 2013

Finished!

This morning I posted my plan to complete two quilted journals or notebooks.  I like to use a basic "Composition Book" for the inside. That way, it is easy to find a refill when the journal is full. The Composition Book can be labeled and filed away as the new one is started.

Here are the fronts of the two I completed.
And here are the backs.

Of course if the owner chooses, it is a simple matter to take out the notebook and switch the front and back.  I do love "crazy piecing" or "free piecing" these covers.  They are always one of a kind.  I did two different types of quilting on them also.  On the leftmost one, I did free form free-motion quilting - that is, I didn't stick to a design but just had fun with it.  On the right-hand one,  I used a walking foot for a different look.   It is fun to try different things on small pieces like this.
I still have some pre-pieced bits ready to cover the other two notebooks. I don't know if I will finish those two this weekend or not.  It is also good to save leftover pre-pieced bits for other projects. I think of them as seeds for another project. And like seeds, some times you keep them until the next "season" before you plant them.
Do you have any way that you have starter pieces for new projects or do you always cut into "fresh" fabric for a project?
Comments are welcomed. I will reply when possible unless otherwise stated.
Foolishly posted "hate speech" comments will be swiftly removed.

Weekend Sewing Plans

This weekend I have one goal.  I have some Notebooks that I am covering with quilted covers. I have four but I have to finish two of them .  Once I get going I am pretty sure I will finish all four. Ha ha.

I though I would share a little of my process for this.  I arrange my area with:

  • Sewing machine
  • cutting surface
  • ironing surface
  • pile of scraps and pieces. These may be as large as a fat eighth or as small as a half dollar. In the picture below you may see some charm squares, some precut triangles and some various width strips. I occasionally take a larger piece and cut random width strips.
Pile of scraps
Then I start sewing scraps and pretty bits of fabric together. 


Now, lets look closely at that bottom piece.
Those edges don't line up at all!  That doesn't slow me down at all when I am working this way.  In fact I just grab a piece and sew it on.  I can lay another piece over that edge and as long as I leave a good seam allowance, I can then trim it later (but prior to ironing the seam!) That is how I build up these wildly scrappy pieces. I do like to repeat a fabric at least once although I can cut through a piece and insert a strip to take care of that. 
Here is one notebook cover front that is mostly finished.
The light blue/aqua strip crosses the center so that it will show both back and front.  You see in this that I cut some random width strips, sewed them together, crosscut the sewed piece and re-sewed it to make a patchwork. 

I am sharing this post on Vicki Welsh's "Weekend Plans" post. If you do a weekend plans post you can share and enter to win a fat quarter of her hand dyed fabric!

Comments are welcomed. I will reply when possible unless otherwise stated.

Wednesday, July 17, 2013

Sale on Classes!!!

This is just a quick post to tell you that Craftsy is having a Sweet Summer Sale.  If it is as hot where you are  as it is here OR if you are in one of the places where it has rained so much you have thought of building an ark - then now is the perfect time to take a class!

Craftsy

There are some great classes as low as $9.99!   For example, Scrap Quilting with Pepper Cory is just $9.99. Or for that same $9.99 you could choose Painted Pictorial Quilts by Annette Kennedy.
I did some looking online.  I found that a ONE DAY workshop from 9am to 3:30 with Pepper Cory is $40.  I found another class with here that was $70 for one day.  This is not uncommon for classes and some cost even more. (FYI-These offers are changing daily during the sale!)

Now in those "in person" classes, there are other students who often interrupt or get in your line of vision (ask me how I know!) and you don't get to see everything up close.  You also have to remember it all. With a Craftsy class you can watch it again and again AND you can ask the teachers questions and frequently get answers in less than a day!  That is pretty awesome in my book.

There are classes in every category on Craftsy that are on sale now.  If you haven't tried Craftsy, you should. It is an excellent learning platform.  I am a VERY satisfied customer.

Disclaimer:  I am an affiliate and get a small dividend when you sign up through my links. However, I am also a customer who has taken a number of Craftsy classes and increased my skills- so I do believe in them or I wouldn't recommend them to you.
Comments are welcomed. I will reply when possible unless otherwise stated.

Tuesday, July 16, 2013

Warning- No quilting or Fabric in this post

I took a bit of a lazy Tuesday evening and decided to cook.  Me cooking is not unusual, however, this time is was.
There were two zucchinis in the bottom of my refrigerator.  I pulled them out and sliced them up.  I had every intention of doing a simple fried zucchini - because after all I am Southern and we like to fry things.  Ha ha.
As I was slicing I had an idea.  Zucchini lasagna-- why not?  I know there are zucchini lasagna recipes online already.  But this time I went off the board!  I made it up as I went -using what I had.
There was a jar of spaghetti sauce that I had used maybe a 1/8 of a cup for a sandwich.  I had a few Vidalia onions.  A canister of Italian seasoned breadcrumbs had actually fallen off the shelf on me two nights ago so I thought of that addition.  I had a package of shredded mozzarella. How could I go wrong?
I sprayed a casserole dish with non-stick spray. Then I did the prep: chopped the onion, opened the bag of cheese and set everything up for assembly.

Here is the basic recipe

Two good sized zucchini sliced -next time I will slightly sauté them prior to assembly
one medium vidalia onion-chopped
one jar spaghetti sauce (your choice) 
Bread crumbs -itallian seasoned or else add in some Italian seasonings
8 oz
 shredded REAL mozzarella cheese

Layer in this order thin layer of each
Sauce
zucchini
onions
breadcrumbs
cheese

Repeat until you have 3 layers

Bake at 375 for 45 minutes.


When I took it out after cooking it looked like this
See that cheese that is just almost burned - I think that is the best part!
I ate a serving of it. ------ Then I went back for seconds.  This is good stuff.  I will do this one again. What a great way to use extra zucchini!

And if you are looking for the giveaway it is HERE.

Comments are welcomed. I will reply when possible unless otherwise stated.

I won a shopping trip!

Several days ago I got a very nice surprise.  It seems that I commented on a friend's blog.  She had reached 1000 followers.  Wow that is a lot of followers.   Get this: the prize was a $50 gift certificate to the Fat Quarter Shop.  I started shopping early.  I filled up a shopping cart and saved it.   I like that feature on the site. Some of what I chose was on clearance. Hey, I love a bargain!

So I finally got the code (okay it wasn't really that long a wait...but I am trying to build suspense here!)  I went back to order  my cart.  OH NO!!!!  Two of the fabrics I had picked were SOLD OUT! So I didn't get the Denim Blue or the Yellow that I had chosen. (Sigh) So I shopped some more. Ahhh!  As I was going to use the denim as a neutral in a quilt, I had to find another neutral.  Would you believe it is called "Mud" ?   Really it is. I also added another yard of a bright fabric.
Oops!  I went over budget!  Oh well, it is good fabric!  So I paid the extra out of my mad money.

One thing I like about the Fat Quarter Shop is that the fabrics always come neatly folded and packed well.  Just look:
It is in a sealed plastic bag (or two in this case) and the invoice is in an attractive Thank You envelope.
Now, let's take a closer look at those fabrics!!!!
I got four bright solids and two pretty Stonehenge fabrics -one purple mottled and one green and yellow.  And I got THREE neutrals-Taupe, Sage and Mud - I confess I don't know which brown is taupe and which is mud, but wait--I just looked I got two yards of taupe so it is the lighter one.
I don't know about you, but I have a hard time buying neutrals.  I am drawn to the bright colors. So I got 5 yards total of neutral fabric in this purchase. (2-taupe, 2 sage and 1 mud)  I think I did pretty well on self control.  Ha ha...Of course I got FIVE yards of bright and a half yard of the muted mingled purple - but here is a secret --that one is 108" wide - so it is really more than a standard yard of fabric. SCORE!!!
In the next few days I will be playing with the neutrals and some batiks I have stashed away for another quilt.  The neutrals will really make the bright batiks pop.

Oh yes, if you are looking for my giveaway - it is HERE.


Comments are welcomed. I will reply when possible unless otherwise stated.

Sunday, July 14, 2013

The Reveal --finally and it still isn't "finished" (giveaway too!)

Some of you have been waiting for the reveal of the piece I have been working on. This is the one that has a fair amount of hand work in it. My right index finger bears the pain of this piece from pulling the needle through so many times.
I know you are thinking "Enough! Just show us." Ha ha...so I will


This is my version of the Windmill quilt from Laura Wasilowski's book "Fanciful Stitches- Colorful Quilts." By the way, you get the ebook version of this FREE as part of the class Hand Stitched Collage Quilts on Craftsy.   It still needs backed and bound in some manner.  I may also go in and add some machine quilting since I am now in love with Free Motion Quilting.
When I showed another art quilt, I was contacted by my friend and pusher hand dyed fabric vendor, Vicki Welsh.  She graciously offered some small pieces of her shibori dyed fabrics to use in my next art  quilt.   No hesitation on my part!  I was thrilled to try it.
So let me tell you about the fabrics in this piece:

  • The sky fabric came from my stash and I honestly don't know where it came from. 
  • The roof of the lighthouse is one of Vicki's gradient pieces -I forced myself to cut this right out of the middle of it.  (it didn't hurt nearly as bad as I thought it would)
  • The walls of the lighthouse (orange) are from another gradient. Yes, I cut into that one too!
  • The ground is still another gradient.  (can you tell how much I love these gradients?  you get so much variety in one piece!) (the door came from that piece too.) 
  • The windows in the light house came from the same gradient as the orange walls.
  • The tulip blooms and the leaves are from a couple of shibori hand dyes.
  • The wonderful visual texture in the windmill blades come from a shibori also. 
Here are some other pictures:
 Windmill blade and the shibori fabric below that I used for it.

notice the lovely color variations in both the windows and the roof!

A great leaf Shibori

Detail of Blooms and Leaves

A great tulip Shibori (also good for other flowers!) 

I used several colors of Auriful wool in the hand stitching on the leaves, the windows and the round "thing" in the center of the windmill blades.  It was perfect to add a different texture to the piece. 

Aren't those fabrics wonderful?  Don't you wish you had some to put in a project? I know you do. 
If you would like to win your choice of one shibori fabric from Vicki's shop PLUS a Mistyfuse Goddess pressing sheet (and let me tell you - these are GREAT for use in fusing!) then you want to play along here.

Goddess Sheet  - a slick sheer teflon coated fiberglass pressing sheet for fusing fabric!

Go to Vicki's Shop in the Shibori section -come back here and tell me which piece is your favorite and why.  
Enter soon!  I will close entries on July 19th (midnight central time) and draw a winner soon after that.  I may not reply to all comments on this post if it gets a lot of response simply due to time limitations. 


Here are some other links to Vicki's blog and newsletter.  I love looking at Vicki's blog for inspiration

As an added bonus, Vicki is offering a special to my blog readers! 
"Coupon code: GENESHIP for free shipping on US domestic orders over $40. International buyers can enter the code in the comments and Vicki will refund $5.00 on their order. Coupon expires July 21"


Thanks for enduring this looooonnnnng post.  I hope you enjoyed the pictures.  good luck in the drawing!  Be sure we can contact you if you should win. 


Comments are welcomed. I will reply when possible unless otherwise stated.