Saturday, July 30, 2016

Sewing Therapy

While re-reading part of a book by Rayna Gillman titled Create Your Own Free Form Quilts, I noticed that she mentioned "therapy sewing."  I like that and it struck a chord with me. Having recently started organizing and ironing scraps to store neatly, I found pieced units also.
Some of them were rather bland.  So, using ideas and techniques from the book, I sat down and played.
A simple square framed with muslin became this:
No, it isn't squared up because it still isn't finished..but it is certainly more interesting than the burgundy and white square.

I have the ends of a strip set that looks like hand dyed fabrics, so it got framed and slashed to add a diagonal strip. 
Again, not squared yet
The a set of three rectangles that made one rather boring piece got  the treatment

None of these are squared yet because I may add more to them later.
The freedom of sewing this way is very therapeutic.

Every one of these has solids or near solids that make them pop nicely. I have ordered many solids or near solids from Connecting Threads Quilter's Candy line of fabrics.  At $4.96 a yard, they really are a great bargain.  So if you need solids to add a pop to your stash, a little shopping therapy may be what you need.


Comments are welcomed. I will reply when possible unless otherwise stated. Of course if you are a "No Reply Blogger"- I can not reply. Links in posts may be affiliate links for which I am compensated if you click through and purchase.

Thursday, July 28, 2016

Squishy Delight

Today I got a lovely squishy package in the mail.  This was preceded a few days ago by an email from Maureen Cracknell Handmade telling me that I was a winner.  I confess that I love winning pretty fabrics.
The prize was sponsored by Llama Fabrics on Etsy.   So, What was in the lovely squishy package?
Oooooh prettty!!!!
It is a fat eighth bundle of Forest Floor by Bonnie Christine for Art Gallery Fabrics.   There are some great prints in this bundle.  I love the mushroom print (bottom, second from left)  And isn't the bunny adorable too?
There is also a luna moth print called "Luna Rising" that I really love.  I will enjoy using these lovely fabrics.

I also made another small batch of fig preserves - six half pints to be exact.  So those are added to my store of canned goods for the next year.  I have more figs coming to can and a few in the freezer to keep until my next canning day.

In case you have forgotten - Life is Good! 
Comments are welcomed. I will reply when possible unless otherwise stated. Of course if you are a "No Reply Blogger"- I can not reply. Links in posts may be affiliate links for which I am compensated if you click through and purchase.

Tuesday, July 26, 2016

Canned "Squirrel" Day

Today's squirrel to be chased was making fig preserves. I had purchased some Pomona's Pectin which allows you to make lower sugar preserves. I got 9 half pints canned (so far I counted 8 that have made that lovely "kuh-plink" sound as they seal. I also have almost a pint to go in the refrigerator. My canner has room for 9 half pint jars, so I just kept the other for "now." I will probably half it and take Mom half of the "now" batch.

I need to go pick more figs and make another batch tomorrow. I love to take advantage of the figs while they are in season. There are few things more delightful than home canned preserves with breakfast - especially in the winter when fresh fruit is out of season.

Comments are welcomed. I will reply when possible unless otherwise stated. Of course if you are a "No Reply Blogger"- I can not reply. Links in posts may be affiliate links for which I am compensated if you click through and purchase.

Monday, July 25, 2016

I did Sew- Really I Did

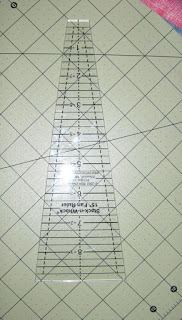
While doing my sorting, organizing, clean up the fabric area, I found a 15 degree fan ruler.
SQUIRREL!!!!
I had to play with it.  It is a stack and whack ruler

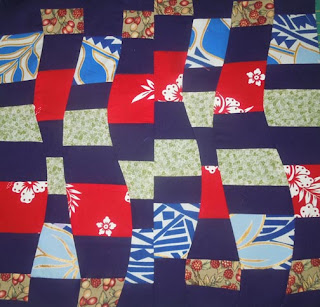
So I stacked two pieces of fabric and whacked out some pieces.
I sewed them into this:
It isn't trimmed, but it has possibilities!
Comments are welcomed. I will reply when possible unless otherwise stated. Of course if you are a "No Reply Blogger"- I can not reply. Links in posts may be affiliate links for which I am compensated if you click through and purchase.

Friday, July 22, 2016

Ho! Ho! Ho! Merry July

Because let's face it, Christmas in July is pretty cool. 
 Here in Alabama it is HOT.  

So let's pretend it is Christmas.  
Think cool thoughts. 

And what is cool do you say?  
One of my favorite places, Craftsy, is having a  Christmas in July sale.   You can buy presents for yourself - or a crafty friend.  Or you can buy supplies to make some great Christmas gifts and get a real head start.  Because it is Christmas in July from now until Midnight Mountain Time on Sunday July 24 th. 
http://www.shareasale.com/u.cfm?d=356498&m=29190&u=759114.
As you may be aware, these are affiliate links. If you purchase through them, you still get the same great prices.  The bonus is that I get a small stipend for letting you know. We both win!

Comments are welcomed. I will reply when possible unless otherwise stated. Of course if you are a "No Reply Blogger"- I can not reply. Links in posts may be affiliate links for which I am compensated if you click through and purchase.

Wednesday, July 20, 2016

Y-Yes I Do Have Scraps

I haven't posted in several days.  The main reason is that I haven't done anything "post worthy." But I have started to feel out of touch so I am going to let you know what I have been doing.

My fabric room has been a big mess.  I keep scraps of fabric from everything.  When I first started quilting, I even bought a couple of bags of scraps - and I still have some of those!  My scraps have been in bags and boxes and were totally disorganized and thus underused.   I decided to see if  I could organize them.  What a chore!
This bag of scraps is the least wrinkled bunch.  So I saved it for "last"
I got a 3 drawer plastic bin.  In one drawer I put pre-cuts and die cut pieces.  That was the easy one.
Drawer two has pre-pieced bits - some of those needed ironing too as they somehow got in scrap bags.
Orphan blocks and pre-pieced segments

And in the top drawer- all the ironed scraps:
uh...to this point...there are more. I still have the last ones I ironed on the ironing board:
I haven't sorted by size or color.  I have just ironed and put in the drawer.  I can sort later while watching Netflix.  ha ha.

And Why "Y"
I did try something with a few scraps- I sewed a Y-seam (aka "the dreaded y-seam)  What I found is that it isn't as hard as some folks think.  I read how in Victoria Findlay Wolfe's book, "15 Minutes of Play."  (Link goes to Amazon - not an affiliate link)  She also has a video on her tutorials page -which I confess I haven't watched. Just scroll down and look for "Y Seams"
Here is mine:
Not exactly perfect, but for a first try, I think I did darn well.

Don't know what to do with  your scraps?  Craftsy has a couple of classes on it (These ARE affiliate links, so if you use them I get a small payment but it costs you nothing extra.)

Big Techniques from Small Scraps
and
Scrap Quilting with Pepper Cory
Comments are welcomed. I will reply when possible unless otherwise stated. Of course if you are a "No Reply Blogger"- I can not reply. Links in posts may be affiliate links for which I am compensated if you click through and purchase.

Friday, July 15, 2016

Sewing with Handwoven Fabric

Yesterday I had a comment on my post asking if the Becca Bag could be made with my handwoven fabric without too much difficulty.  Of course, that seemed like a great challenge to attempt.
I had a piece of handwoven fabric that was already partially used in another project.  There was almost enough left.  So I changed the pattern dimensions just a bit.

I took the handwoven and added a cotton fabric band at the top and fused it to the fusible fleece.  Then I cut it to size. This helped to stabilize the handwoven so I could do a little less "prep work" on it prior to cutting.
I sewed - and sewed for a while.  I sorta  followed the directions, but I may have left out a step or two. In my defense, it was after supper when I started.
I discovered that the handwoven adds even more bulk to some seams that are already bulky.  I was glad I didn't use the Soft and Stable for it.  I love the Soft and Stable but it also adds a bit more bulk than the fleece in my opinion. On the other hand, the Soft and Stable adds a "firmer" finish to your project.

Other than the bulkier seams, the handwoven worked well.
Here is the bag:

                     You get to see both sides since the handwoven is different on each side.

The one undesirable thing I noticed using my handwoven for this:  The bag is not as firm as the one made with all quilting cotton.  But then part of that may be that I made it taller - and I made the width less due to the size of my handwoven fabric.


Comments are welcomed. I will reply when possible unless otherwise stated. Of course if you are a "No Reply Blogger"- I can not reply. Links in posts may be affiliate links for which I am compensated if you click through and purchase.

Thursday, July 14, 2016

Another Class Project - The Becca Bag

After the great success with the Sweet Pea pods, I decided that I just had to try the Becca Bag.   I love the way Joan Hawley shares great tips for success.
Other than my imprecise measuring for the lining, everything went great.  I re-watched segments as I went - often on 2X speed - to reinforce what I saw the first time I watched it.  I used the pause feature when I went to cut, sew or press so that I could come right back to where I was in the class.  You can also add a bookmark if there is a bit you want to watch again. That is a great feature with every Craftsy class.
So here are three pictures of my Becca Bag. First up- Zipped closed:

Then one side:


And the other:  

If you are wondering, the fabric is from  a Connecting Threads kit.  Unfortunately it was in Clearance  and is now sold out - or at least I didn't find it.  However, there are always some fun fabrics in Connecting Threads Clearance section

And let me remind you  that I learned to make this bag in the class "Zippered Bags with a Twist- The One Zip Way" on Craftsy.  But if you just want to get the pattern, it is available at Annie's for $10.99.  
Personally, I am very glad I took this class, because I have learned several tips and trick to make a successful project. And those tips will carry over to other sewing projects too. 

Did I mention that when you make the Sweet Pea Pod  that you cut enough fabric for two of them?  I sewed the "leftovers" up but  I switched out the lining fabrics to add some variety.
here they are with the Becca Bag


Comments are welcomed. I will reply when possible unless otherwise stated. Of course if you are a "No Reply Blogger"- I can not reply. Links in posts may be affiliate links for which I am compensated if you click through and purchase.

Tuesday, July 12, 2016

Sweet L'il SweetPea

There are times when you need a sweet little project that will come out looking great without too much work.   I have learned to make one of those.  I got to take the class "Zippered Bags with a Twist- The One Zip Way" on Craftsy.   In the class you learn three different projects.   The first one is the Sweet Pea Pod.  I have watched the other segments, but I haven't tried the Becca Bag nor the Fobio yet.   I am too in love with the Sweet Pea.  It took less than an hour to make the first one - and I made a couple of oopsies.   It still came out looking  great!  I made another one this evening. I didn't time it, but I am sure it was far less than an hour - not counting the fabric selection time.  And these take very little fabric. Even with lining, each of them uses less than a fat quarter total.
Look at these sweet little zippered pods

But if you just want to get the pattern, it is available at Annie's (affiliate link) for $9.99.
They are about six inches long on the zipper diagonal 
Both of them came out wonderfully professional looking. The one on the left is quilting cotton, the one on the right is fabric that I embellished with stitching over a year ago.  They look a bit different because in one, I used Soft and Stable in place of the recommended fusible fleece.  The other has the fusible fleece.   I have to say I like the finish on the one on the left made with Soft and Stable a bit better.  It made construction a bit harder, but I think it is worth it.  The Soft and Stable is not fusible so I had to add a step to fuse the fabric to it.
The fleece is already fusible and gives a softer finished product. It also costs less.
I have no idea what I will do with these zipper pods, but I am sure they will be used.  And I am sure I will make more of them.  When you are making them, you automatically cut out two at a time. So I have pieces for two more ready  to go except the zippers - and I used zippers that I bought on a trip to Mexico at bargain prices. I even had extra zipper pulls ready to use.

Now, let me say a few words about the class.  Joan Hawley makes the construction process so easy.  She gives some great tips on how to streamline production and get a successful finish.   One of my favorite moments was when she said (and I am probably not using the exact words) "We aren't aiming for perfection. We are aiming for success - and that is a whole different thing."  Isn't that brilliant?


Comments are welcomed. I will reply when possible unless otherwise stated. Of course if you are a "No Reply Blogger"- I can not reply. Links in posts may be affiliate links for which I am compensated if you click through and purchase.

Monday, July 11, 2016

Just Wave - Part 3

As Promised, here is part 3 of the Just Wave saga.

After writing the post for part two, I did some simple piecing with some HST blocks that I had in a plastic baggie - they are 2" finished pieces.
But the muse kept kicking at me.  I had to try adjusting the plan to see if I could make it work as expected.

I had some 2 1/2" jelly roll strips handy so I picked 4 that had already had pieces cut off of them. Then I cut four background fabric strips -chocolate brown since it played nicely with the strips.   I sewed the strip sets alternating them. Cut the piece in half again.  And for next time, I will cut that on a wavy line too!  Then I turned one piece top to bottom and layered them again both facing up.   I cut them into three sections -wavy line, free form rotary cut.  And I sewed them as I described in yesterday's post.   I didn't want a straight seam down the center so I overlapped the edges and cut a slightly wavy line through both pieces. Yeah, I should have taken a picture of that. (oops)
Here is a graphic I made to hopefully make that a little clearer than mud

                                               Then I joined them with a final wavy seam.


Surprise!  A lot of the seam lines match - not all but way better than before.

I think this satisfied the muse so that I can go back to my UFOs.  Unless another squirrel runs by and I have to chase it too.  I think my spirit animal is a squirrel hunting dog. Ha ha.

Comments are welcomed. I will reply when possible unless otherwise stated. Of course if you are a "No Reply Blogger"- I can not reply. Links in posts may be affiliate links for which I am compensated if you click through and purchase.

Sunday, July 10, 2016

Just Wave-Part 2

It happened - but not successfully.   I attempted to do a pieced version of the "Just Wave" piece that was made for the previous post.  That piece was woven, fused then sewn.  I thought it would be great to find a way to make it with piecing and no raw edges.
Sorry to say it didn't exactly work that way. Here is my final block:
What is the saying? Oh yes: Close but no cigar!  (whatever that means.....)
I like it anyway and it is fun to do.  Want to know how I did it?  I will tell you- and explain the things I realized (too late) that I did wrong.

First I sewed a strip set:
I used varying size strips - Strike one! And I realized it as I took the picture-  For it to come even close for matching, they need to be the same size.
Then I realized that I needed two, so I cut it in half and layered them (both facing right sides UP) but I flipped the top one so they didn't match up. Here I realized my second mistake:  The end strips should not match-mine are both purple solid. (Strike two!)  Never the less I carried on.
With them layered I cut wavy lines with my rotary cutter from bottom to top. I did three cuts making for a total of four pieces.  (Strike three - gee I am glad this isn't baseball!)  I didn't realize until later that having an odd number would probably work better (however this theory is one I haven't tested - maybe later)
I took the top strip in the first cut section, bottom in the second, top in third, and bottom in fourth for one "block."  The remaining pieces make up the other "block"(really half blocks)  It is important to keep them in order or you may not get them sewn together again.

Sorry I completely forgot to get a picture at this point.

Next I started sewing the wavy seams using the method for my "Wavy Bars" block tutorial.  After sewing they look wavy/wonky and won't just open up and lie flat.  But a good steam ironing will help this. Do it for each section as you go...don't wait. Lots of steam and a little starch (if you didn't starch the fabric well before you started) will really convince them to lay flat.
Left, before Ironing           Right after being convinced by the steam iron
As you can see the points don't match-at all.  Oh well!  Carry on. After sewing and flattening all the wavy seams, I wanted to join the two pieces.

{expletive deleted}  No mater which way I turn it...the pieces match up too closely. Hmm.... a bit of creative rotary cutting/trimming and then sewn together.
They had to be trimmed for the uneven ends anyway, so I used it to advantage.  However, this is why you shouldn't have the same fabric on both ends. I think this may be the perfect "fabric" for making a zipper bag or pouch.

**** Come back Monday afternoon for Just Wave- Part 3. ***

Just a little reminder that today is the last day for the Class Sale going on at Craftsy this weekend.  See my previous post for more info.

Comments are welcomed. I will reply when possible unless otherwise stated. Of course if you are a "No Reply Blogger"- I can not reply. Links in posts may be affiliate links for which I am compensated if you click through and purchase.

Saturday, July 09, 2016

Just Wave

A few days ago, one of my friends posted a picture of a technique she learned from a friend.  A couple of emails and I realized that it is essentially the technique I have used for some art quilt backgrounds.  I had not thought of using it for other purposes.

I had to give it a go.
I used a solid purple for the background and some fun Samoan print fabrics for the patterned strips. The patterned strips are 2 1/2 inch strips. It is fused and quilted on fusible fleece- I wouldn't do that again.  You may see that these are raw edged.   I think if I did this again I would use varying sizes of strips.
Since Barbara commented and was confused - let me clarify:  After fusing these, I sewed on both sides of the cut lines to both hold the fabric in place AND to quilt the piece.  At this point there is no backing.  However, I could have backed it prior to sewing the quilting lines.

For the art quilt backgrounds I cut pieces of gradient fabrics for both parts of the woven design. And both sections were cut with wavy lines. This is what it looks like done that way.
I am thinking I need to figure out a way to piece a design like the first one.  If I manage it there will be a tutorial in the works. 

Hey, don't forget the Class Sale going on at Craftsy this weekend.  See my previous post for more info.

Comments are welcomed. I will reply when possible unless otherwise stated. Of course if you are a "No Reply Blogger"- I can not reply. Links in posts may be affiliate links for which I am compensated if you click through and purchase.

Thursday, July 07, 2016

Craftsy Sale - Top Classes up to 50% off

Hi, I wanted to let you know that my favorite online learning platform, Craftsy, is having a class sale. A friend of mine is taking 'The One-Zip Way' by Joan Hawley.  I am sorry to say that it is not included in the sale.  But Joan Hawley has another class that is included. It is Zip It Up: Easy Techniques for Zippered Bags .  Now if you aren't familiar with Ms. Hawley, she is the genius behind the Lazy Girl Designs patterns.   Lots of clever crafty folks use her patterns for a sure fire way to make it the "lazy girl" way. In this class you will learn to make the Runaround Bag, the Nickita Bag and the Bendy Bag.  Just  two of those patterns will cost as much as the class at the sale price.

A class that I loved and had a lot of fun taking is Stupendous Stitching with Carol Ann Waugh.
My favorite piece that I made in that class is "String Theory"
 And I also made the fun piece below in that class.
The mixture of machine stitching and hand work really make Stupendous Stitching a lot of fun.

Of course if you want to indulge a sweet tooth, how about Cinnamon Rolls: Classic to Contemporary.  I will come help you eat your mistakes.  (just kidding - I wish I could.)

I am sure you can find a class you love during Craftsy's Class Event. And remember, if you don't love it, there is a money back guarantee -just return it in the first 30 days.  How can you lose?


Comments are welcomed. I will reply when possible unless otherwise stated. Of course if you are a "No Reply Blogger"- I can not reply. Links in posts may be affiliate links for which I am compensated if you click through and purchase.

Sunday, July 03, 2016

Scraps- Fabric 'n' Paper

When you do paper piecing there are often some odd shaped scraps of fabric left behind.  If you happen to sew clothes, the same thing can happen.  It is easy to just toss the scraps in the trash bin.  But considering the prices of good fabric, I find it hard to do that even though I have a stash of fabrics.  For most of them, I still paid upwards of $5 a yard for those scraps - some of them were considerably more per yard.

So, when these odd shapes appear we should find a cool and fun way to recycle them, right?  I learned a trick in the class I am taking that helps me to recycle AND makes my heart happy with the "wildness" of the creation process.
Here are the materials you need:
Scraps of fabric and strips of newpaper or in my case old phone book pages - a double recycling effort.  I cut my strips of phonebook pages to 3 inches wide using an old rotary cutter blade. Note: If you have a spare rotary cutter you can keep an old blade in it for cutting paper when you paper piece OR you can cut with paper scissors.  I used easily torn transparent tape to join two strips.

To make the "crazy strips" just lay two pieces of fabric (right sides together) over the paper.  Be sure to lower your stitch length.  Sew them and fold the top piece back over the exposed paper....repeat until the paper is covered.  Press and trim.  I put the paper side up so I could see more easily where to trim.
So far, I have made two and sewed them together.
I can see using these strips for the basis of an entire quilt. I would probably do sections like this, or maybe three strips joined and sash them.  You could do shorter strips and make square blocks of the pieces.  Really you are only limited by your own imagination with this.  The more variety of scraps you have to use in this, the more interesting your quilt will be.

And what about the paper you tear off the back of the finished strips?  Easy! Just drop it in your recycling bin.
Comments are welcomed. I will reply when possible unless otherwise stated. Of course if you are a "No Reply Blogger"- I can not reply. Links in posts may be affiliate links for which I am compensated if you click through and purchase.