Friday, July 30, 2021

Mostly Quilted

The table topper is mostly quilted.  The outside border still needs to be done.  I am undecided as to what quilting design to use in it.  Or, maybe I want to do more than one design in it.  Until that decision is made, this quilt is in limbo.  Ha ha. 

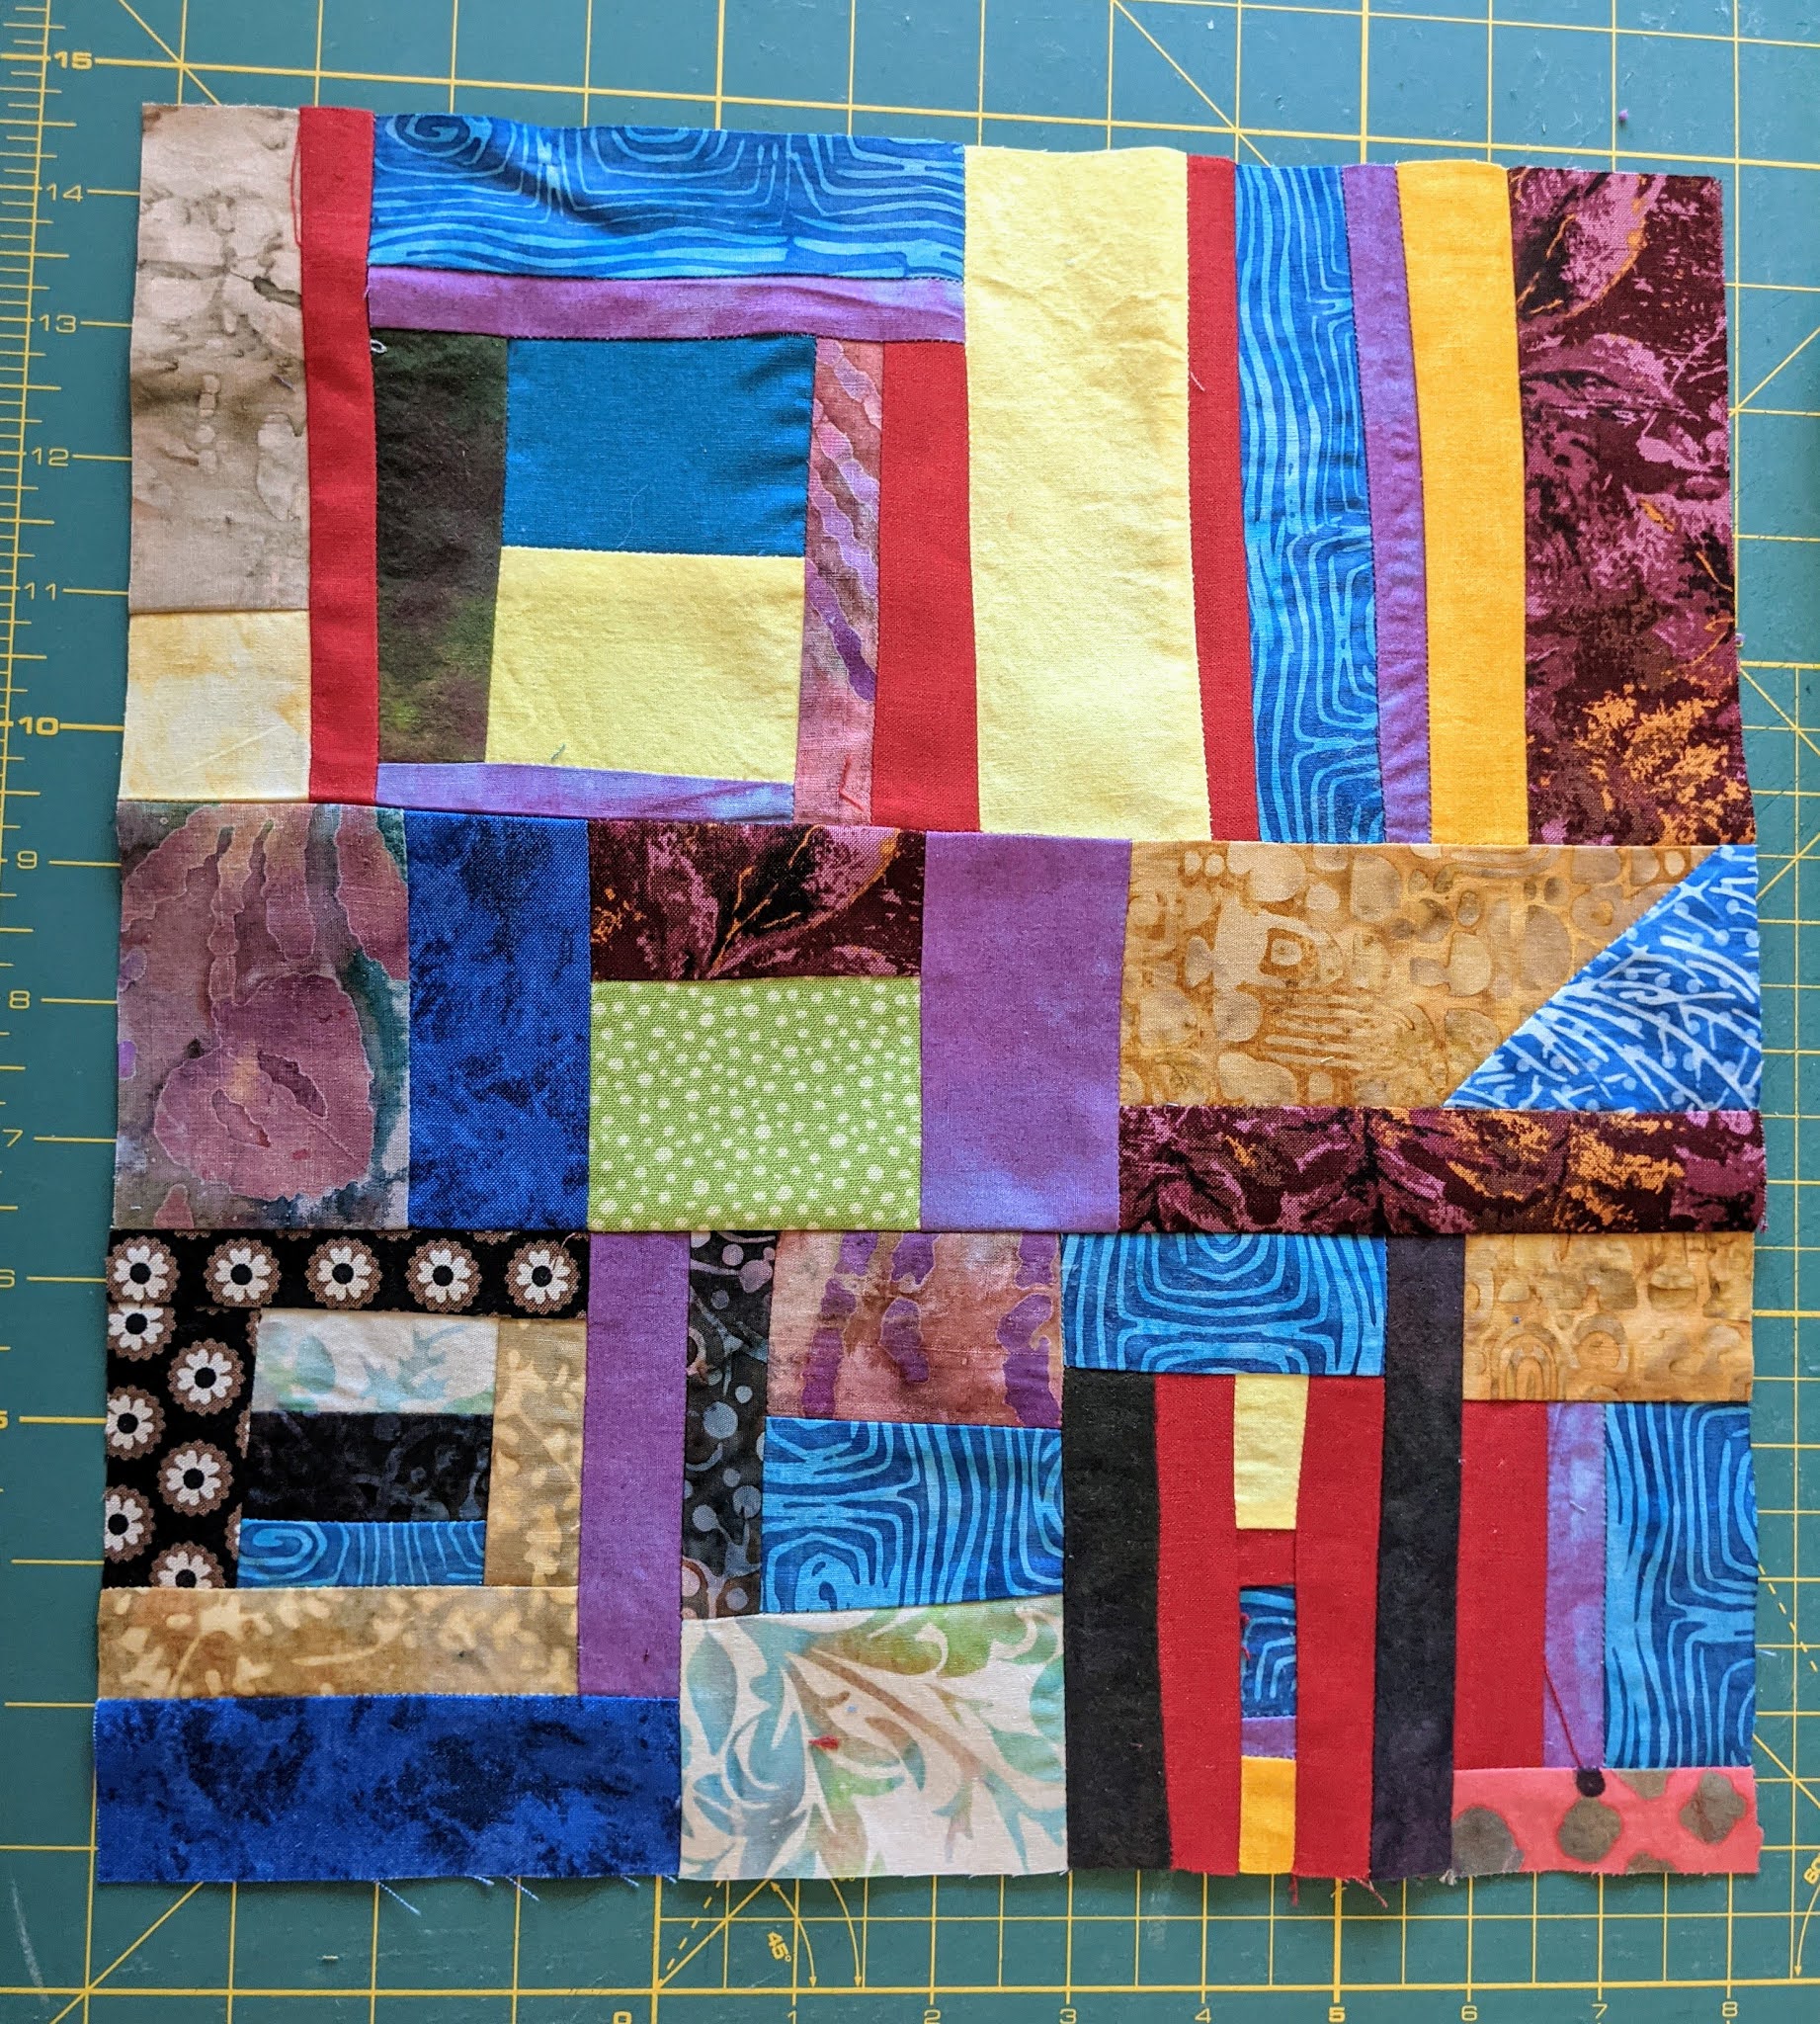
Here is a photo of it on my cutting mat, and hanging off the edge. 

I thought you might want a straight on look at the center panel.  So I took another photo of it. 

The red "bumps" that were fused on, were quilted down first with red thread around the edges.  For the rest of the quilt I used a nice medium gray thread that will fade into the background once the quilt (table topper) is washed. 

This piece has been work but also fun to make. I love acts of random quilt making - both the random piecing and the random quilting.  The center is quilted as an uneven four patch with the sections quilted in opposite directions. The lines are sort of straight but not "perfect."   I think that will make the center very flat but also give it some nice texture that contrasts with the rest of the quilt. 

Until Next Time,  Stay Creative!


Comments are welcomed. I will reply when possible. Of course if you are a "No Reply Blogger"- I can not reply. Links in comments will result in the entire comment being deleted.

Wednesday, July 28, 2021

Quilting Again

Finally I have stopped working on the website issues long enough to get the little quilt top layered and basted.   Then I did some ditch quilting on it.  I stayed mostly in the ditch but as you can see next to the presser foot in this photo - there were momentary bobbles out of the ditch.  
Oops!

However,  my rule for that is  - if the stitches are good and it won't be noticeable from across the room, leave it in and keep going.   Once the ditch quilting was done (enough for my purposes)  I started quilting. Here is the beginning. 

I am quilting with the same gray thread that showed slightly on the blue where it bobbled out of the ditch.  Once I quilt that blue inner border, that will be well hidden. Right now I am thinking maybe pebbles in that skinny border.  Most of the quilting is whatever I think of as I am doing it.  For me, that is just more fun - and this piece is nothing if not fun. From the fabrics to the random piecing and now to the quilting, this piece has a joy and freedom.  

If you want to check out the new website, it should be at https://www.geneblack.com/ (or maybe I messed up again and you get an error. ARRRRGH!)

Right now the link " blog.geneblack.com "  doesn't seem to be working for me.  But the original blog URL https://artbygene.blogspot.com/ is still working just fine.  


Until Next Time,  
Stay Creative 


Comments are welcomed. I will reply when possible. Of course if you are a "No Reply Blogger"- I can not reply. Links in comments will result in the entire comment being deleted.

Friday, July 23, 2021

Internet Blues - Website Issues

The company I have used for several years to host my website has gone up so high that I decided to drop the hosting service.  Honestly my website isn't drawing many visitors and I don't make money from it.  So paying for hosting was a "vanity" thing that I can live without.  I have uploaded my website to a free hosting server but have not managed to get my URL (geneblack.com) to work yet.  It should be simple - but it isn't. 

So if you went to http://blog.geneblack.com on July 23rd in the afternoon - you may have gotten an error message.   GOOD NEWS - I am all right, I am still here.   

That said,  you may try to visit my site in coming days and get error messages. I am determined to make it work. Or at least spend hours trying to make it work. 

For now, I think you can get here by either http://blog.geneblack.com OR http://artbygene.blogspot.com


This picture is one of my favorite small art quilts. I just thought it would be nice to have a pretty picture in this post. 

Until Next Time,  
Stay Creative 


Comments are welcomed. I will reply when possible. Of course if you are a "No Reply Blogger"- I can not reply. Links in comments will result in the entire comment being deleted.

Liberated Quilt Top

The piece shown last was not quite grown up.  But now I do believe it is.  The idea for this top was sparked by this book that I bought used from another quilter who was de-stashing some books. When I saw this one, I wanted it. 
While I didn't follow the book ideas for the center medallion,  the idea of using the first piece as a medallion came from the book.  In the book, Marston shows various quilts - a few of them have medallion centers with interesting borders.   I liked that idea.  Therefore, I used it. 

Next up was the idea of borders. As you can see, the cover photo shows a liberated quilt top with a solid  border around the middle section -then a liberated piecing border  outside that.  Marston showed this idea several times.  So I added the blue border.  Then I added a border of snub-nosed triangles.   But to finish it out,  I decided on a "semi-solid border" with an interesting print fabric that looks hand-dyed. 
Of course I broke up that border with a few pieces of blue, one of green, and a real hand-dyed fabric. 
Here is the top as it is now. 

The hand-dyed fabric almost disappears into that border fabric, but it is there on three of the four edges. 

At this point,  I plan to back and quilt this small top and make a nice table topper. It is roughly 29" square.  That means it will be easy to use yardage to make the backing --- unless I decide to piece a backing.   


Until Next Time,  
Stay Creative 


Comments are welcomed. I will reply when possible. Of course if you are a "No Reply Blogger"- I can not reply. Links in comments will result in the entire comment being deleted.

Thursday, July 22, 2021

Growing or Grown?

Wednesday was "growing day" for my fun random scrappy mini quilt.   I had added two borders made of triangles. Some of them were snub nosed, some weren't.  The truth is that I didn't follow the directions and just did it my way.  Had I followed the directions in Gwen Marston's book,  they would all be snub nosed. Do I care? No!  This is liberated quilting and I am just having fun with it.   

I realized that I needed/wanted a solid or near-solid border before those two.  Rather than ripping the stitches,  I simply cut them off on the seam line.  (Liberated!!!)  Then I added the solid border. Of course now those two were too short lengthwise.  So I sewed on some pieces to make them bigger and attached them.   Two more of the snub nosed triangle strips were made and attached. BOOM!  It is bigger and more interesting.  

If any of you are really eagle-eyed, you will see that the interior section is changed slightly.  Here is what happened:  I found a seam that wasn't closed.  Resewing it would cause a "bubble" in the quilt top.  Hmmmm... This is an opportunity to add some fusible applique.  Thus three of the red strips now have "bumps" added.  Those will get quilted down securely when I quilt this.  

I can't decide if it is still growing or if it is grown?  I can add more borders as desired. I am thinking one more "sort of solid" border.  This would be strips going around again - but with some surprise pieces added in for a bit of a liberated surprise.   You know, I like that idea.....so maybe......

Until Next Time,  
Stay Creative 


Comments are welcomed. I will reply when possible. Of course if you are a "No Reply Blogger"- I can not reply. Links in comments will result in the entire comment being deleted.

Monday, July 19, 2021

Scraps Becoming

The pieces from the last post have been added to and joined into one big block.  I still have no idea what it will become.  Nevertheless,  I love it. 
Do you see the accidental word in the lower right corner? 
That was totally unplanned. 
I love to see what "shows up" when I just play with scraps.
The red bits were a cut from the selvedge side of the fabric.
I trimmed off the selvedge bit and used what was left. 
This is roughly a twelve inch block. 
I am thinking maybe, just maybe a small medallion quilt.
Maybe 24" to 30" square or rectangular.
It could go on a wall or a table. 


Until Next Time,  
Stay Creative 


Comments are welcomed. I will reply when possible. Of course if you are a "No Reply Blogger"- I can not reply. Links in comments will result in the entire comment being deleted.

Friday, July 16, 2021

Scrappy Play

When I have been sewing, a pile of scraps always builds up on my sewing table, ironing board, and yes, some of it is on the floor.   The stack on my cutting table was taunting me.  I needed to clean it up.  But instead, I grabbed some of the pieces and went to the ironing board.  Hmmm.... there were some more pieces there.  I got them all reasonably flat and went back to the sewing machine.   Some relatively mindless sewing time later,  I had these fun pieces. 

Where is this going?  What will it be?  Who knows?  Mostly it was just some fun sewing time. Whatever it becomes will be fun and whimsical.  And I love these  unplanned pieces made from some "throwaway" scraps.  (Of course you know that I rarely throw away any scraps. And this is exactly why!)

Until Next Time,  
Stay Creative 


Comments are welcomed. I will reply when possible. Of course if you are a "No Reply Blogger"- I can not reply. Links in comments will result in the entire comment being deleted.

Thursday, July 08, 2021

Altered

Some of you know that I am working to reverse my diabetes.  A nice side effect from the process is weight loss.  So far I have lost between 18-20 pounds.  But that creates a problem.  My clothes don't fit so much anymore.  I have been slowly working on my blue jeans to adjust/resize the waistlines.  Here is how I am  doing it. 

First I get a few pair of jeans.  Today I pulled out three pair of comfy, lived in jeans. 
These just nearly fall off when I put them on until I get my belt on.   Note: I almost always wear a belt. For this method the belt hides the spots where I have adjusted the size.  

The three center back belt loops are key to making this easy. 

The pair below has a label right where I need to sew.
Off it comes!

I tore this one, but if you are careful you could sew it back on. 
I really don't care for it being there so I trashed it. 

Then I fold one of those three loops in to match the center loop. 
I don't pin or typically use this clip - it is there so I could get a good photo. 

For these I am sewing a simple dart at about half an inch. 
Notice that I sew back and forth about three times to add strength.  

Then it is repeated for the other side. 
Here are both sides sewn. 
Outside
And Inside. 

I didn't worry about thread color as it should never show, but you 
could match the blue or the thread color used to sew the seams on your jeans. 

I did the first pair one day when I was going to put them on.  
When I saw how well it worked, I decided I would do them all eventually. 
If I lose 10 more pounds, I will buy NEW clothes.  For the 
transitional period, this works. 

FYI  I have noticed that the seat is a bit baggy.  But I can live with that.  
Taking in that back center seam would make the pockets a bit too close. 
At least for now, my jeans fit nicely in the waist again. 
That is my Alteration "tutorial"  Ha ha. 


Until Next Time,  
Stay Creative 


Comments are welcomed. I will reply when possible. Of course if you are a "No Reply Blogger"- I can not reply. Links in comments will result in the entire comment being deleted.

Wednesday, July 07, 2021

What is next?

After finishing the plaid quilt.  I haven't sewn much at all.  I did take in the waistline of a couple more pair of jeans.   But I started looking through all of my UFOs trying to decide what to do next.  I found a couple of quilt tops that really need to be quilted.  

First up is this one from -oh my goodness - March 2018

I love the variety of colors - and the fact that it is set in a black background.  

Then there is this one, from (yikes!) February 2015. 

I love it a lot but it is a bit bigger than I want to quilt on my domestic machine. I need to find a reasonably priced longarm quilter that I can get to quilt it. Someone local would be great, but I don't know of any.  I do know it deserves to be quilted. 

In the end, I didn't make any firm decisions. But I have a better idea what projects I have hidden about waiting to be finished. 

Until Next Time,  
Stay Creative 


Comments are welcomed. I will reply when possible. Of course if you are a "No Reply Blogger"- I can not reply. Links in comments will result in the entire comment being deleted.

Thursday, July 01, 2021

PLAID - Finished

Yes, the plaid quilt is finished.  This quilt is a convergence design using one (discontinued) gradient from Colorways by Vicki. The borders are from a different gradient that she wasn't happy with and used as a giveaway prize. (Lucky me!) 

I love the full range of colors in this quilt. Using the convergence plan (a Ricky Tims design) makes it look like a lovely plaid.  I opted for a black binding as the edges are mostly dark. 

I had this "no-name" batik in my stash from years ago, so I decided to use it as the backing. 


I think these photos do justice to this little table topper quilt.  I haven't decided where it should go at this point, so it is over a chair back so I can see it frequently. (grin) I love the colors and the design. 

I need to pull out another PHD (project half done) and start toward another finish.   Heaven knows I have several more (several??? ha ha) in various places. I know that I have at least three tops that need quilted. Not to mention projects that were started and "put on hold" and forgotten. Or not forgotten but waiting for their time to be ripe for completion.   

Until Next Time,  
Stay Creative 


Comments are welcomed. I will reply when possible. Of course if you are a "No Reply Blogger"- I can not reply. Links in comments will result in the entire comment being deleted.