Thursday, March 31, 2022

Weaving -and Slivers

One of my many fiber arts/crafts is weaving.  I simply love the rhythm and calmness of the weaving process.  I admit that when starting it can be "tension creating" to learn to warp the loom.  But once you know how and get comfortable with it, even that part can be calming.

I decided to make a warp with five threads in four colors.  There are two greens, a light green and a darker neutral green, a blue/turquoise, a red, and a purple.  The purple is between dark blue and purple.  When I originally chose it, I thought it was a dark blue.   Luckily it works beautifully in this. 

Here are some pictures of cloth on the loom. 


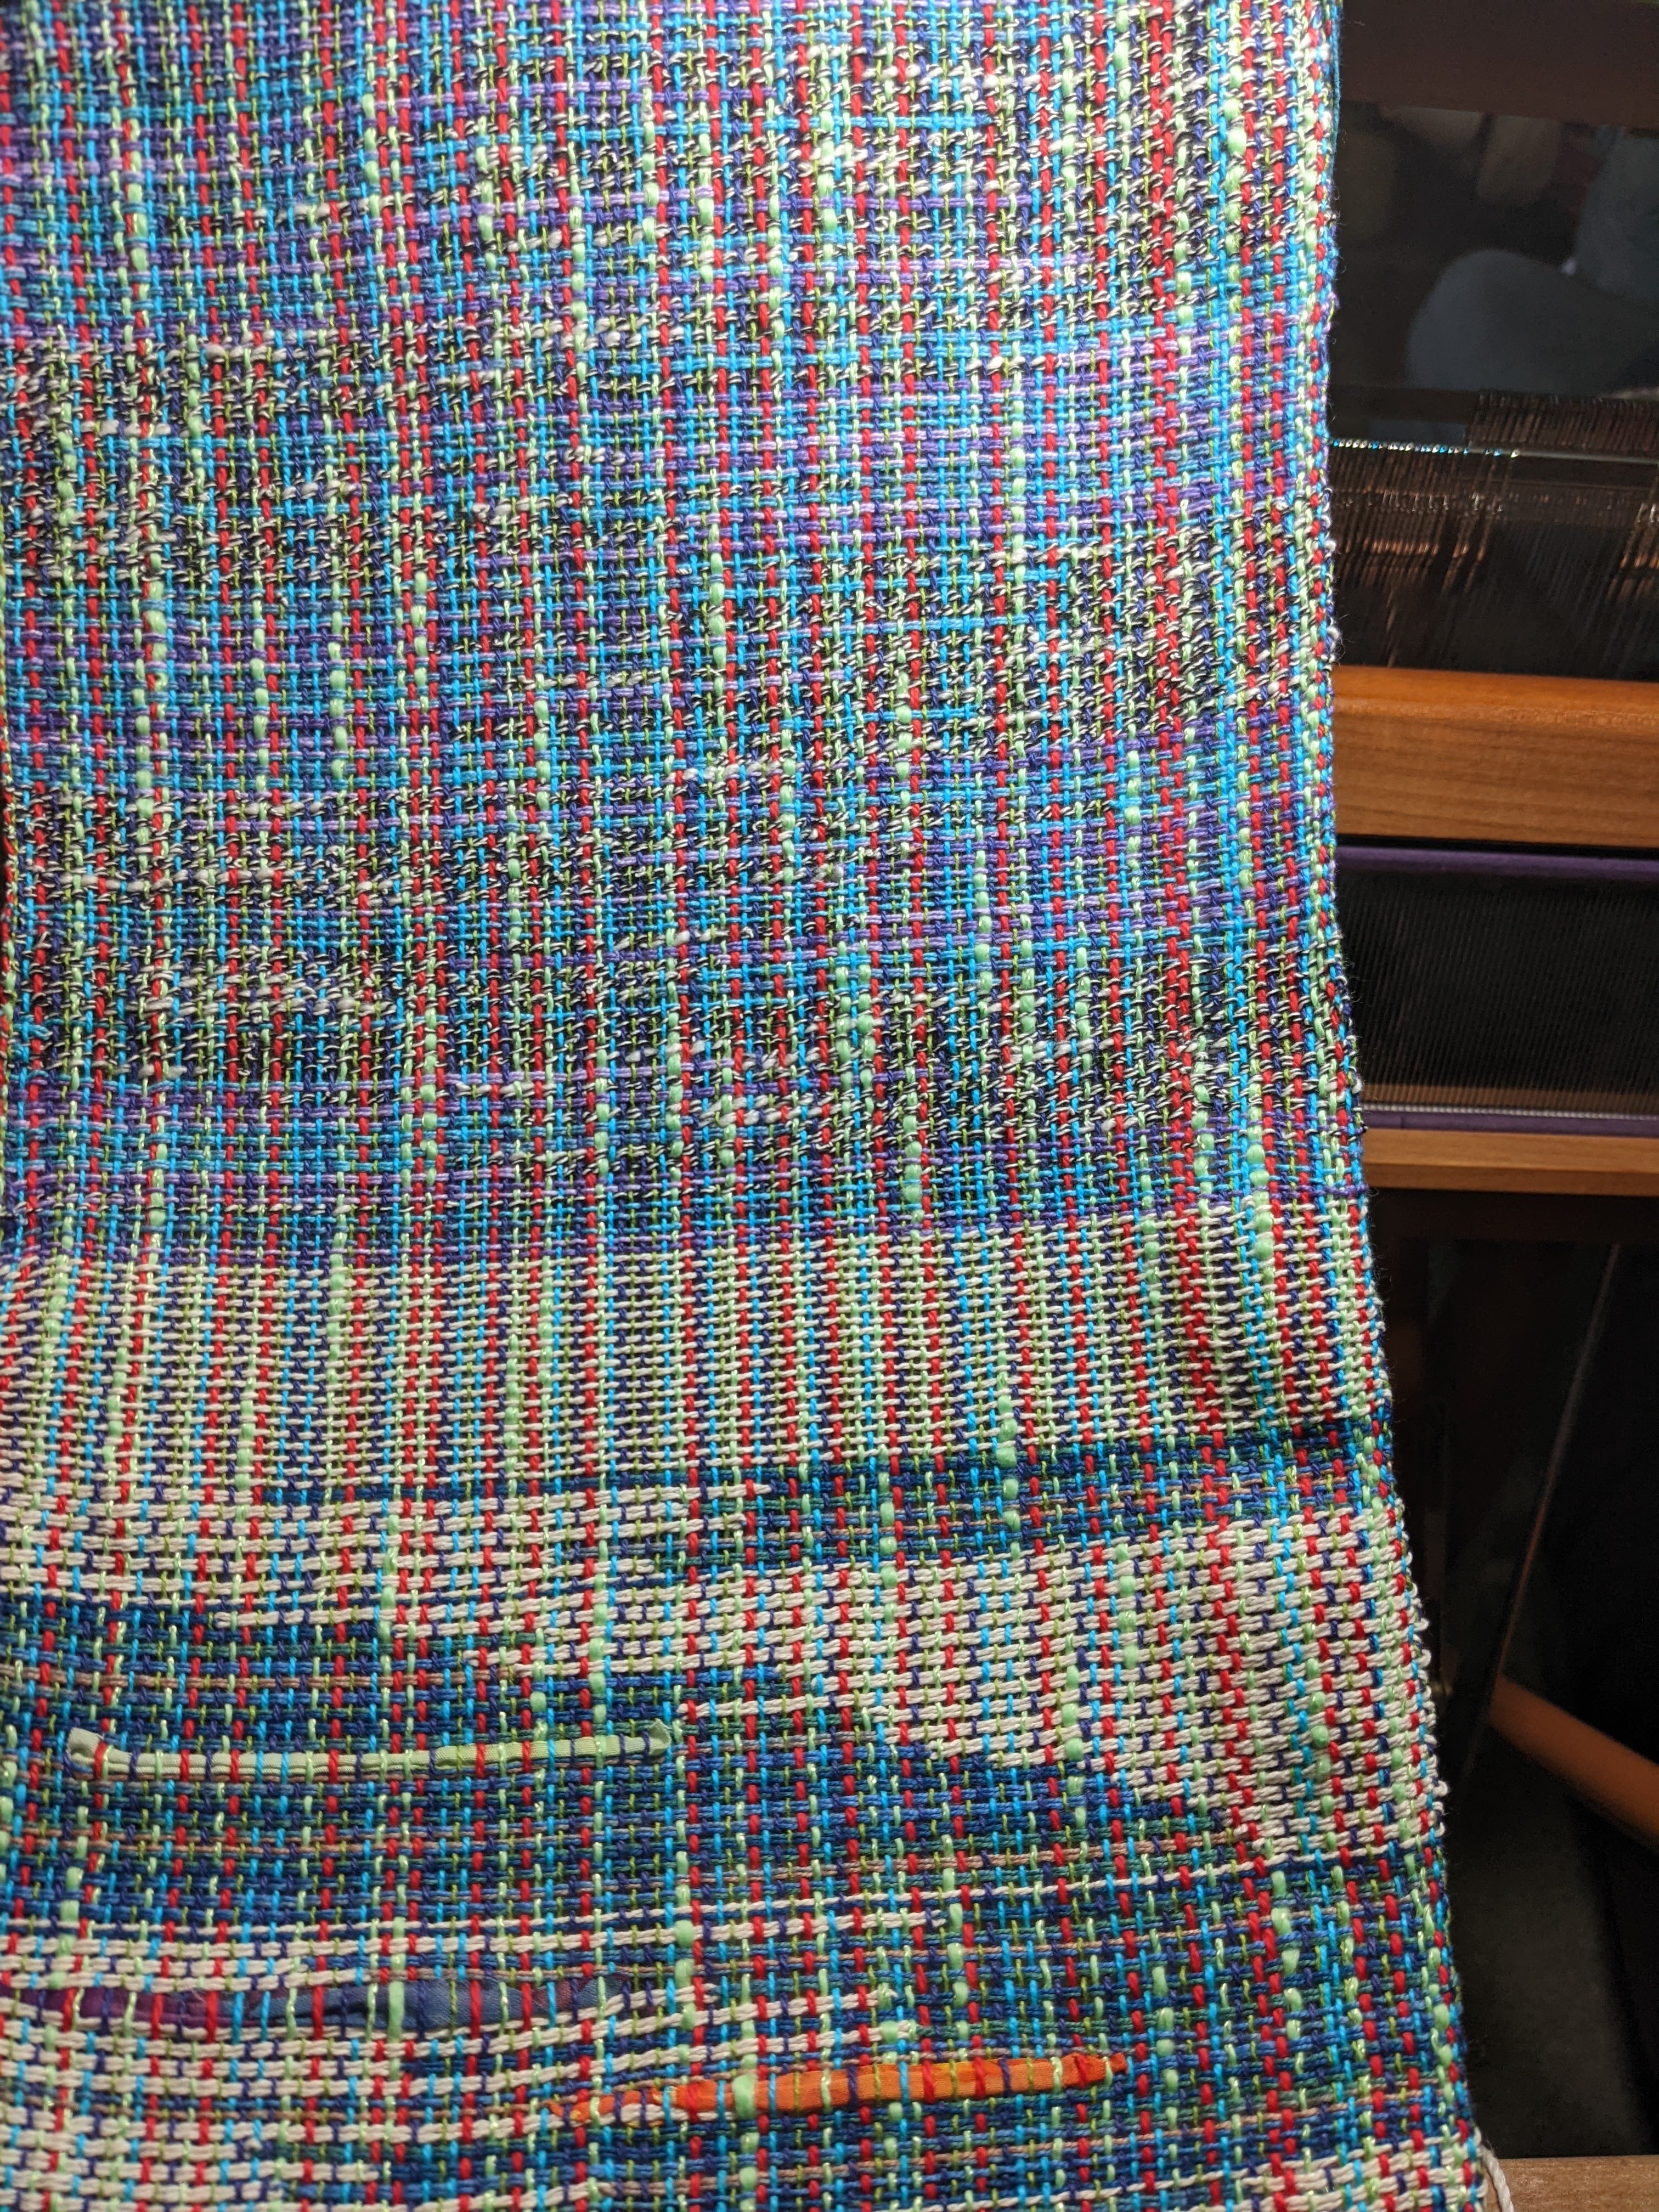
And here is one that is "sideways"
In the first photo and in the sideways photo you may see that there are slivers 
of fabric embedded in the weaving.  For the record, those are added during the 
weaving process and will stay in there nicely even when the cloth is washed. 

The slivers are often trimmings from making quilt blocks. Or if there is a scrap that 
probably won't be used in scrap quilting, it is made into slivers and added to the bag.
Here is the bag I am using with this project. 


As you can see, some of the pieces are cut neatly while some are torn and frayed.
Both work and add different effects to the finished woven fabric.

I am not sure what this fabric will become, but I like it a lot.
Hopefully, I can get in the mood to sew a vest for myself from 
the previous fabric that I posted.  And perhaps that is what I will make
with this fabric also.

Tomorrow, I plan to show my latest clay face from my "gnarly gallery."
I have added the "Dad" face  so perhaps I can make a family portrait/rogues gallery. 


Until Next Time,  
Stay Creative 


Comments are welcomed. I will reply when possible. Of course if you are a "No Reply Blogger"- I can not reply. Links in comments will result in the entire comment being deleted.

Thursday, March 24, 2022

Table Scraps - Placemats

The Joyful Quilter has a "table scraps challenge" where quilters use up the scraps they have often left on the cutting table after a project.  I always have a pile of table scraps.  I decided that I wanted some quilted placemats to use on my table. So this was perfect for the challenge. 

I chose bigger pieces of scraps that allowed me to make "matching" placemats. Seriously, they are almost identical. 

The biggest difference is the quilting AND the pieces of multicolor printed fabric.

The center was a solid blue fabric -and once finished I thought it was 
just a bit bland/boring.  Of course I have a lot of "tricks/tools" in my
toolbelt, so grabbing some fabric paint and a bottle cap, 
I printed circles all over that area. That part doesn't match exactly either. 
But it is very close. 


The themes for March Table Scraps are 
flowers and yellow. Neither is required but
it does give a starting point. 
The above two have yellow as a strong presence, but there are no flowers. 

Earlier in the month I posted these two, made for a friend.

There are yellow fabrics AND some flowers in each of them.

Oh yes, and that fabric I used for the backing of all of these is one
that I have had for a while.  
That fabric just makes me smile -and hits the "yellow" part of the theme too.

Mom and I are working on yet another puzzle.
This one has letters on the back dividing it into four sections, 
A, B, C, and D. 
I marked all four corners of the board to help us stay on track. 
The first thing we did was sort the pieces by letter. 
We have finished parts A (top right)
and D (bottom left.)  We are moving along on C also. 

It seems to me that the letters make it a bit too easy.  But I think for Mom, 
it is just the right amount of help. I was amazed at her progress on section C. 


Until Next Time,  
Stay Creative 


Comments are welcomed. I will reply when possible. Of course if you are a "No Reply Blogger"- I can not reply. Links in comments will result in the entire comment being deleted.

Sunday, March 20, 2022

Clay Face - The Mother of Trouble

This is my latest clay face.  I never seem to be able to time it correctly for "Friday Face-Off" with Barbara and Nicole.   Nevertheless, here is my latest face.  I did a casual poll, using the unpainted face.  I asked "what gender is this face?"  The results were mixed.  So I finally decided that this is the Mother of Bruno and "Butch."  After seeing their faces on previous posts  you will understand that "Mom" is no  blonde Bombshell.  
Mom worked as a dance-hall girl "a few" years ago. That is where she met 
some unsavory characters. Perhaps where she met the father(s?) of her boys

Meanwhile, I have another face that is formed and baked, but not yet painted. Will he be a third brother or perhaps the Dad of this unsavory clan?   I guess we will wait and see.

Until Next Time,  
Stay Creative 


Comments are welcomed. I will reply when possible. Of course if you are a "No Reply Blogger"- I can not reply. Links in comments will result in the entire comment being deleted.

Thursday, March 17, 2022

Woven Fabric -Finish

For some time, there was a warp on my loom made of threads that I had dyed for weaving.  The process started in November of 2020.  By mid-November 2020, I had the warp on my loom and the weaving had begun.  Then it sat for a long time.  I got tired of weaving with just black weft thread.  In February of this year (2022) I began trying  a few other colors to weave with.  I didn't find great happiness with that either, so it sat again.  One day I noticed the yarn I had spun sitting patiently on the bobbin of my spinning wheel.   INSPIRATION!!!!!  I finished that yarn, washed and dried it, then put it all on weaving bobbins. 

Once I started weaving with my hand spun yarn made of bamboo, acrylic faux cashmere, real silk and rayon.  I was so happy.  It was all woven pretty quickly.  It came off the loom and was wet-finished (aka washed, ironed wet, and hung to dry.)  

Then it rained or was too cold for photos.  Now I have some lovely photos. 
I love how the variations in the hand dyed warp and the hand spun yarn play together. 

The fig tree looked like an interesting place to "pose" the cloth. 

Hmm...  a few threads shed from the sewn end. 
I need to trim those. 

What will this cloth become?  I don't have a plan, 
but the cloth will tell me when it is ready. 


Until Next Time,  
Stay Creative 


Comments are welcomed. I will reply when possible. Of course if you are a "No Reply Blogger"- I can not reply. Links in comments will result in the entire comment being deleted.

Monday, March 14, 2022

A Face, Quilt Layout, A Finish

In the works is a new small face in polymer clay. I am making these pretty small.  This one is 2" by 2" at the widest points.  The camera catches every flaw, far more than you would notice in person.  But with the small size, I am sure the paint will hide most of the flaws.  

Of course this one still needs paint and embellishments.  And I haven't decided 
on the gender of the face. At this point it is rather androgynous. 

Next up is the quilt layout, using the Block ideas from my last post. I took the 
Basic starting block and incorporated it in with the pieced blocks. 
If you are willing to do the math OR experiment a bit you can certainly 
figure out how to make this one.  It should be fairly easy to make the blocks any
size that you want following the idea from the last post. Just realize that the single
framed square will need to be sized smaller than the chopped block.

Adding the single framed blocks should speed the making of this quilt. 
I still have no plans for making this one, it is just a good brain exercise and
helps me to maintain my skills in Electric Quilt. 

As for the finish mentioned in the title, Mom, my brother and I finished this puzzle. 
I think the hardest part was the body of the black dog.  It was pretty much one color 
with no clues for  putting it together other than trial and error. 
My brother bought two more puzzles and we have started on one that is 
a 'reflections' puzzle - all the pieces are shiny/metallic finish. 
My eyes may not survive it. 


Until Next Time,  
Stay Creative 


Comments are welcomed. I will reply when possible. Of course if you are a "No Reply Blogger"- I can not reply. Links in comments will result in the entire comment being deleted.

Thursday, March 10, 2022

A Block and Design Playtime

I have several pieces left over from a layer cake (10 inch squares.)  So I decided to see what I could do with them.  I cut two squares in half.   One 5x10 (blue) was cut into 5" squares.  The other was cut into two 2.5x10 strips.  I took one yellow 5" square and cut it into two 2.5x5 strips.  
The short strips are sewn to either side of the blue square.  Then the long strips are added to complete the frame. Giving this block. 

You could stop here and make more blocks to make a framed block quilt. 
You should have a 5" yellow square leftover and enough blue to make the reverse image.
This is 8" unfinished

OR
The block can be cut into four units by bisecting it in each direction
like this:


Then you can rearrange the pieces. 


This first option is far less interesting once you start laying it out

The option below is far more fun for layouts.

This block is about 7.5" unfinished. 

If you only used two colors, you could make the quilt below. 
Or using one color for the strips and two alternate colors
 for the center,  you can get the one below. 
Of course I think scrappy would be amazing, just use a 
charm pack and a background fabric for the strips. 


Here is an alternate layout. 
I could have come up with more ideas for this, but 
you can make some blocks and play to make your own creations.
If you do this do share some photos with me. 


Until Next Time,  
Stay Creative 


Comments are welcomed. I will reply when possible. Of course if you are a "No Reply Blogger"- I can not reply. Links in comments will result in the entire comment being deleted.


Tuesday, March 08, 2022

A couple of Placemats

A friend moved into a smaller home.  It is quite cozy.  The kitchen/dining table is a nice, although simple, wooden table.   I saw that he is using two potholders as placemats.   You know, I just felt that I needed to fix that. 
Therefore, on Tuesday, I grabbed up some scraps and sewed a bit of patchwork.  Some strips were added to bring them up to size.   Then they were layered with batting and backing. Next up they were quilted using the walking foot - just because! 

The variety of fabrics (scraps) makes these really eye-catching in my opinion.  While they aren't exact matches, enough fabrics repeat to make them a nicely cohesive pair.  Even the bindings were made of leftover bindings with a couple of scrap pieces to extend them.  
My hope is that they will be enjoyed and bring a nice bright spot to a friend's table. 

Until Next Time,  
Stay Creative 


Comments are welcomed. I will reply when possible. Of course if you are a "No Reply Blogger"- I can not reply. Links in comments will result in the entire comment being deleted.

Friday, March 04, 2022

Another "Dark Alley" Sculpture

This may be a mild addiction.  But, I am enjoying the creativity and possibilities of sculpting "ugly faces." 

Therefore, I present to you, Bruno Roccia, the second in my series of "Faces you don't want to meet in a dark alley." 

Bruno is a big guy who works for someone else. He is usually works as
a bodyguard and does whatever "Da' Boss" tells him to do. 
Bruno is not a thinker, that isn't his strong area. Rather, Bruno is the muscle. 
He is very good at making people remember to do what they need 
to do to make his boss happy.  

Barbara asked about the tools I use with the polymer clay.  To be honest, 
my fingers are my primary tool. Still I do need a few things to help in places 
where my fingers don't seem to fit.  One of them is simply a wooden skewer, 
like you would use to make shish-kebabs.   But I do use a couple of tools from 
my painting supplies. One of those is a palette knife that I have had for years.
The other is a "color shaper" that I bought to move paint  around in abstract
or non-representational paintings. 

Both of them have been well used.  The flat blade of the palette knife is useful
for cutting pieces of clay. But it is also useful for mark making in the clay. On 
the previous face, it made pock marks in the face and wrinkles. 
The shaper is good for (surprise) shaping the clay. When a place needs 
smoothed, the cupped inside surface is good for adding a softly rounded area.

At the sewing machine, I have nothing to show. That doesn't mean I haven't sewn
anything. Rather, I have done some mending.  I have also replaced the elastic 
in the waistband of a pair of pajama pants that I enjoy wearing when I relax. 
I wonder if you feel "creative" when you repair something.  I know, that
I felt quite creative when I fixed the elastic band.  While it isn't 
original work, it is "re-creating" and giving new life.  


Until Next Time,  
Stay Creative 


Comments are welcomed. I will reply when possible. Of course if you are a "No Reply Blogger"- I can not reply. Links in comments will result in the entire comment being deleted.

Tuesday, March 01, 2022

Sculpted Face

My friend, Barbara, at Artistic Living has been sculpting faces from paper clay.  I don't have paper clay in the absurd amount of crafty supplies that live with me.  But I do have some polymer clay. I have a nice sized container of white Sculpey clay.  So I took some of it and tried my hand at sculpting a face.  Following Barbara's thought of "face I don’t want to meet in a dark alley. "   This face appeared after some time playing and coaxing the clay.  
He looks as if he has been in several fights in his lifetime.  But if you ask, he may reply " You should have seen the other guys!"   Most of the "scars" were added intentionally.  However the scar across his chin is a bad join in the clay.  I just accented it with paint and made it a "feature" Haha.  His nose is a bit crooked and has an odd shape. It was broken in a bar fight years ago and he did not have it fixed.  

In the construction, I was going to put a ball of aluminum foil as the base. Then I saw some smooth rocks that I had attempted to paint on (I hated the results.) So I grabbed one and use it as the base for this fellow. Here is another one that I may use for the next face.

You can see some paint around the edges. That doesn't matter at all once it is covered with they clay. 
Of course there are some more of these rocks in a bag ---somewhere - but I am not going to search for them.  That might result in finding more squirrels. 

Mom, my brother, and I worked on the puzzle for a while and got to this point, but I never shared the photo. 
As you can see, all that was left to do were parts of the birch trees. 
Those were the hardest parts. 
But we finally conquered it. 

My brother showed up with a new puzzle even before we finished this one.  
I think this is it but I am not sure.
We will have fun with it next. 

Until Next Time,  
Stay Creative 


Comments are welcomed. I will reply when possible. Of course if you are a "No Reply Blogger"- I can not reply. Links in comments will result in the entire comment being deleted.