Friday, November 23, 2018

Free Motion Quilting Woes -Another Notebook Cover

Sometimes when we are doing free motion quilting it seems that everything goes wrong.  I made another composition notebook cover to practice some free motion quilting. 
Front

Back
 It looks pretty good, but I had serious issues while quilting it.  The top thread kept shredding.  The back is what I quilted first with black thread.  I assumed it was the thread and switched threads in the machine to what I have quilted with last. 
That thread shredded also.  ARRRGH!  I changed the needle, but it was still shredding the thread.  I managed to finish quilting it but I didn't get to do it like I would prefer to do it.

The next day, I tried to figure out what the issue might be.  I completely forgot that when I pulled out this darning foot, that I had modified the Leah Day way, that I saw the rubber band had deteriorated.  I replaced the rubber band.  But,  this rubber band was different.  So I had to take off some of it to raise the foot so that the quilt sandwich could slide easily under it.  I didn't get it right!
Apparently, I had it too high above the surface of the quilt sandwich which can cause some machines to shred the thread. 

I decided to try another foot.  There is this one, that I have used with some success.
But, no, it hops. And it obstructs the view also, because the base is so big. That makes it more difficult to hit the marks you want to hit.

Then there is this one:
 It works, but that base ring is too large also.

Then I saw this one!
The base is small, and the spring is adjustable with the thumbscrew at the top of it.  It is "just right" as Goldilocks once said.
So I made a sample quilt sandwich and tried it out. 
No thread shredding, I did have to adjust the machine tension a bit - but mostly because I had loosened it when I was trying to figure out what was wrong.

I am glad I got it sorted out before I started quilting on the Coins Quilt.   Hopefully this blog post will be a reminder to ME of what works best.  Happy Stitching!


Comments are welcomed. I will reply when possible. However at this time Blogger is not notifying me of comments. Of course if you are a "No Reply Blogger"- I can not reply. Links in comments will result in the entire comment being deleted.

Thursday, November 22, 2018

Happy Thanksgiving - My cooking

This year for Thanksgiving, I will be celebrating with my mother and my brother and other assorted extended family.  It will be an absolute delight I am sure.

When I was invited, I volunteered to make a pie, a cake and maybe something else. After a few text chats with my brother, I decided to also make my aunt's recipe of Cranberry Relish. 
The first thing I cooked was the cake.  It is a rich chocolate cake base....so the topping (frosting, icing - whatever) needs to be light, right?  Ha ha.  Wrong.  I found a recipe for a fudge-y chocolate icing that you pour on.  Once I started making it and it was cooking down, I realized that it was almost the same as the chocolate fudge my mother made when I was young.   The cake was well cooled before the icing was even started, so when the icing was ready to use it went right onto the cake.  (That is important with this recipe or it will harden before you can use it.)
It doesn't look like a lot, but I will confess that I ate a bit of that icing and it is MMMMMmmmmGood. 

Next up was the Cranberry Relish.  I wait until AFTER Thanksgiving and buy cranberries when they are marked to half price or less.  Then I freeze them in the bag they came in - inside a freezer bag.  They keep beautifully and you can use them when you are ready.  I have kept one bag for two years and they were still excellent.   This bag was just frozen for a year.  
The recipe adds strawberry jello, sugar, canned pineapple and walnuts.  I also added some orange drink mix just for extra flavor.  
Here it is in the bowl it will be transported in. 
 Hmm...... let me dip a spoon in so you can see the texture. 
(true confession:  That spoonful ended up in my mouth.  Wow!  It is delicious.) 

Finally, I repeated the apple pie recipe that I used for my Uncle's birthday pie. 
This time I opted for Star shapes in the top crust. 
There are three star holes and the three star cutouts are placed between them.  There was leftover filling for this one. It is stored in the fridge for maybe another small pie OR to eat with hot biscuits for breakfast.  

I feel really accomplished.  I also went to Mom's and "helped" her make the dressing.  We made two pans of it to take. (unless she sneaks into one of them.  Haha.) 

I hope you have a wonderful Thanksgiving and remember to be thankful for all that you have. And also be especially thankful for those problems that you don't have!  

I wish you love and happiness on this day and throughout the year.  If you can read this, you are truly blest.

Comments are welcomed. I will reply when possible. However at this time Blogger is not notifying me of comments. Of course if you are a "No Reply Blogger"- I can not reply. Links in comments will result in the entire comment being deleted.

Monday, November 19, 2018

Quilted Notebook Cover

Feeling the need to do a little practice quilting,  I decided to make a quilted notebook cover.  I have made a lot of these that fit composition books - because it is easy to find a refill for it when you fill up the notebook.
I always quilt the covers as practice for free motion quilting (FMQ.)  The quilting may not be perfect but it is is fun to do and helps with my skill in FMQ.   There are no process photos because I get involved and forget to take them.

For the front, I used a block that was in my "whatever" pile.  That is the pile of blocks that I have pieced but had no real plan to make something specific.

The quilting is random and lively- but most important to me - it is tactile.  I love a cover that you feel with your fingertips.
For the back I used a larger chunk of fabric and quilted a large flower on it.
It is a reasonably fast bit to quilt which is why I did that for the back.
Inside the front there is a pocket for a pen or whatever - maybe a dollar or two to buy a snack.
You can also see my label there. I forgot to sew it under the edge of the pocket so I improvised.  It actually works nicely there.

Now,  I need to be starting the food for the Thanksgiving festivities!  Happy holiday.


Comments are welcomed. I will reply when possible. However at this time Blogger is not notifying me of comments. Of course if you are a "No Reply Blogger"- I can not reply. Links in comments will result in the entire comment being deleted.

Saturday, November 17, 2018

Making the Coin Quilt - correcting an error

The Coin Quilt is still in progress - although it is going very slowly.  Last weekend, I sewed what I thought was the final side border.  Then I realized, when I sat down with it again, that I had sewn a gray border on the right side. The plan had been to put a black border on it so the black would connect all around the quilt. **note: I have yet to put the top and bottom borders on it due to this oops.
So my trusty little seam ripper and I spent a bit of quilty, quality time together. The gray border was removed from the right side. After a week of doing various other things (reading, studying Spanish, ukulele practice and planning for Thanksgiving) I finally put the black border on that side.
This is a poor photo with the pieces just laid over my bed, but you can see the black at the bottom. That is the replacement piece.  I folded up the back edge (top of photo) so that you can sort of see the black there.

My next job on this is to trim the three sections to the same length exactly so that I can add the top and bottom black borders. This will probably not happen until after Thanksgiving - just so you know.

I took the mockup photo from before and edited it so that you can have an idea what it will look like once the pieces are joined.
The center section of the quilt has solid gray borders on either side. Those will be joined to the outside sections with thin black strips.  Before that, I will first be quilting each long section.  This quilt will completely cover my queen-size bed with a overhang on each side and at the foot.

I hope you will pop over to The Frog Quilter blog and see what amazing work she has done on the Wonky Stars top.  It is delightful to see what she has done with my simple top. Her quilting really adds greatly to the total quilt.

This coming week I will be busy in the kitchen.  For our family dinner, I am making an apple pie, possibly a cake, and cranberry relish. I will also be helping Mom with her contribution of dressing. I will make the cornbread and then help her with assembly and getting it in and out of the oven.  I may use the cooking time to borrow her living room hardwood floor to lay out and trim the quilt sections.  But then again, we may just visit and enjoy each other's company. 

If you don't hear from me between now and then, have a wonderful Thanksgiving holiday.


Comments are welcomed. I will reply when possible. However at this time Blogger is not notifying me of comments. Of course if you are a "No Reply Blogger"- I can not reply. Links in comments will result in the entire comment being deleted.

Saturday, November 10, 2018

Coins Have Been Flying

With the finish of the Wonky Stars quilt top - and getting it mailed off, I took a couple of days away from the sewing machine.  Then bright and early this morning - not that early to be honest-  I started finishing the last section of the Coins Quilt.

I had the middle section handy to use as a guide for length.  After sewing four columns, I took a photo. 
The four newly sewn columns are on the right. The four columns on the left are the center section that was already sewn.

But my mojo was back in force, so I decided to keep going. Not long after lunch, I had the full section completed.
It is a total of six columns.  Close to the end, I realized that I would run out of the gray fabric before I finished.  So I substituted some of the green as they are both background fabrics for the coins. I won't even point out where it happened.  I did make sure there was enough gray for the edge strip so that it matches the other side.
These sections will have a thin black border added to each end (maybe 2 inches wide at each end.)  This is going to be a big old quilt.  After adding the borders, I will back and quilt each  section separately and them join them with black strips that will serve to join the the black borders visually. I am also thinking of using black for the binding - unless I find a piece of a nice black/white print that I can use for it.  I would want that to be more black than white to mimic the joining strips.

Of course, I will also be doing other projects in between quilting sessions - but they may be "gift sewing" that I won't be able to share until after they are given.
Comments are welcomed. I will reply when possible. However at this time Blogger is not notifying me of comments. Of course if you are a "No Reply Blogger"- I can not reply. Links in comments will result in the entire comment being deleted.

Saturday, November 03, 2018

Wonky Stars Top

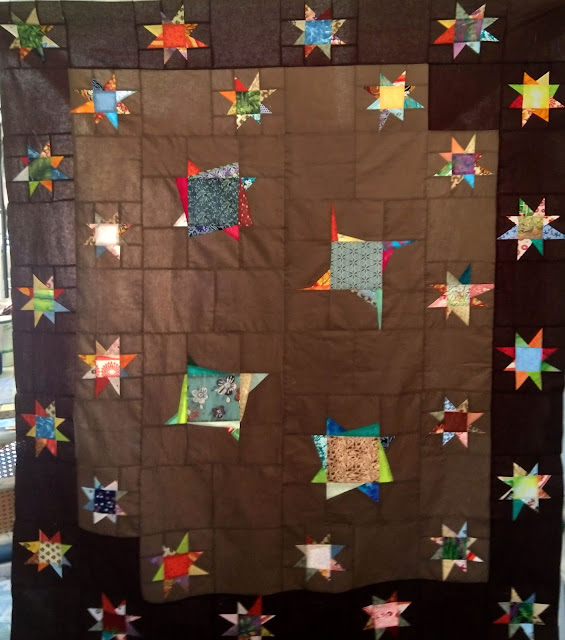
The Wonky Stars quilt top is completed. A nice Friday evening sewing session combined with a Saturday morning sewing session allowed me to complete the top.

As this top is being sent to FrogQuilter for her Quilty Hugs donations.  I love that this quilt will be given to someone who needs a hug during a trying time.  I hope the stars will make that person feel that life is a bit brighter. 
Next, I should be getting back to the Coins Quilt - should be--but only time will tell what I pick up next.  I have no deadlines or burning desires to rush.  I shall just enjoy whatever I do.  I have decided to take this advice from Kenneth Branagh
Lighten up, just enjoy life, smile more, laugh more,
and don't get so worked up about things. Kenneth Branagh
Comments are welcomed. I will reply when possible. However at this time Blogger is not notifying me of comments. Of course if you are a "No Reply Blogger"- I can not reply. Links in comments will result in the entire comment being deleted.

Thursday, November 01, 2018

Dark Stars -and more

Most of the dark stars for the wonky stars quilt are made.  I think there may be two more to finish.  But I have a nice stack of them.
I have some serious love for these on the darker fabric.  I do wish I had made the entire quilt with this. But of course, I didn't have enough of this fabric to do it with.

The entire center section is now joined into one big chunk of quilt.  It is rather rumpled in the photo - and for that I am sorry.
My hope it that this will make a very nice comfort quilt for someone who needs a bit of brightness in life.
Next up after sewing the final two star blocks is assembling the side rows and then the top and bottom rows to finish the top.   Depending on what the weekend holds, I may be able to finish it before Monday.


Comments are welcomed. I will reply when possible. However at this time Blogger is not notifying me of comments. Of course if you are a "No Reply Blogger"- I can not reply. Links in comments will result in the entire comment being deleted.