Tuesday, January 31, 2012

More Fuse and Sew

After my success with the fuse and sew birds a couple of days ago, I decided to do a bit more of it.  I had already fused and cut the die shapes.  I had another couple of birds and a some dogs. The dogs are the AccuQuilt Gingham Dog die for the GO! cutter.

My dogs are not Gingham though, they are batik just like the birds.  The previous birds were blue birds. Today I used the red batik and have two red birds.  I am thinking these will go with the other two birds (and probably more dogs and birds) in a fun quilt. I will have to fuse and cut some more shapes with other batiks - but I am good with that.

I had some difficulty sewing around the birds. I couldn't figure out what was wrong. I thought the tension was messed up. Then I happened to glance at the thread spool.  The thread was wrapping around the rod that the spool goes on.  My machine is designed with the thread spool rod horizontally.  The thread wasn't coming off the spool properly.  Hmmm..what to do?  This  thread is embroidery thread on a small cone. Hmm... (((Light Bulb!!))))  I place the spool on the bobbin winder post.  It worked beautifully.  My other option would have been to wind the thread on a spool or a bobbin OR use a thread stand, and well, I was being lazy and didn't want to get up. This was easier and it worked.

**Today's tip(s) 
1. When you make something you like and have fun making - repeat your success; it feels good.   
2. If the tension seems off, watch your thread to make sure it is coming off the spool neatly. If it catches on the rod, it will wreck your stitches and mimics a tension issue. 

Have fun sewing!

Monday, January 30, 2012

Applique -Fuse & Sew

As many of you know, I don't normally do applique.  However, I have a few AccuQuilt Go!  applique dies.  One of these is the GO! Bird die.  It is just one simple little bird shape.   Birds make me think of happy days, freedom and flying.  I would love to be able to just fly up high in the sky and soar.  Do you have "flying dreams" ?  I know I do.  My flying dreams are usually happy dreams when I am resting well.

Oops, I got lost there.  Ha ha.  I decided to fuse some fabric - well, actually I was fusing some solids for a quilt along that I plan on doing.  I used up all of my Wonder Under -so I ordered more!  But I had some Misty Fuse so I grabbed a couple of batik fabrics and put Misty Fuse on the back of them.
I have to tell you that I have issues with Misty Fuse.  For me it is hard to cut due to the lack of a paper backing. My poor old eyes have a hard time focusing on it.  There are some things I love about it also. if I mis-cut the Misty Fuse then I can either just add a bit along the edge OR if it is just a little too wide, I can fold it back on itself and it hardly makes it any thicker.  You can't do that with paper backed fusibles -at least not easily.  So really, the good outweighs the bad. Yeah, that MistyFuse is a good product.

So, I cut some birds with my die.  **Today's tip: if you are die cutting pre-fused fabrics, where the fused pieces touch you will need a layer of release paper between them.  Otherwise they will be VERY difficult to separate (ask me how I know!) **   Then I cut a thin wavy piece of pre-fused fabric for a branch.  I got a background piece and fused them down. Ahhh..that feels good.,
Next I layered some  tearaway/washaway embroidery stabilizer behind it.  At the machine, I set up for a blanket stitch and outlined it all.   Here it is:

My blanket stitch accuracy needs a little work, but I like the overall outcome.  This will end up somewhere in a quilt I am sure.

Saturday, January 28, 2012

Something to Crow About

For the past week I have been suffering with a cold/sinus ailment.  Today, Saturday,  I woke up feeling like I actually wanted to do something besides hibernate.  So,  I have something to crow about.  I downloaded a design from Laura Wasilowski at Artfabrik and made this little art quilt.
I confess that I strayed away from her directions, but then this is MY quilt and I can do that.  **Today's hint- give yourself permission to take a creative detour. **   I used some Floriani stabilizer called Stitch 'n' Shape to make it firm so it will hang straight easily. It is a fused design, but then I free motion machine stitched on it to add some extra texture. I forgot to put a layer of batting under the top fabric so that I could hand stitch some embellishments on it.  The Stitch and Shape is easily machine stitched, but is a little too tough to hand stitch through (at least for me!)
Here is my creation that I am calling "Something to Crow About."
This is based on Laura Wasilowski's "Singing Chicken" design. I really just used her pattern to cut out the pieces of the chicken.

Winner - Finish Almost Any Quilt

You may remember that we had a giveaway for a book titled "Finish Almost Any Quilt" by Marguerita McManus.

I also reviewed the book here.   I gave it my "Golden Thimble" rating.

So I know you are all waiting to find out who the lucky winner is.

Yeah, remind me to not keep a giveaway running quite so long.  (okay?)


Mr Random was so kind as to pick a winner in our giveaway.
He picked 
 Number 55.

By my count (and two re-counts to be as sure as possible) that is VickiT who said:
Well VickyT my dear, you are the winner. Congratulations.  I will be in touch to get your mailing address.

Tuesday, January 24, 2012

Monkey Business

If  you are looking for the book giveaway, click here.

I have to  confess that I have been lazy lately. I really haven't sewn anything except the embroidery stitch outs.
A few of you have asked about my little sock monkey.  Several of you even tried to help me guess the name. Folks, we were all wrong and even on the wrong track.
The other morning I had an epiphany; the light bulb went on.  I asked 'are you a girl monkey' - she answered with giggles.  Ah HA!  I suddenly KNEW her name.  I am happy to introduce you to "Minnie Monkey"

 Minnie says if she could have one wish it would be for World Peace. (I think that she thinks this is Miss America! LOL)

She really likes the shiny embroidery threads and she also likes my "fabric rose" pin cushion.

However, looking at her little apron, I think she needs some sewing lessons. That thing is a hot mess!
At least the mystery is solved.  Don't be surprised if Minnie shows up again.


Disclaimer:
I confess ignorance at determining a monkey's gender.  I must have missed that day in biology.

Oh yes, don't forget that my videos are available by clicking on the tab that says "Videos-Quilting " at the top of this page.

Monday, January 23, 2012

Mea Culpa -Sorry Floriani

In case you don't know, Mea culpa is Latin for "my mistake."   When I posted about the free embroidery designs from Floriani not being usable, I was simply wrong.  I made a mistake in the installation of the CDs.  


It seems that the files are compressed somehow and you don't see them. I looked using Windows explorer AND Mac Finder, but didn't see the files.  When you install the software there is a little thing that asks about file type but defaults to cs2- which is a Floriani working file. When I tried it again, I saw the dialogue box that I obviously just didn't see before and was able to get the files in the format my machine uses.


I feel like a dunderhead (whatever that is!) 


Meanwhile, I did a couple of stitch outs late Saturday that I put on Flickr, but didn't blog.  These pics are slightly blurry (again - my fault) 
The center and outer hearts came programmed in my machine, but the one between (the thicker gold) was digitized by Majorie at Marjorie's Quilting Bee.


 Marjorie also digitized the interior heart and the word 'dream' on this one. The outer scalloped border came programmed in my machine.  
I love combining the designs.  Marjorie does a great job. The heart shapes match the size of the AccuQuilt GO! hearts small die cut.  I will be doing some applique with this later. 


Saturday, January 21, 2012

ME - Machine Embroidery that is

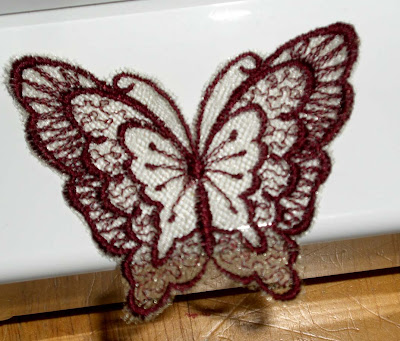
After my last post, I decided to alter one of the things we learned in the embroidery class.  I don't have any nylon organza in my stash (not surprised are you?) but I will be getting some.  Anyway, I substituted sparkly tulle for the organza and it worked.  What I did was use a layer of water soluble stabilizer with a layer of tulle on top and bottom.  I hooped it and stitched out a butterfly that was NOT designed as "free standing lace."  Then I washed out the stabilizer, trimmed down the tulle and I got this:


I did two shots with different lighting so you could get a better idea.  Now this can be used as an embellishment by just tacking down the center and leaving the wings loose.  It can also be stitched around with invisible thread to fully sew it down.  Or it could be pinned on a headband or.....well you get the idea. You are only limited by how far outside the box you can think.  Cool huh?


Then I went to the computer to pull some of the designs off the discs that were in the packages I got at the show.  I was surprised and highly disappointed to find that they will only work if you have (buy) Floriani's software.  Not a good marketing strategy if you ask me.  I now have 5 discs of designs that I can't use unless I find someone who has the software and will convert them for me. (These are .cs2 files and as far as I can tell  no other software will read them.)  That has really put me off on recommending ANY Floriani products.  Sorry, but it is just a very bad way to treat customers. 
Oops!  The above was a mistake!  I figured out MY mistake and the designs work fine.  (see this post.)
But on to happier things!  Today I decided to embroider a cute little teacup that I got free from Embroidery Library.  They are a great place to get embroidery designs.  This one happened to be free, but I have bought a number of designs from them and they have all stitched out beautifully (as long as I didn't mess it up.)
So here is the finished product, still in the hoop 


I should have printed off the color change sheet before I started because my machine substitutes strange colors. As I was stitching out the first color (pink here) I went to the site to look.  Oops, it was supposed to be a medium taupe. Still, l like how it came out. 
Did you see that I now have a blog button that you can grab and add to your blog? Check the sidebar on the right, it is right under followers. 

Friday, January 20, 2012

Machine Embroidery

Hi everyone.
I had an adventure in education today.  I attended a Floriani Embroidery perfection tour.  I expected to be so ready to start some projects after the class that I could hardly wait.  However, I got information overload and can't even decide on a project. Ha ha.
The class was excellent.  I learned more about embroidery supplies than I ever imagined. I also learned that there is a LOT that I haven't even started to learn yet.
For attending the class, we got a great take home box of goodies.  Just look!
There are samples of stabilizers, ten spools of embroidery thread (which can also be used for free motion quilting - just so you know), an educational DVD on stabilizer solutions, four discs of embroidery designs, a project DVD with several projects on it, thread color charts, and some reference sheets.

I also bought the show bundle for quilters.  It has some great products in it. I will tell you about them as I start using them.
Now, what do I use first?  Whew, my head is spinning with ideas - I am afraid I didn't take enough notes. LOL.  I guess I just need some quiet time to let the ideas solidify and then I will be off and running.

Stay tuned.

Thursday, January 19, 2012

New Blog Design

Don't freak out, you are at the right blog. I decided to play with the MyMemories Suite software that I won at SewCalGal's blog. I created the new header for the blog with one of my quilts in the background. But I ran out of time and just used a stock Blogger image for the page background.

What do you think? Do you like the change? Any suggestions?


If you are looking for the Book Giveaway click here

Tuesday, January 17, 2012

Followers

Follow my blog with Bloglovin

I have read about Google Friend Connect going away for "non-blogger sites." Not being sure what that means to some of you who don't have blogs, I have added a Blog Lovin' button on the right for your convenience.  If you use yet another following method, please let me know and I will try to add that option also.
My readers mean a lot to me.
And if you are looking for the book giveaway go here.


Monday, January 16, 2012

Five Strip Slash Block

If you are looking for the book giveaway go here
I had a few 2.5" strips left over and decided to play with them.  As you may guess this will probably end up on the back of one of my quilts.  Hey, it is the perfect place to use up experimental or orphan blocks. No need to waste them is there? 


Here is my real result:
It is actually a half block.  So I used some digital magic to make an entire block because I didn't have any more matching fabric. 
No, the points are not perfect -live with it!
I am calling this a Five Strip Slash Block.  Here is how to make it.


I took the strips (which were actually only partial strips) and sewed a set of five.  I then cut the unit into squares.  (using digital mockups since I was in the zone and didn't take pictures along the way)
Take two of the squares, rotate one of them 90 degrees, then layer them right sides together.
Two units -one rotated 90 degrees
Line them up as neatly as possible - pin if desired.  On the back of the top block draw a diagonal line corner to corner. (you can use a pencil or ink pen, it will not show in the finished product!)
Sew a quarter inch seam on both sides of that line (you are sewing through both units) Once both seams are sewn, cut (slash) down the drawn line to make two 5-strip half square triangles.
Real picture this time!


Join these along the edges with the small triangles to make half of the finished square:


Join those to make the finished block
Not hard to do and it really pops. 
Here are a couple of EQ samples I prepared to give you an idea of a full quilt made from these. I did layouts in both rotations for you. 
Alternating blocks -joining non-matching colors.
Joining Similar Colors
If you make this quilt I would love to see a picture of it. 
You could alternately make the units with an even number of strips and there would be no solid interior square. 


I am considering new videos to make.  What would you like to see demonstrated?


Saturday, January 14, 2012

A little Sewing on Saturday

I thought I would show you a little something I sewed today.  If you are looking for the book giveaway go here
While I was visiting the Nana after Christmas, she said that her "oatmeal mat" needed replacing   It had gotten stained and wouldn't wash clean.   I had made that one with some 'cheater' fabric that she just loved.  
So today, I found some of that same fabric in my stash and made another.  I would suppose the cheater fabric is the front, since that is her favorite.  
Now don't be surprised if you might call this a mug rug rather than an 'oatmeal mat.'  Fact is she uses it to hold her hot bowl of oatmeal while she sits in her recliner. (and at 80 years old she is entitled to that comfort!) 
Here is the front made of the cheater fabric.
Don't you just love the cow mug?
For the back, of course, I took artistic control and used some scrap strips.  I love the batiks in this.  If I kept it, this would be the 'front'  but for now it is the back. 
Aren't the flowers inside this mug adorable?


I also spent part of the morning working on a quilt, but I discovered that I don't have batting on hand.  That changed my plans a bit, so I just folded it up and put it back in the project box without even taking a picture.  So I will save that for another day.  But I will say that the pieced back portion that is done looks better than the front. I think it is because I am far more free artistically with the back. I don't over think the backs. 
Do you piece your quilt backs? 

Thursday, January 12, 2012

Announcing

Officially CLOSED - winner to be announced soon 


Yes I am announcing a giveaway. (Can I get a Hooray?)  
After doing the book review more than half of the comments said "Yes do a giveaway." So  a copy of Finish Almost Any Quilt  by Marguerita McManus is going to be up for grabs.  Oh, not "just a book" no, it will be autographed by the author!  (I love having autographed books!) 


If you need to go back and read the review it is here


So how do you enter?  You can get several entries.
1. Comment on why you want or need this book.
2. Be a follower and tell me so in a separate comment. 
3.  Blog about this giveaway and come back tell me in a comment with a link to your post. 
4.  The lucky few who commented on the book review PRIOR to this post (and I know there were 17!) get an extra entry for commenting to tell me that they commented on that post. 


This giveaway will run through January 27th.  Mr Random will pick a winner.  The winner will be contacted prior to being announced.   
Please be sure that you are NOT a no-reply blogger.  (not sure?  Check by following this tutorial)  If you are no-reply, you must leave your email in the comment to win. 


Okay...let the comments begin! 
I must inform you that I probably won't respond to all the comments on this.  But I do promise that I will read them all!

Sunday, January 08, 2012

Finish Almost Any Quilt - Book Review


As promised, here is the review of Finish Almost Any Quilt  by Marguerita McManus. 

So many readers have asked "How do you join your quilt as you go projects?"  Since the method I use was taken from a copyrighted work,  I  contacted the author to ask about sharing it.  We both agreed that it wasn't a good idea to try to squeeze it in a blog post.  However, after looking at some of my work and some of others who adapted her method, she realized that another book would be great.
Marguerite kindly sent a copy of this book as a gift to me.  She said that I actually helped to inspire the book. (Wow, that made my day.)
I have throughly devoured this book.  I looked at how the information is presented.  I looked at the pictures (I love pictures!)  I enjoyed it. And the best part - I learned even more and got ideas!
Before I get going, I have to say that this book is not for everyone.  Here is some text (used with permission) from the Amazon description:


This book is meant for people who want to make and finish a LOT of quilts and who are not fussy about "perfection". If you want to spend a year making a perfect quilt, this book is NOT for you. 
If you are a brand new quilt maker who has been intimidated by the idea of trying to quilt a huge quilt, I hope that you'll read this book with inspiration and then find a block that you like and make your own quilt, your way, and finish it with me. 

You will be surprised at how quickly you will have a finished quilt on your bed! If you are an intermediate quilt maker who is tired of struggling to machine quilt your own quilts on your home sewing machine, I hope you'll find inspiration in my machine quilting techniques. You'll see how easy it is to put together a finished quilt using the methods in this book. 

If you are an experienced quilt maker, let's turn "I need to finish these quilts" into "I can finish my quilts this way! I like this look and I'm sure I can do it!" 

If you've vowed "No new projects until I finish something," let's finish your quilts together in a whole new way, quickly and easily. 

You loved your quilt projects when you started them, now let's pull them out and fall in love with them again and finish them in lots of new ways! 

If you are a perfectionist, this is not the book for you - I break a lot of "traditional" rules and you may not like it. 

If you want to make award winning, blue ribbon quilts, this is definitely not the book for you because I don't follow traditional rules. If you want to finish lots of quilts easily, I wrote this book just for you! 

If you: 

  • love playing with blocks 
  • want to finish your quilts yourself 
  • like change and adaptations 
  • are open to new ideas 

------------then this is the book for you! 


Now, on to my review.
In this book, many topics are covered.
Planning discusses options for finishing up completed tops (you may have to do some un-sewing!) But it also explains choosing patterns that work well for this method.  She very honestly states that some patterns just won't work for this.  But so many do work for it. Even if some require a little tweaking.
This Chinese Coins quilt (sorry about the lighting problem) 
is one that I made using the method.  It really didn't require any tweaking.  

Other things are settings and there is even a section on tee shirt quilts. (I wish I had that when a friend was having difficulty making one - the tips are excellent!)  Of course the actual construction method is in the book. There is a nice section on "how to quilt" that includes some basic free motion quilting.

Have you ever made a quilt and realized it was a little bit too short or maybe not wide enough?  How about just adding some borders right before  you bind it?  Yes that is in this book too.  I have done this and it works great! Don't believe me?  That Chinese coins quilt has added borders.

Another nice section talks about binding.  This method is "all machine binding" which I use a lot.  But you can still finish the binding on these the traditional way if you wish.  I did that on one quilt I made this way.

If you are looking for a way to quilt larger quilts yourself on a small domestic machine, This just may be the book for you.  I am giving it my  golden thimble rating. (And that is my best rating! Just so  you know.)  I wish that I had found this book when I first started quilting.

Should I have a giveaway for a copy of this book?  What do you think?  (comments will certainly influence me to do it; so speak up.)

Saturday, January 07, 2012

Ooooh a new Book on Quilting

In the next few days (hopefully this weekend) I will be reviewing a book that I got.  The book was a gift from the author, Marguerita McManus.  The book is Finish Almost Any Quilt.


This book shows the method I use for Quilt As You Go. It is very versatile.  I was thrilled when I emailed a thank you to Ms. McManus and she told me that I was a part of the inspiration for the book.   I have done a preliminary read through of the book.  I will be going through the book again before I do my review. 
If you want to know "how Gene does it" AND how to quilt your own quilts, this is The Book. (you can do a king size quilt or even BIGGER this way.)


I hope you are as excited about this as I am. I love that she covered every aspect I would have wanted to tell you.  I do suggest going through the entire book before jumping into quilting your quilt.  (patience my dear, you may find a tip that makes life easier, or an alternate way to do it.)
Review as soon as I can get to it. I promise!

Wednesday, January 04, 2012

Who Is This?

I was getting ready to sew last night when I spied this fellow on my sewing machine.
Hey, wait a minute!  He has my Aurifil thread sampler under his arm.  Cheeky monkey!   Whew! I rescued my thread.  Now I wonder what this fellow's name is?  Maybe he will tell me in time.  I am sure you will see him again.  You may want to suggest a name.  I asked if it was Rumpelstiltskin but he just smiled and shook his head "no."


I solved the photo dilemma, although I still have the SD card stuck in my computer.  (another SD card and a different transfer method)


So here is a picture of the fabric I got in the remnant bundle from fabric.com
I also made my first mug rug last night. It isn't perfect but it is great for me, I used my favorite color- blue. It was done as a challenge. I had five "rules/suggestions" which I could use all of /some of/ or even just one.   I managed four out of five.


(1) I used only non-square rectangles. There are no "square" shapes in the piece.  Try designing a quilt project without allowing any square shapes! I had to draw it out several times. Ha ha.  
 (2)I stuck with a monochrome color scheme. 
(3)I used Pigma pens to add words and images to the finished product. 
(4) NO borders were added. 
All the measurements for cutting the fabrics are 1", 2" and 4" -that is raw cut. It is sewn with 1/4" seams. It is just right for my mug and a cookie or a couple of crackers.
I don't know if you can see all the words.  It says "1, 2, 3 Coffee or Tea" "Have a cup" (drawing of cup and saucer) "Smile" (and a drawing of a smile)  This was added AFTER it was finished with a BLUE pigma marker - in keeping with the monochrome theme.


Monday, January 02, 2012

Late Christmas Presents

I went to visit my Nana over the long holiday weekend.  She was doing well and we both enjoyed the visit.  While I was there we exchanged gifts.  She always asks me for a wish list -so I go to Amazon.com and make out a list for her.  I try to put plenty on there so she has a choice.  I guess I didn't put enough on the list this time- Why?  because I got it all. Now these are gifts for a quilter!  I am very very happy with them.  I feel like I am on the "cutting edge" of quilting now.
Every single item is related to quilting and specifically rotary cutting.  This does NOT mean I will not be using my AccuQuilt GO! cutter.  But I am a diversified quilter.  So I will be trying some new things.
The cutting mat was number ONE on my wish list. The mat I was using had already been used a lot in an art studio when I got it.  It had a few grooves and was ready for retirement.   This nice Olfa mat will be kinder to my eyes with the green and yellow than the old mat which was black with grey lines.
I already have several rotary cutters, but I love trying different styles - and after all, I needed one that I can leave a wavy edged blade in for cutting fusible fun pieces.
Extra rotary blades- yeah- who doesn't need those?
The book was one of those "that might be interesting" selections.  I read through it a couple of times already.  I can't wait to try some of the ideas in it.

I was going to show you some fabric I bought, but I made a HUGE mistake.   That means I may not have pictures for days!  You see, my delightful new iMac has a nice little SD slot on the side right below the DVD drive.  So, I reached up to insert the SD card from my camera and slipped it right into the DVD drive.  YIKES!  The card is in there and (good news) it didn't make any noise -the Apple support guy said that is a good thing- I also can't use the DVD/CD drive until we go to the Apple store and get it  fixed.  Apple support was very nice and didn't say "you dummy!" unlike what I said to myself.  For now I have covered the DVD/CD  slot with blue painters tape to reduce the chance of me trying to pop a disc in there. Bad new- the Apple store is over an hour away and I won't be able to get there until at least next weekend.
The fabric that I was going to show you came from Fabric.com.  They have a selection called "Three Pound Cotton Remnant Assortment"  It says approximately 9 yards of fabric packaged from random end of  bolt remnants.  This has tempted me since I first saw it.   I got some great pieces including, Phillip Jacobs, Jinny Beyer, Moda Hullabaloo, a couple of Free Spirit fabrics, Michael Miller, and others.  All of it is good quilt shop quality fabric and I suspect it is more than nine yards.  Some of it is fabric I would never have bought, but that is good; it will challenge me find a way to use it.  Oh yes, this was a present of sorts also.  I was given money for Christmas and told buy something you want! LOL, I always want fabric.