Thursday, May 31, 2018

Pillowcases

The hand dyed fabric for the pillowcases just kept calling my name.   I could not resist.
The pillows on my bed are not standard pillows.  So I had to adapt the pattern to make it work. However, you can find the pattern that I worked from on Wanda Hansen's website in the "Free Resources" area.

When I started laying out the plan, I realized that the pillowcases would have to be pieced.  So I made a front and a back piece for each of them.  One of the pieces has a flap/pocket that the end of the pillow goes in so that the pillow doesn't come out of the end. I really like that feature as it keeps the end of the pillow cleaner.  That flap is supposed to be the front but mine is the back so I made the front hem even with the edge.
Here is the first one (the pillow that I sleep on nightly.)
 Now, let me show you the back where you can see and 
appreciate why I changed the position of the flap.
While this side is pretty too, the other side has a nicer design symmetry. 

Then I made the other pillowcase and repeated the "mistake" for the sake of consistency.
The second one is in the front here.  I love these new hand dyed pillowcases. 

BoNuS!!!!
 There were some nice scrap pieces left over from the pillowcases. 
These will be so much fun for piecing or perhaps another project. 

Now I want some 100% white cotton sheets to dye too!
FYI - my posts may be sparse for the next few weeks as there is a lot of "non-crafty" stuff going on in my life.  But no worries - these are mostly good things.
Comments are welcomed. I will reply when possible unless otherwise stated. However at this time Blogger is not notifying me of comments. Of course if you are a "No Reply Blogger"- I can not reply. Links in comments will result in the entire comment being deleted.

Saturday, May 26, 2018

Fabric Dyeing

On another blog I saw a pattern for pillowcases in the European style.  I really liked the idea of them so I decided to dye some fabric to make them with.  I mixed up some dye, pulled out some fabric and made it happen. 
Since there is no point in dyeing - at least for me - if you are going to do a nice batch of fabric,  I also did some other pieces to effectively use up all the dye that I had mixed.
 First let me show you the other pieces that are NOT for the pillowcases.

These two were dyed using mostly a "light red" dye. 
 Although I did drizzle just a little bit of a blue on this one.

Next up: the blue fabrics


And now the pieces with both colors 

 The above is nice and will be great for quilting
But the next one is my favorite of this batch.
I love the way the colors blended in places, the patterning and 
just everything about this piece. 

Finally the big piece of fabric that will eventually become my pillowcases:
 I am showing both sides since when I hung this to take photos, it was still folded in half.
I got more delightful patterning on this big piece, but there is a bit more white than I intended. 
After it is made into pillowcases, I will use it for awhile and decide *if* I want to 
overdye it to add more color. 

I think this dyeing session was a big success.  This is the first time that I have dyed fabric to make something specific.  The pillowcases made with the big chunk of fabric will be for my bed and will go perfectly with the quilt that I use on it.  That quilt has hand dyed fabrics in it also.
Comments are welcomed. I will reply when possible unless otherwise stated. Of course if you are a "No Reply Blogger"- I can not reply. Links in comments will result in the entire comment being deleted.

Wednesday, May 23, 2018

Improv Process and a Recipe

The improv quilt block process is basically whatever the quilter makes it to be.  What I am showing is my personal process.  In truth, this changes from time to time depending on my mood. (Yes, seriously.)
Some quilters think that they 
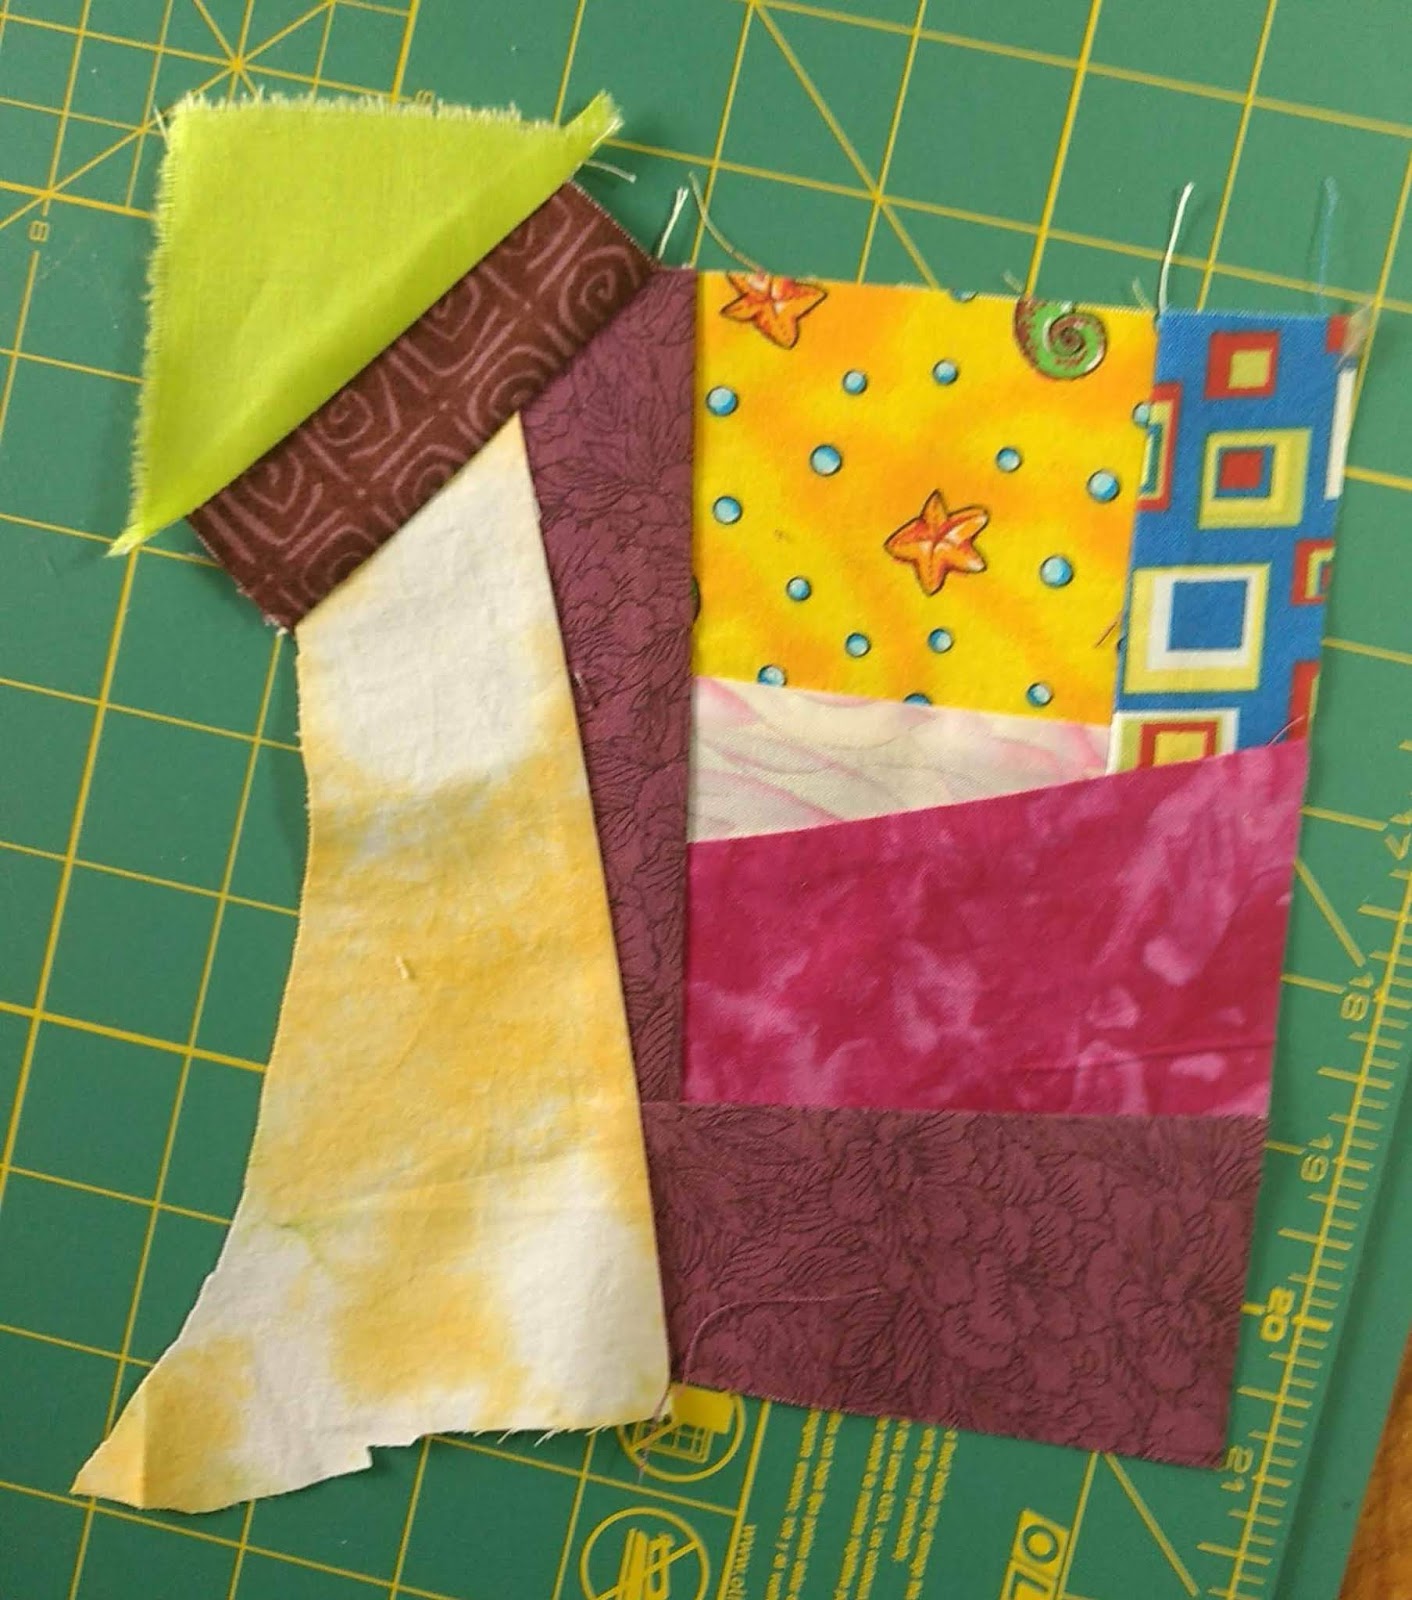
need to cut neat exact pieces for any block, but that is not how I do this.  For me, improv is grabbing a piece to add on that hopefully will look good and have a nice value change. (dark against light.)   My pieces don't always fit exactly.   Look at this piece.
The hand-dyed yellow/white was a piece that a piece had been cut from.  It wasn't quite long enough so I just sewed it on and then sewed another bit over the corner. It still wasn't enough so I added the green triangle to fill out the corner.  I don't trim it all neatly as I go - but I do trim seam allowances as I go - usually with my scissors.  That curved edge will be trimmed into a straight line before I sew anything onto that side.

This next piece (the center section) was scraps cut away from some other block parts.
It was in two parts.  On one part the dark green bit was added to bring up the width and then the pieces were sewn together.  The yellow triangle was added on one side.  Then the burgundy bit added at that top. Obviously I will be adding more to work toward a square shape. Some of this may be cut away in the process, but the scraps are getting used.

In the final one, the green strip was added across the top without trimming.  It is faster for me this way and I stay more in the creative flow.
Perhaps you noticed that new fabrics are being added as I go?  This adds some variety as well as allowing other scraps to be used from the scrap basket. But if you notice, the greens pull from the greens in the snails on the yellow fabric.  The burgundy is close in value and color to the purple that has been used in most of the blocks.  Honestly, I didn't think about this until I had sewn these fabrics in. I suspect that my subconscious mind was giving me hints.  I have learned that you should trust your instincts.  At worst, you may have to cut up a piece and re-do it.  But following your instincts will speed you up and develop your own style in the long run.

Recipe as requested!


Several asked for the recipe for the "cake" that I made for Mom's birthday.  The recipe that I used was for the filling between the layers.  It is Peanut Butter Cream Cheese Frosting.

* note: I did cut this in half as I was only using it between the layers - but then I added a bit more cream cheese - because---YUM!.
Peanut Butter/Cream Cheese Frosting

1(8 ounce) package cream cheese, softened
1⁄2cup creamy peanut butter
1 teaspoon vanilla
3 -3 1⁄2cups powdered sugar
2 tablespoons milk or 2 tablespoons cream

DIRECTIONS
Mix together cream cheese and peanut butter with mixer until smooth.
Add vanilla and powdered sugar, 1 cup at a time, along with the milk or cream and beat until spreading consistency.
(I used only 3 cups powdered sugar and 2-3 tbsp. of milk).
Spread on cooled cake.


Big Confession:  I used a Duncan Hines dark chocolate cake mix - it said "3 large eggs" but I substituted 2 Jumbos and one Large egg.  Other than that I followed the directions.  I alway put a parchment circle in the bottom of the pan.
Next- for the outside frosting- I used Duncan Hines  Dark Chocolate Fudge frosting. (no high fructose corn sweetener.)   I put it in a bowl and whip it pretty good with the mixer to make it spread better  and look prettier on the finished cake. 
Then I used some mini chocolate chips all over the top which worked out very nicely. They add a surprising bit of "chew" to that you wouldn't have otherwise.  I really liked that addition.


Comments are welcomed. I will reply when possible unless otherwise stated. Of course if you are a "No Reply Blogger"- I can not reply. Links in comments will result in the entire comment being deleted.

Monday, May 21, 2018

Improv Quilting - and a Birthday

I have been slowing adding to the improv blocks that I am making. I have no idea what this will turn into, but I am having fun playing with it.

I took the original two and added an applique piece to the one on the left here so that the pink fabric "marries" the two pieces a bit better.

 In other news, my mother is having her eighty-err something birthday this week,  so we had a party for her this past Saturday.  We did it early to attempt to surprise her.  I am not sure if it worked or not. Ha ha. 
Besides making some roasted brussels sprouts for the meal, I also made a chocolate cake with a peanut butter/cream cheese filling.  I regret that I didn't take a photo.  I can assure you that it was delicious.  I did save a bit so that Mom can have a piece on her actual birthday.  She doesn't know about it, so that will be another surprise for her.
Here is a photo my niece took of me with Mom that afternoon.
Happy Birthday Mom!


Comments are welcomed. I will reply when possible unless otherwise stated. Of course if you are a "No Reply Blogger"- I can not reply. Links in comments will result in the entire comment being deleted.

Tuesday, May 15, 2018

More Improv Quilting

Several months ago I was playing with pattern repeats using some Spiderman fabric.  I happened to notice that the blue fabric with squares in the other improv blocks had the same colors and similar values and tones.  So the test pieces became the beginnings for some more improv blocks.
By adding strips of the same fabrics in the other improv blocks, it was easy to make the blocks all work together.
This one is still a little bit undersized, but I really like where this is going at this point.  The other one still needs several rounds of strips to get to size.  But I am still playing with the fabrics.


Comments are welcomed. I will reply when possible unless otherwise stated. Of course if you are a "No Reply Blogger"- I can not reply. Links in comments will result in the entire comment being deleted.

Saturday, May 12, 2018

Improv Quilt Blocks

Improvisational quilting is a very old idea.  Still there are several fairly new books on the subject. I have read a couple of those books.  I have also taken a week-long class with the Gee's Bend quilters.   What I have learned from it all is that you need to trust your instincts and have fun playing with your fabrics.

I took two blocks that were in my orphan pile and decided to "re-imagine" them.  I started with a simple nine patch. Sorry, I forgot to take a before photo of this one.  I then cut a couple of  strips and crossed it in both directions.

You can see that this makes the edges get a little wonky.  So it needed trimmed.  I trimmed it to 9 1/2" square.
At this point I am not loving it, but I will let it sit a bit and work on the next one.
For this one I started with a big half square triangle block.
By itself it is not anything special. So I took some scrap strips and sewed across the corners -trimmed off the corners and sewed them to the outside edge of the strips and squared this one up to a 10 1/2" block.
Hmmmm... now I have two blocks that don't go together colorwise - and are different sizes.  More scraps of the yellow strip and the blue fabric with squares to the rescue.  I did more sub-cutting and adding strips.  Two inside the block one direction and then two were added to the edges in the other direction.
9-Patch: Take Two
The blocks are now the same size and because I repeated fabrics from the other block - they don't look so bad together.
When these are added to a quilt top with lots of different fabrics they will play very nicely together. . Seriously, I know with just the two blocks it isn't great.  I really need to see if I have more of the light pink from the 9-patch to make an applique shape for the other block.

The art concept of repetition with variation is what makes this work The idea is that you repeat elements (in this case fabrics) but in different sizes (or shapes) so that the subconscious connects them and the viewer's eye follows through the design.


Comments are welcomed. I will reply when possible unless otherwise stated. Of course if you are a "No Reply Blogger"- I can not reply. Links in comments will result in the entire comment being deleted.

Thursday, May 10, 2018

Paint surprise

The run off from the painting that I liked best did this:
Yes, it formed cells. Yes, it is far more interesting than the canvas.  I am hoping that it will stay and dry in this form. You see, acrylic paint on a smooth surface will become a plastic film that can be peeled up and used in collage.  I am thinking that I could collage this right onto the painting that it dripped from and make it better. 
Sadly, when I went back after typing this, it had all shifted and run together into a muddy mess.

The other small cups of paint were still liquid so I poured more paint over the piece that I didn't like.  I still did not get cells, but I did try.   I wonder if I will be able to develop this into something interesting.  Right now it is more "Massacre at the O. No Corral."   ha ha.

Comments are welcomed. I will reply when possible unless otherwise stated. Of course if you are a "No Reply Blogger"- I can not reply. Links in comments will result in the entire comment being deleted.

Wednesday, May 09, 2018

Playing with Paint

“Failure is success in progress”― Albert Einstein
Since I am not yet sure what sewing project I will work on next, I decided to go back to my roots and play with paint.  One thing that is very popular now is an acrylic pour - sometimes known as a dirty pour.
After mixing up some paints according to the videos I have watched, I made two small pours on 6" by 6"  canvases.   Neither of them did like the videos I have seen with multicolored cells and a dramatic effect. 
Here is the one I like best.
At this point they have to remain flat to dry (for possibly days!)  This one shows some small cells although they are not at all dramatic.

The other one is less successful I think.
I didn't see any cells in this one except the small ones at the top of the photo.  It really looks like the aftermath when a dog has eaten crayons and got an upset tummy. (sigh!)
I like the upper left corner of this one but the rest of it - yuck.
Right now,  they will sit until dry.

There is still a possibility that these may change as they dry.  There is also a possibility that I will paint over them completely at some point in time. Or maybe I will change my paints and additives and try pouring over them.

Experimentation sometimes leads to discoveries.  And sometimes, it just makes a mess. But if you are paying attention, the mess can be a lesson in what doesn't work.

"The important thing is to not stop questioning. Curiosity has its own reason for existing."  Albert Einstein
“I have not failed. I've just found 10,000 ways that won't work.” —Thomas Edison.

Comments are welcomed. I will reply when possible unless otherwise stated. Of course if you are a "No Reply Blogger"- I can not reply. Links in comments will result in the entire comment being deleted.

Sunday, May 06, 2018

Creative Stirrings

After recuperating from the sickness, which was probably flu, I spent a few days just resting and letting the body recover some strength.  Honestly, I still didn't feel like doing much.  But, since I had a nice new warp on the loom - and not just any warp, but one that had been dyed - I decided to weave a bit on it.
Dyed Warp
The warp started out in a multicolor design.  We used a dye that not only dyes, but also has a reducing agent that removes some color from the original. So there are lots of gradations of color in the warp.
Using colors in the warp, I did some weaving.
The first part was woven with purple, then I switched to green.  I had looked at a pattern weaving done on a rigid heddle loom with pick up sticks and thought - I want to try that on my loom.  Let me show you a couple of close-ups.
A couple of float patterns woven.

Another more subtle float pattern woven.
The second one is very subtle and you may have to look to find it.  It forms a wide "V" shape.
I am enjoying the interesting color variations on this dyed warp.

The episode of The Quilt Show that premiered today has Katie Pasquini Masopust as the visiting artist.   She did a demo of using grids for quilt design.  I was inspired to grab a clipboard, paper, ruler and pen to play for a bit.  While I don't think I will be following the same path that she used with it, I did design a grid for a possible art quilt.
There are a lot of possibilities here. I love the dimensional effect that I achieved with just straight lines on paper.  Only time will tell which direction this may go - or if it will go in the "un-used idea" storage bin.

Comments are welcomed. I will reply when possible unless otherwise stated. Of course if you are a "No Reply Blogger"- I can not reply. Links in comments will result in the entire comment being deleted.