Tuesday, January 31, 2017

More Dyeing

After reading some articles on dye painted yarns for weaving,  I was curious about trying it myself.  So, prodded by Abby, my muse ,  I wound two skeins of weaving yarns to dye.  Yesterday, I acquired a wallpaper tray to use for dyeing.  The wound skeins were soaked along with part of a white sheet in a soda ash solution. It stayed in the soak for quite a while.
 The excess was drained off then dyes were mixed.  I poured on the dyes in what should be a palindrome. The colors are Cobalt Blue, Grape, Chinese Red and Deep Orange.
Not a great picture but it gives you an idea. 
You can see the plastic wrap on the left side of the photo.  That is to cover it and keep the moistue from evaporating.  The dye only works if it is kept wet.
There is also the fabric hiding under there to get the excess dye and add to my hand dyed fabric stash. Somehow, I managed to mix an abundance of the purple so I put some of the extra in a tub and added a folded and bound bundle of fabric to that.
Those are rubber bands to keep it bound and act as an extra resist.  
Tomorrow afternoon all of this will be rinsed and washed out. With the first rinse, the colors and patterns start to show and I will see if this dye session is a success.   
The work part was "easy" the waiting part is much more difficult for me. 

Comments are welcomed. I will reply when possible unless otherwise stated. Of course if you are a "No Reply Blogger"- I can not reply. Links in posts may be affiliate links for which I am compensated if you click through and purchase.

Saturday, January 28, 2017

New Video Tutorial

Thank you for all your kind and supportive comments.  Several commenters said that they would love  to see how I make the Four at a Time Flying Geese units.

My wonderful videographer did the filming and the editing.  My only edits were to add the annotations in the video.  If you are on a mobile device you will not see the annotations - that is a limitation of YouTube.
Without further ado - here is the video!


If the embedded video doesn't work for you, please go to YouTube to watch.  https://youtu.be/mfuzwqvIdtA
Thanks!
Comments are welcomed. I will reply when possible unless otherwise stated. Of course if you are a "No Reply Blogger"- I can not reply. Links in posts may be affiliate links for which I am compensated if you click through and purchase.

And Then There Were Ten

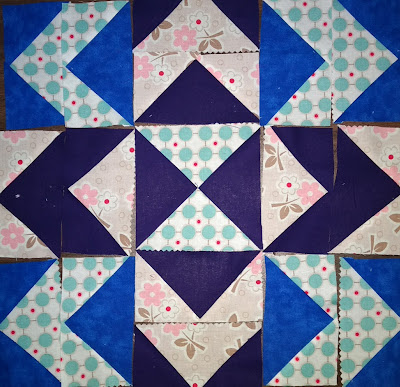
A bit more play, and then there were ten flying stars.
No your computer isn't leaning - my photo is. 
I am having a lot of fun with the flying geese units.  There are several more waiting to become points on stars.
I want to point out the center on this one.  
This center started as just a simple striped charm square. So, my muse, Abby, said "If you are careful you can cut it into fourths and reassemble it for a 4 1/2" square. Then the center will be more interesting!"  She was correct. I like this a much better than the solid piece. I think will use the duplicate of it as corners for a Star block.

I may or may not get the video made on how I am doing the flying geese units. (At least not right away. )
   Comments are welcomed. I will reply when possible unless otherwise stated. Of course if you are a "No Reply Blogger"- I can not reply. Links in posts may be affiliate links for which I am compensated if you click through and purchase.

Friday, January 27, 2017

A Few More Flying Stars and a "Lesson"

Thursday morning brought a bit of spare time to sew before I had to travel to my doctor's appointment. (there are too many of those appointments lately!)   So, it was obvious that I needed to make more Flying Stars blocks.  Of course with using the Layer Cake squares to cut up for the needed pieces, there were scraps.  Many of them were strips, so.....I decided to make centers of the scrap pieces.  Once enough strips were joined, they were cut into 4 1/2" squares to use as the center of the star.  I made two this way.  Here is the lesson:
Where are the star points?
Since there isn't enough contrast with the corner stones and the outer edges of the flying geese, the points kind of fade away.  I am thinking about ways that I may fix that by embellishing the block rather than deconstructing it. Or maybe I will just leave it as a humility block.  We will see. Lesson: take a good look at contrast before you sew.

Here are the Flying Stars so far:
If you look at the top row, second from the left,  you will see another "lesson" - all reds are not created equally. The red in the layer cake of Hello Darling is darker and "redder" than the red in Prairie.  The Prairie red is a bit pinkish.  It still works fine, but a truer red would have been prettier.

Clearly, more stars are needed for this quilt top. I like the one with the red background, so that needs to be repeated.

Just so you know - Craftsy is having a sale on classes. 
http://www.shareasale.com/u.cfm?d=392418&m=29190&u=759114
Find some inspiration or just learn a new skill to start on a journey of creativity. 
All people are creative, it is in our nature.  Some just need a push to get going. 
This quote is from a book I read and loved.  
“I’m not very creative” doesn’t work. There’s no such thing as creative people and non-creative people. There are only people who use their creativity and people who don’t. Unused creativity doesn’t just disappear. It lives within us until it’s expressed, neglected to death, or suffocated by resentment and fear."
― from "The Gifts of Imperfection" Brene Brown
Express your creativity!
Comments are welcomed. I will reply when possible unless otherwise stated. Of course if you are a "No Reply Blogger"- I can not reply. Links in posts may be affiliate links for which I am compensated if you click through and purchase.

Wednesday, January 25, 2017

I Dyed - and it Made me Happy

Back in October I signed up for a class on Craftsy.  The class is The Art of Cloth Dyeing with Jane Dunnewold.   Then on Tuesday, I finally put fabric in dye to see what magic might happen.  I used 5 different resist techniques on the fabric pieces that I dyed.  Every one of them gave a somewhat different result.   Let's look at the photos:
Scrunch with two colors
This one was a scrunch technique.  I had the purple dye in the container with the fabric but there was extra of the blue, so I put a bit of it in there too. I love the way it worked out.

Flag Fold
This one was a flag fold with plexiglass used on the outsides of the bundle as a resist.  The blue you may notice in the upper left is where some of the dye "broke" or "split" - That is just a happy accident.
Pole Resist
The red piece is a resist done using a "pole" although I improvised and used a big plastic drinking glass. The result is not what was intended but it is still a great piece of fabric that I will certainly use.

Cloth with a surprise - and the neighbor's dog photobombing
This blue is a rather simple fold technique. I didn't exactly do it like instructed, but it still came out just wonderfully.  The real surprise is the "image" that showed up in some sections of the cloth.

Do you see a face?  I do
As I was ironing the fabric, I realized that this section looks like a face. It makes me think of Yoda in the Star Wars saga.  I may have a difficult time cutting into this piece of fabric.

Simple fold with Rubber Bands
This is another simple folding technique.  I pleated the fabric and then folded the long pleated piece to make a smaller bundle. Rubber bands held it folded and also acted as a resist. 

I had a GREAT time washing the dye out and seeing what had happened.  I can hardly wait until I can do another dyeing session. I want to attempt some other techniques.   I plan to repeat the pole resist but I expect to have the proper equipment for it next time. 

If you want to join me on this adventure, the class is on sale now for $24.99   The Art of Cloth Dyeing with Jane Dunnewold.   I really love how she explains the science of what you are doing. That helped me so much with achieving success. 
Comments are welcomed. I will reply when possible unless otherwise stated. Of course if you are a "No Reply Blogger"- I can not reply. Links in posts may be affiliate links for which I am compensated if you click through and purchase.

Orange Peels will Fly, Fabric will Dye and More

The latest block made with the Flying Geese and the Orange Peel templates is finished.  I switched to an aqua fabric for the orange peels.
I improvised on the square in a square for the center since I only had a small piece of this red fabric left over. I think it came out great.   I will probably make a couple more of them so there is not "just one" in the quilt.  It does add a lot of work to making just one block. But, it is also a pretty cool design.

This seems to be my week for medical appointments.  I had one Tuesday morning and couldn't attend the quilt guild meeting of the Bama Belles.  I did drop by for a quick hello and to deliver something to my friend Linda.  
I also have an appointment with another doctor on Thursday.  Whoever said "This gettin' old ain't for sissies!" certainly was correct.  I probably won't get my walk in on Thursday, but I somehow managed to get three miles in today.  An audiobook is always helpful to make the walk less boring.

 I also managed to make a batch of soap on Monday. I have been making my own soap for years.  I love being able to control the contents and the fragrance.  That batch of soap was unmolded and cut on Tuesday evening also.

Finally before supper on Tuesday night, I put small pieces of fabric into small dye baths.  According to the class I am taking it is best to leave the dye bath to "batch" for 24 hours.  Since I am not in a hurry to get the fabric, that is what I plan to do.   Thus, on Wednesday night, I will take the fabric out of the dye bath(s) and rinse it out well so I can see my results.  However, at the point I am writing this it is difficult to just leave it.  The key is knowing that the dye will continue to exhaust up to that point and the rinse-out will be much easier.

Needless to say, I hope the dyeing works well and I have lovely fabrics to show you in the next few days.  Right now, I have a Purple spot on my pinkie finger and a bit on my other fingers since I got all excited about the process - but forgot the gloves.
It looks a little like a bruise doesn't it?

Comments are welcomed. I will reply when possible unless otherwise stated. Of course if you are a "No Reply Blogger"- I can not reply. Links in posts may be affiliate links for which I am compensated if you click through and purchase.

Tuesday, January 24, 2017

Flying Orange Peels?

About a week ago an email came.  It said "You are a winner of the set of Orange Peel templates and the four quilt patterns! Congrats!" Seems I made a comment and my name was drawn over at Lily PadQuilting.  Yesterday,  the prize was in my mailbox.  I haven't opened the patterns yet, but I did open the templates.
There are four sizes of templates.  The first ones I cut were the 4" ones.  I considered putting one section in the center of a 'Flying Star' block.  Meh!  I didn't love it -and Abby laughed and said, "Well that won't do!" So the 3" was the next smaller size -in fact the smallest one.  I cut a couple of those and tried it.  Nope, try again!
Hmmmm.... does  it have to go in the center square?  What if.....??????????
Grabbing the scissors it was easy to cut one in half. But where do the pieces go? I thought I could put four coming from the corners of the center square.  Abby said "Get out of the box!"  Okay, let's put them on the Geese units. What do you think?  Abby said "You never know if you don't try it."
I tried it.  Then I said "If the middle was a square in a square....."  and this layout came to be.
The only parts sewn are the actual Flying Geese units.
The rest are just piece of fabric on the design board.
Now I have to decide what method I will use to applique the half orange peel shapes in place.  I am thinking that with the red block, maybe I should use one of the aqua fabrics for the orange peel pieces.   To quote the muse "You never know if you don't try it."  So back to the cutting board!
Comments are welcomed. I will reply when possible unless otherwise stated. Of course if you are a "No Reply Blogger"- I can not reply. Links in posts may be affiliate links for which I am compensated if you click through and purchase.

Monday, January 23, 2017

Flying Stars!

After looking at lots of images of quilts made with flying geese, it was easy to see that there should be some star blocks in my design.   I have NOT decided on an actual design yet. This may be a somewhat "modern" quilt when I make it.
So let's look at the stars.   Thus far there are three of them.

The Trio 

The first one I made - with a square in a square center.

The second one with a simple square center.
Since my flying geese are 2 1/2 by 4 1/2 unfinished,  there is a 4 1/2 square for the center and four 2 1/2 square pieces for the corners.   I call them "Flying Stars."  There is probably another name for them, but MINE are Flying Stars. (Edited to add: Barbara Brackman calls this a "Sawtooth Star."  I like "Flying Star" better.)
There is no close-up of the third one because I forgot to take the photo.  But it has a secret.  I spied a pack of Prairie charm squares in a similar color-way to the Hello Darling.   One of the charms became the center for the  third Flying Star.  It worked wonderfully.

Here are some pieces I cut already and the pack of Prairie charms.
I discovered that from the Layer Cake (10 inch squares) I can cut one of the 5 1/4" squares and four of the 3 inch squares that I use to make four at a time of the flying geese units.
There are a few videos on YouTube showing the process.  But, I will ask you-"Do you think I should make another one showing my process for making 4 at a time?"


Comments are welcomed. I will reply when possible unless otherwise stated. Of course if you are a "No Reply Blogger"- I can not reply. Links in posts may be affiliate links for which I am compensated if you click through and purchase.

Saturday, January 21, 2017

Flying Geese Again

The idea of flying geese blocks has just taken over my quilting mojo.  Abby is obsessed with them right now. And whatever the muse wants - the artist should do.
While searching for scraps to use, I happened to look in the drawer where I found a layer cake of fabric.
The top piece of red and white jumped at me. I did some quick "quilt math" and decided that two layer cake (10 inch) squares would make 8 flying geese blocks at 4" by 2" finished (4 1/2" by 2 1/2" unfinished.)  So I pulled out two contrasting squares and tried it.

Success!!!!

I also pulled some solid white fabric to use also.  These are great for chain piecing. And I started. 
I copied my previous layout for this one. And there were these pieces leftover.
There is a funny story about flying geese units that I want to share with you.  An aquaintance's mother saw something I posted about flying geese.  She watched the video intently so I am told.  Then she sent a message asking "When are you going to show the rest of the goose. I want to see the finished goose quilt."  
Apparently non-quilters (and even some quilters) have no clue about how quilt blocks get named.  The "flying geese" unit (not goose, it is never a goose!) is named so because the triangle part looks like a flock of geese flying in formation.  From what I have read and seen, a flock of geese almost always flies in this formation.  

Blocks are given names based on what some creative soul saw when they looked at the block. That is why some blocks have more than one name designation.  

And about creativity, I will close with this quote from a book I read. 
“I’m not very creative” doesn’t work. There’s no such thing as creative people and non-creative people. There are only people who use their creativity and people who don’t. Unused creativity doesn’t just disappear. It lives within us until it’s expressed, neglected to death, or suffocated by resentment and fear."
― from "The Gifts of Imperfection: Let Go of Who You Think You're Supposed to Be and Embrace Who You Are"
 by Brene Brown
Comments are welcomed. I will reply when possible unless otherwise stated. Of course if you are a "No Reply Blogger"- I can not reply. Links in posts may be affiliate links for which I am compensated if you click through and purchase.

Tuesday, January 17, 2017

The Geese are Flying

Are these things contagious?  How many geese are flying around my house now?
Before yesterday, I rarely made flying geese blocks. Then a couple  of photos on a blog and I am making lots of geese.
I pulled out a jelly roll of fabric, some yardage in blue and purple, and my Go fabric cutter to make strips of the yardage.
Then a quarter-square triangle unit, a bit of chain piecing and some design play and I have this layout.

Monday evening, I did this layout with some geese and some leftover strips:


The geese have been flying for sure. I love the variations that can be created so easily.  Abby said that she likes them too. I wonder what she will have me doing next.....

Comments are welcomed. I will reply when possible unless otherwise stated. Of course if you are a "No Reply Blogger"- I can not reply. Links in posts may be affiliate links for which I am compensated if you click through and purchase.

Monday, January 16, 2017

Playing with Piecing

Some scraps and an idea called my name this morning.  Abby said "Always say 'why not' to an idea" so I did it.
I have never enjoyed making flying geese blocks.  But I saw a quilt that I really liked that is mostly flying geese.  So I made a few.
When you lay them close you get this
But then you probably knew that already.   They are just flying geese with the colors reversed to make the second half.
A quartersquare triangle is also one that is not easy for me to make and match the points well.  But this sample is pretty darn close.
One thing that I learned as I was getting ready to piece these is that my quarter inch foot and my sewing machine default setting are not a perfect match.  Moving the needle from 3.5 to 3.4 (slightly to the left) made my quarter inch much better.  It only took a little bit of searching in the manual to make that the default setting.

Comments are welcomed. I will reply when possible unless otherwise stated. Of course if you are a "No Reply Blogger"- I can not reply. Links in posts may be affiliate links for which I am compensated if you click through and purchase.

Saturday, January 14, 2017

A little Trip and a Birthday Present

We decided that we needed a trip to the Florida panhandle to visit Nana. A year ago she and I had talked about a shawl. She wanted someone to knit or crochet her a shawl.  I started one and then it became a UFO/albatross.  Knowing that I needed a birthday present for Nana - and that I had never finished that shawl - I decided to see if I could find a pattern for a woven one.
I found ponchos, shrugs, ruanas and many other woven things, but no shawl. I did find a pattern for a knitted shawl though, and it inspired me.
One of the great things about my Saori loom is the ability to take off your "inside set" and warp without interrupting the work in progress.  I had a plain black warp on my spare set, ready to hang on the loom and weave.
The current project was removed and stored. The black warp was placed on the loom and I wove some fabric using a lovely yarn that changes color in a delightful blend.  A long piece of cloth was finally woven and cut off the loom.  I put the other project back on the loom. The new fabric went to the cutting table to 'become.'  
Here is the result.

The following image may help you to see how simple the pattern for this really is.
Sometimes, simple is simply perfect.


Comments are welcomed. I will reply when possible unless otherwise stated. Of course if you are a "No Reply Blogger"- I can not reply. Links in posts may be affiliate links for which I am compensated if you click through and purchase.

Monday, January 09, 2017

Can't Stay Away

Sometimes, I just can't stay away from it. The loom was sitting there naked and alone. Abby said "C'mon, have mercy on that loom! It is cold here this evening. Make it a warp so it feels warm and loved."  (Abby has such a way with words.)

So I said "I usually use bright colors and lots of intensity."  Abby said, "This is a great time to go dark. But don't use much black!"
Weaving threads were gathered - including one cone of black and one of a gray. There is a darker blue, purple, green, brown, the black and gray.  So 60 rounds of  nine and a half meters and I wanted a change.  Abby said, "Add a red, and look for a couple of lighter colors."  So with her permission red, pink, a light blue and maybe one or two more were added. After so many rounds of this we switched back to some of the original colors - but not exactly the same.  Once there were 220 threads wound on,  the warp was tied up to remove from the loom. But this time I took a photo for you!
It looks pretty dark against that white door, doesn't it?

You may see that my warp ties are different colors. This makes seeing where the "parts" of the warp are when it is chained so much easier for me. The long stretches are tied with both dark blue and off white - but that is from grabbing randomly.  The yellow tie is the "choke."  The choke is tied very securely so that the threads don't shift.
I chain the warp as  it is removed from the warping board. Chaining is a lot like a giant crochet chain done by hand.  Here it is chained up and piled up ready to be threaded.
I love those colors.  So before bed, the reed was threaded and ready to put through the heddles.  I do both of those using a stand that allows me to thread at a table in my favorite office chair.  The heddles were threaded this morning and then the loom got dressed. Here is the warp roll at the back of the loom.
And here is the front of the loom - yes, I did weave a bit once it was on there.
What you see at the bottom of the photo is the rod that holds the threads at the beginning of the weaving. I think it looks pretty. 

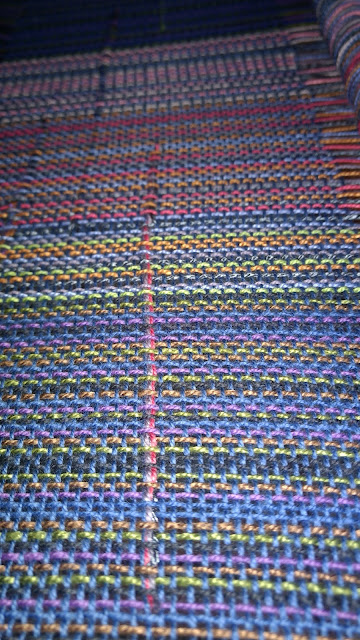
 Here is a side view of the woven cloth at the beginning of the warp.
I started weaving with a dark blue thread so that the warp colors are dominant. I love how the color used for weft can change the appearance of the warp.  My current plan is to only use the colors in the warp for this weaving. But seriously, it is over nine meters (almost 10 yards!) so I am sure that plan will fall by the wayside before I finish weaving it.

Comments are welcomed. I will reply when possible unless otherwise stated. Of course if you are a "No Reply Blogger"- I can not reply. Links in posts may be affiliate links for which I am compensated if you click through and purchase.