Friday, June 28, 2019

A Finish! Mosaic Flamingo

This was a fairly quick project to complete.  And a "shortcut" made it even faster.  The binding I chose to use matches the outer border and is fused into place a la Laura Wasilowski.  Since this is an art piece, it should never be washed. Thus, simple fusing should be adequate.  I love the whimsy of this Flamingo Mosaic art quilt.

Of course I added some Island Batik fabrics into the mosaic tile pieces.  Then I used two Island Batik fabrics for the borders and binding. I am very pleased with the finished piece. This is a technique that I will certainly use again.  I am excited to try creating my own design to work from.  I have such grand ideas.  Stay tuned!


Until Next Time,  
Stay Creative 


Comments are welcomed. I will reply when possible. Of course if you are a "No Reply Blogger"- I can not reply. Links in comments will result in the entire comment being deleted.

Wednesday, June 26, 2019

Another Bird!

I like watching birds - like I said in the last post.  Several years ago (2010, I believe)  we made a trip to Mexico and went on a side trip to Celestun, Mexico to see flamingoes.   It was a fun boat ride out into what I would call the bayou.  There were many kinds of birds to see as we went through the mangrove trees in the swamp.  But the highlight was seeing the flamingoes.

Fast forward!  I was watching The Quilt Show in March of last year.  Cheryl Lynch was a guest.  She was showing her Low-Sew Mosaic Quilts.  I loved seeing them. I considered purchasing the kit and the ruler.  I have no idea why this idea resurfaced over a year later, but it did.   I saw the kits for sale and I had a coupon and a few dollars to spend on something fun.  I ordered the kit and the ruler.

You know that of course I chose the flamingo kit.  It arrived and I let it sit for a day.  Then I just had to play. I cut up some 3/8th inch squares using the ruler/cutting tool.   Then I started building the flamingo.  I just had to share this with you.  I am loving it.  One of my favorite things is that it is all done with batiks. 

This is going to a a fun little quilt to remind me of that trip. I hope to go see the flamingoes again one day.  I do love going to Mexico.
Here is a photo from that trip in 2010. 

Until Next Time,  
Stay Creative 


Comments are welcomed. I will reply when possible. Of course if you are a "No Reply Blogger"- I can not reply. Links in comments will result in the entire comment being deleted.

Thursday, June 20, 2019

Bluebirds Make me Smile

Here is a sneak peek at my current project in progress.  I am a bit of a backyard birder, so I love seeing interesting birds.  I have had bluebirds build in my front gutter several times.  I love seeing the bluebirds on the fence or perched on the railing or even on the electric line.   They always make me smile.


I hope you have reasons to smile today.
Linking up with For the Love of Geese

Until Next Time,  
Stay Creative 


Comments are welcomed. I will reply when possible. Of course if you are a "No Reply Blogger"- I can not reply. Links in comments will result in the entire comment being deleted.

Saturday, June 15, 2019

Weaving Meets Quilting

Before we get to the "meeting of the two" let me show you and give you an update on my placemats.
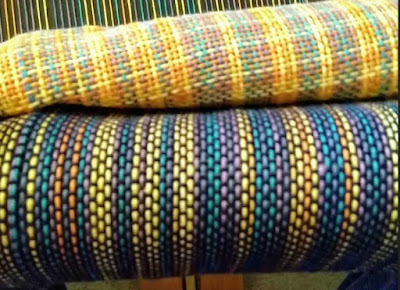
I finished weaving the two that use the dark blue as weft.  There was a nice bit of warp left.  So, why not try weaving it with a different colored weft?  I decided to use the yellow/orange variegated thread
Here is a bobbin filled with that thread. 
I have woven a bit of it on the warp and the difference is amazing.  First let's look at the cloth by itself.
It is much brighter and has a completely different character than the blue weft version.
Here they are together.
Isn't the difference amazing?

On the last post, Quilting Tangent commented and said that perhaps I could weave a quilt piece.  In my reply I said that I had made quilted pieces that I used my handwoven fabric in.  I have not used it in an actual quilt, but here are some pieces where "Weaving Meets Quilting"
Two pillows each using both quilting fabric and handwoven. These two were not quilted.

This notebook cover was lightly quilted. I love the pinwheel made of batik and handwoven. 

This pillow is also lightly quilted. The handwoven fabric adds a nice bit of interest.

This is another notebook cover that is quilted. As you can see, I did the pinwheel a second time.

The pinwheel is more difficult because the handwoven fabric is bulky in those seams at the center of the block.
I was lucky,  they both look good. 

Will I ever use handwoven fabric in a quilt?  I don't plan to do it, but only time will tell.


Until Next Time,  
Stay Creative 


Comments are welcomed. I will reply when possible. Of course if you are a "No Reply Blogger"- I can not reply. Links in comments will result in the entire comment being deleted.

Tuesday, June 11, 2019

Weaving Placemats

Sometimes,  I need or want to switch gears a bit.  It seems to help me overcome creative blocks.  The loom was sitting empty and sad.  It called to me one morning while I was eating breakfast.   You see there are two placemats on my table that I use regularly. These were created from fabric that I wove, cut off and sewed the ends so they would not ravel.

It is time for new placemats even though these are still fine and have a lot of wear in them. I grabbed some cones of cotton weaving yarn and went to the warping board to create the warp.  The warp is the threads that run lengthwise in the fabric. Those of you who quilt or sew know it as "the direction the selvedge runs."  The selvedge is actually composed of the outermost threads in the warp.

I chose two blue threads, a lavender thread, a yellow thread and one thread that is a variegated yellow to orange thread. I also had a red in my hands, but I chose not to use it.

Once the warp was made, I put it onto the loom.  I confess that  doing that takes some time.  I have good tools so I made the warp and got it on in a couple of hours.  This warp is 140 threads wide.  (For my own notes  - I am using a 5 dent per cm reed.)   Next time I will probably use at least 160 threads for the width I would like the  placemats to be for my table.

I decided to use only a navy blue thread as the warp thread (the thread that runs from one side to the other - from selvedge to selvedge.)  Once the warp was in place I wound a bobbin and did some preliminary weaving to be sure I liked the navy as my weft.

Yes I do like it!
I want both placemats to be roughly the same length.  To do that I am using a measuring thread.
It is hard to see in the photo but it is the brown thread I am holding between my finger and thumb. It is pinned in at the beginning of the weaving and left loose on the side.  I just have to remember not to weave it into the fabric.

I am to this point right now.
I am not sure you can see the measuring thread, but I have only a few inches to go on the first placemat.

I think I will enjoy using these new placemats in my kitchen.  I hope you remember to make pretty things for yourself - and for those you love.

Until Next Time,  
Stay Creative 


Comments are welcomed. I will reply when possible. Of course if you are a "No Reply Blogger"- I can not reply. Links in comments will result in the entire comment being deleted.

Saturday, June 08, 2019

Pointing the Way - Try a Technique

The June challenge for the Island Batik Ambassadors is Try a Technique. I have tried lots of techniques over the years.  Some have become regularly used tools in my quilter's toolbox. I think the idea of a challenge to try a technique is designed to expand our skills -or we may find out that we don't love a technique so we feel free to say "That isn't for me, at least not right now."
For this challenge I chose two techniques that I have tried in the past with so-so results.  Those two are foundation paper piecing and sewing curves. The truth is that neither one of them are techniques I consider myself to be good at.  But, it was time to try them again.  I am really happy that I did.  With both techniques I had success. 
Sections sewn but not joined together. 
Island Batik Moroccan Bazaar strips were used for the curved pieces with points. The background fabric is an Island Batik basic called Lilac. In some of the photos my camera flash washed out the Lilac and it appears gray.  Trust me it is a lovely pale lilac that is slightly more to the blue side of the color wheel.
Paper piecing these sections of curves went so well. Adding the curved pieces also went amazingly well.  The fact is, I watched a class Clever Curves by Toby Lischko on BluPrint.  She explained and showed how to get it to all line up with only 3 or 4 pins.  I am no longer afraid of curves.
( I also watched Carol Doakes class on paper piecing. I will likely be doing more of that as well.)

BUT

The real "try it" for me on this challenge was one that I have never attempted in the past.  I decided to make and use prairie points. Having seen Susan Cleveland do clever things with them on The Quilt Show, I wanted to try it.  She used them in unusual ways.  So, of course, I wanted to do that also.
I did some and sewed them into the seams as I joined the seams in the block.
There are nicely 3-D on the surface of the pillow. 

I pressed the seams so that they all go clockwise on the front of the pillow.
But then I discovered a tutorial on making continuous prairie points. So I had to try that too.  But, with the pillow being square, I decided that attempting to round the corners would wait for another time, perhaps with a test piece that I wouldn't mind tossing if it fails.
I cut the continuous points into pieces and put one section on each of the four sides.

If you happen to notice my "oops" just consider it a design choice!

The top was quilted prior to constructing the top. I used the Hobbs 80/20 Black batting behind it because it really makes the colors pop. To construct the pillow, I placed the top face up and positioned and pinned the prairie points in place.  Then I layered the two pieces for the envelope back on top of that face down. I sewed around the edges and then turned it right side out.


The Island Batik fabrics and Hobbs batting used in the construction of this pillow were provided to me as an Island Batik Ambassador. Some of the stitching was done using Aurifil thread which was also provided to me as an Ambassador.   I am very grateful to these companies for their sponsorship of the Ambassadors group. 


Until Next Time,  
Stay Creative 


Comments are welcomed. I will reply when possible. Of course if you are a "No Reply Blogger"- I can not reply. Links in comments will result in the entire comment being deleted.

Wednesday, June 05, 2019

What's Cookin'?

This week I have been doing some secret sewing that I can't show yet.  So, I thought I would share with you another part of my life. 

Saturday I cooked some pork in a nice sauce in my Instant Pot.  I love cooking meat in a pressure cooker.  It is always so tender and delicious.   Before you ask for the recipe for that, I will tell you that I made it up as I went like I frequently do when cooking. I do improv cooking as well as I do improv quilting.
Improv Quilting
There are a few ingredients that I remember:  diced tomatoes, tomato paste, a cup of liquid whey, Mexican Oregano, a quarter cup of sugar, ground cloves, smoked paprika and a diced onion. 
The sauce on this was excellent and there was a lot leftover. 


So today I am using that leftover sauce as the base for a soup/stew that I am making in the crockpot. After adding the rich red sauce to the pot, I put in cabbage (a whole cabbage, cut into bite sized pieces) along with a can of diced tomatoes, a can of garbanzo beans (drained and rinsed)  and some frozen meatballs that needed using.  I did precook the meatballs in the microwave and then chop them.  I also had a couple of nice fresh broccoli crowns so I cut the stems off and trimmed them.  Then I sliced and diced those stems to add to the stew. I also added some baby cut carrots and a small bit of frozen cauliflower that was in my freezer. The heads of the broccoli were not added.  I will have those for another use. (Possibly some of them will be steamed for lunch today.) 

It needed more liquid so I added a half pint of liquid whey which was leftover from making a simple farm cheese.  Also added was a partial container of low sodium beef broth. 

Here are a couple of pictures of the concoction right after I put it all into the crockpot and stirred it down a bit.

I can see that I "slopped" some of the liquid on the rim of the pot.
This is started on High, but once the cabbage cooks down a bit I will move the setting to low for continued cooking. Right now, it smells delicious.

The bonus of making this is that several containers have been removed from the refrigerator and freezer, making a bit of space available.  Of course, once this is fully cooked some of it will be refrigerated for use over the next few days.  The rest will be frozen for use later.

How creative do you get with cooking? Do you use the broccoli stems or do they end up in the compost or trash?  They are edible and quite good to use to extend a soup or stew.  You can even cut them in matchstick size and use them in a salad or slaw.

Until Next Time,  
Stay Creative 


Comments are welcomed. I will reply when possible. Of course if you are a "No Reply Blogger"- I can not reply. Links in comments will result in the entire comment being deleted.