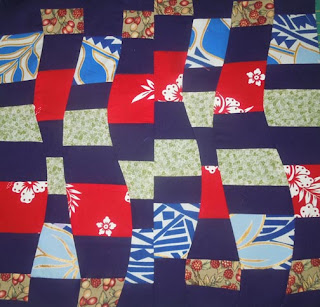
Sorry to say it didn't exactly work that way. Here is my final block:
What is the saying? Oh yes: Close but no cigar! (whatever that means.....)
I like it anyway and it is fun to do. Want to know how I did it? I will tell you- and explain the things I realized (too late) that I did wrong.
First I sewed a strip set:
I used varying size strips - Strike one! And I realized it as I took the picture- For it to come even close for matching, they need to be the same size.
Then I realized that I needed two, so I cut it in half and layered them (both facing right sides UP) but I flipped the top one so they didn't match up. Here I realized my second mistake: The end strips should not match-mine are both purple solid. (Strike two!) Never the less I carried on.
With them layered I cut wavy lines with my rotary cutter from bottom to top. I did three cuts making for a total of four pieces. (Strike three - gee I am glad this isn't baseball!) I didn't realize until later that having an odd number would probably work better (however this theory is one I haven't tested - maybe later)
I took the top strip in the first cut section, bottom in the second, top in third, and bottom in fourth for one "block." The remaining pieces make up the other "block"(really half blocks) It is important to keep them in order or you may not get them sewn together again.
Sorry I completely forgot to get a picture at this point.
Next I started sewing the wavy seams using the method for my "Wavy Bars" block tutorial. After sewing they look wavy/wonky and won't just open up and lie flat. But a good steam ironing will help this. Do it for each section as you go...don't wait. Lots of steam and a little starch (if you didn't starch the fabric well before you started) will really convince them to lay flat.
 |
| Left, before Ironing Right after being convinced by the steam iron |
{expletive deleted} No mater which way I turn it...the pieces match up too closely. Hmm.... a bit of creative rotary cutting/trimming and then sewn together.
They had to be trimmed for the uneven ends anyway, so I used it to advantage. However, this is why you shouldn't have the same fabric on both ends. I think this may be the perfect "fabric" for making a zipper bag or pouch.
**** Come back Monday afternoon for Just Wave- Part 3. ***
Just a little reminder that today is the last day for the Class Sale going on at Craftsy this weekend. See my previous post for more info.
 Comments are welcomed. I will reply when possible unless otherwise stated. Of course if you are a "No Reply Blogger"- I can not reply. Links in posts may be affiliate links for which I am compensated if you click through and purchase.


5 comments:
"Mama said there'll be days like this." You made the best of it, though - and I agree - it will make wonderful fabric for a zippered pouch - ;))
I think a little pouch will be perfect for this piece. I went ahead and chose a spinning class that was half off-spinning singles-looked like they were doing some different things in that class-
Actually I just took a look lol and I had chosen a different class drafting worsted to woolen
It's not what you wanted but it still looks kinda cool.
Uh, hard to believe it didn't work, looks good to me!
Post a Comment