Friday, September 30, 2016

Life gets in the way

This is just a quick post to let you know that "life has gotten in the way" for me.   Two nights ago we had to take my mother to the ER.  Her blood sugar was elevated and her speech had become slurred. She didn't remember things that she knows well (siblings names.)  My nephew, brother, and I got her blood sugar down by feeding her peanut butter and forcing fluids, but the other issues were still there.  So, at this point I am spending lots of time sitting and sleeping in a hospital room.  My brother is helping but he needs to go to work at times (understandable) and I am retired.  So,  my time to create is limited as Mom comes first.
No worries - she is improving.  Just send good thoughts, and if you pray, prayers our way.
Comments are off so I don't feel I need to respond.  Thanks for understanding.
Comments are welcomed. I will reply when possible unless otherwise stated. Of course if you are a "No Reply Blogger"- I can not reply. Links in posts may be affiliate links for which I am compensated if you click through and purchase.

Wednesday, September 28, 2016

Spinning Silk

I am back to spinning some silk onto a core of purchased weaving yarn.
Currently my bobbin looks like this:
 The color there may be off a bit.  And the next one is one I think I showed a few weeks ago-that bobbin filled up and is now in a center pull ball.
Here are the supplies I am using this time.   The core yarn is a pale mint green (but it rarely shows in the finished product so the color doesn't matter.)  And the silk fluff is from Camaj Fiber Arts in Florida.
That cone of yarn is a huge one.  I am guessing it started at 3-5 pounds - I got it "slightly used" at a thrift store a couple of years ago and I haven't put a dent in it yet.

So, let me ask a question.  Would you be interested in seeing a video of how I do the core spinning? 
 I know that there are several videos on YouTube of "how to core spin" but it seems that everyone does it just a bit differently.  

Comments are welcomed. I will reply when possible unless otherwise stated. Of course if you are a "No Reply Blogger"- I can not reply. Links in posts may be affiliate links for which I am compensated if you click through and purchase.

Saturday, September 24, 2016

Another Set Sewn

After making the previous set of pillowcases, I decided that I needed some really bright cheery ones for Fall/Winter.  You see, I can suffer seasonal affective disorder (SAD) and become depressed when the days get shorter.  But I have learned to deal with it in creative ways.  One of those is to make my daily environment bright and happy.
With that in mind, I stopped by Wilson Fabrics and found a lovely sunny yellow fabric with a design of stars and swirls.  They could be shells and starfish - and the beach makes me happy -- so that is what I am going with.   I found a nice mottled green fabric (possibly a hand dyed piece) in my stash to use as the cuff.  This morning, Saturday, I sewed another set of pillowcases.
Oooh, I love them already.  I especially like how using good quality fabric for pillowcases make them feel so good when you use them.  Otherwise, I could buy pillowcases for less - but they wouldn't be as fun either.
In case you are wondering, I use the burrito pillowcase method. You can get a free pdf download of the instructions at Craftsy.  And by the way - don't miss out on the Class Sale at Craftsy going on through Sunday 11:59 pm Mountain Time. Most of the classes are under $20. So if you have been looking at online classes, this is a good time to buy one.

Comments are welcomed. I will reply when possible unless otherwise stated. Of course if you are a "No Reply Blogger"- I can not reply. Links in posts may be affiliate links for which I am compensated if you click through and purchase.

Friday, September 23, 2016

Experiments in Fabric Embellishment

Wednesday an early birthday present arrived in an Amazon box. I love getting presents. Inside were two presents from my wish list.  For now, let's focus on the artistic choice - Lumiere fabric paints.
It was a set of 7 paints and an extender. (I will have to read up on how and why to use the extender.)  But Thursday, I tested some of the paints.  I got some fabric and ironed it onto some freezer paper.  This does two things: 1. stabilizes the fabric 2. protects the work surface.  So you get a two for one use of the freezer paper.
As you can see, I left overlap for surface protection in case I got close to the edge.    Then I gather the other supplies.  Two palette knives from my painting supplies along with a styrofoam plate to use as a throwaway palette.  (When those are gone, I will start using a permanent palette that I have in the art supplies.)
 And my hand carved rubber stamps - well some of them.
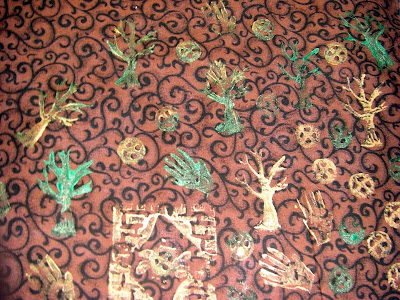
This was all inspired by a blog hop about a book by Deborah Boschert.  She does art quilts that are a lot like abstract collage -  there is also some more realistic stuff in there, but I love the abstract art stuff.  On one of the blog hop stops, the question asked to readers was "Do you have any personal symbols and what are they?"  My spur of the moment thought was "the cross in a circle" and a bare tree.  When I pulled out this stamp box, I realized there is one more: A hand with an extra finger. When I was carving the stamp my subconscious added the extra finger - so I left it there.
Here they are:
I played with just the gold and green paint and here is my embellished fabric.
When it has dried, I will need to heat set it to make it permanent.  This would probably have been more artistic on a plain or mottled fabric rather than over the print, but it was only for play when I started. Before anyone asks, I don't know what I will do with the fabric, but I will keep it for a while and see if it speaks to me artistically and suggests a use.

Meanwhile,  I want to tell you also that starting today Craftsy is having a class sale. Many classes are under $20.  See the infographic from Craftsy below.


Sale Thumbnail
Offer
Most classes under $20

Dates
Friday 9/23
-through-
Sunday 9/25 @11:59PM MT
Select classes are not eligible, including those from The Great Courses®. 
Comments are welcomed. I will reply when possible unless otherwise stated. Of course if you are a "No Reply Blogger"- I can not reply. Links in posts may be affiliate links for which I am compensated if you click through and purchase.

Thursday, September 22, 2016

Blogger's Quilt Festival - Grad Quilt

This year I am entering the Blogger's quilt festival as I have previously (but not every year.)  In May of this year,  I made a bed quilt that I made and quilted in record time, for me anyway.  I had eleven days from design to finish and I made it.
I am entering this in the large quilt category although it would fit in a few other categories. It is an original design that is home machine quilted.  I made this quilt in very specific colors for my nephew when he graduated from High School.   My brother, his father, told me that black, white and red would be perfect as that would incorporate the colors from the two high schools he attended and both post secondary schools he was considering.
The design changed as I started sewing and made some errors  err.... new design choices.  I simply embraced the "oops," went back in to Electric Quilt and did a re-design.  I think it came out far better than then original plan.
The quilt has a definite symmetrical design.  Yet it is scrappy and color coordinated.  It also used up some odd scraps and a fat quarter bundle that was languishing in my stash.

Please visit the Blogger's Quilt Festival by Amy's Creative Side - and once voting starts - I would love your vote.

You can link to the original post where the quilt was given here.

Comments are welcomed. I will reply when possible unless otherwise stated. Of course if you are a "No Reply Blogger"- I can not reply. Links in posts may be affiliate links for which I am compensated if you click through and purchase.

Monday, September 19, 2016

Sewing for My Home

There isn't a lot to say about this, but I did decide I needed new pillowcases so I raided my fabric stash.  I really liked both the look and feel of the print fabric that I used for the main body of the pillowcases.  I chose a green fabric that has a suede appearance for the cuff.  I decided that I should have made the cuff a bit longer, but c'est la vie!  Done is better than perfect.
I made two and they are now on the pillows on my bed.  Since my sheets are a very pale green, I think these are just great.  Plus, the other sheets that go on this bed are white, so they will work with those also.

Comments are welcomed. I will reply when possible unless otherwise stated. Of course if you are a "No Reply Blogger"- I can not reply. Links in posts may be affiliate links for which I am compensated if you click through and purchase.

Saturday, September 17, 2016

Photos - Weaving the Novelty Warp

Beverly who reads the blog by email, said that the warp is lovely but the fabric deserves better photos.  I have woven more of it and added more color in the weft (threads that go across.)  So here are some photos.
A little detail of the shadow weave pattern


Lots more of this warp to weave as time permits! Have a great weekend.
Comments are welcomed. I will reply when possible unless otherwise stated. Of course if you are a "No Reply Blogger"- I can not reply. Links in posts may be affiliate links for which I am compensated if you click through and purchase.

Thursday, September 15, 2016

Weaving Setup and Start

Today was the day I got some reprieve.  Mom's eye drop dosage changed from 4 times a day down to two times a day.  So I decided to do make a new warp and thread my loom for some fun fabric making.
First I wound on 160 threads on my warping board in some cotton weaving threads and some nylon novelty yarns.  Of course, I was "in the zone" so there is no photo of it on the board.  Then I moved it to the tabletop threading setup.  This is one of the delights of a Saori loom - I can sit in my comfortable desk chair and thread the reed and heddles of the loom.  Then I can move it to the loom and wind on the warp.
So here is the warp in the reed.
Okay,  it is actually through the heddles there also. But this is from the reed side.
Here it is through the heddle side with the safety knots tied so that it doesn't come unthreaded.
That may look slightly messy, but as my teacher said "You have to trust the process."
I moved it to the loom and set it up for winding on to the back beam.
Because of all the novelty yarns this was a bit more labor intensive than I wanted it to be.  A helper would have made it much easier.  But I was alone so I got up and down several times to "pop" the warp and help the threads to feed on smoothly.
Here is my reward for all that work:
The novelty yarn that is more predominate on the left of the photo
was the 'troublemaker' to wind on.
It is an almost black thread with "fuzzy bits" spaced along the length. 
Look how pretty it is!  Once the front was "tied on" it was ready to start weaving!
Starting with black yard was the easy choice - plus it really shows off the warp nicely. So black went on first.
The lower third of the photo shows it woven.  I regret that the photo didn't come out as good as I wanted it to.  But if you click on it, it should enlarge for a better view.  The bits of color in the novelty yarn really sparkle in this.
Perhaps it is time for me to end this post and get back to weaving.  See ya soon!
Comments are welcomed. I will reply when possible unless otherwise stated. Of course if you are a "No Reply Blogger"- I can not reply. Links in posts may be affiliate links for which I am compensated if you click through and purchase.

Tuesday, September 13, 2016

A Matching "Bit"

You may remember the Bendy bag that I made in Joan Hawley's Zip It Up class on Craftsy.
Today I used the excess pieces to make a cute little pouch to go with it.
For the accessory pouch, I chose to use a red zipper for contrast with the Bendy Bag.  I have been using the Bendy Bag to carry my iPod and earphones when I go to walk.  I think they will both fit in the Bendy Bits pouch so I can also pop the charger in the larger bag with them  and keep the iPod screen from getting scratched on the charger plug.    I really think the make a great combination and will help me stay organized.
Do  you sew items to help keep your things organized?
Comments are welcomed. I will reply when possible unless otherwise stated. Of course if you are a "No Reply Blogger"- I can not reply. Links in posts may be affiliate links for which I am compensated if you click through and purchase.

Sunday, September 11, 2016

Spinning Silk

Since I am still doing four trips a day to put drops in Mom's eye, I have to do things that I can either take with me when I stay there or stop and start.
One of the things that I can take with me is my spinning wheel.  The one I have - a Kromski Fantasia- fits right in the car seat with the seatbelt to hold it in place.
I had recently purchased some "waste silk" roving and some silk"cloud" to spin. So I packed up Meg (my spinning wheel) and the supplies and took them with me. I had decided to core spin the silk onto a cotton yarn that I had in my stash.  Here are the three of them together.
The cone of yarn is black and white wrapped around each other or plied together.   The pinker silk (right side) is the "waste silk" and the red/gold/black is the silk cloud.  I spun a nice bit of the silk around the core thread, but I still have plenty to work on.
Here is my bobbin at the moment.
This is a lot like spinning straw into gold.  Perhaps you should call me "Rumpelstiltskin" - or not, I am not as devious as he was.

Pink has never been one of my favorite colors but I am loving this combination. The black silk from the cloud hasn't shown up on this yet.  But in some places I have left the core thread showing. That way there will be a little bit of black throughout the spun yarn.
I also have some other silk fiber that I may add in also.

I don't have a place at Mom's to set up my sewing, so you may be seeing a lot of fiber work for a couple of weeks.
Comments are welcomed. I will reply when possible unless otherwise stated. Of course if you are a "No Reply Blogger"- I can not reply. Links in posts may be affiliate links for which I am compensated if you click through and purchase.

Friday, September 09, 2016

Checking In - Project prep

This week, next week and for a while longer,  I am "mom-sitting" after her cataract surgery.  She is unable to put the drops in her eyes.  For at least another week, there are drops four times a day. Then we drop to twice a day for a while and finally once a day.
So, as a result, I haven't been home long enough to start a serious project.  I still have other things I can't let go too long.
So during a "break" - I pulled out my stash of spinning fibers, my blending board and a big bag to carry it all in.   While doing Mom's laundry, I started making rolags - they are fiber that is prepped for spinning into yarn.  I really just had fun mixing colors and not worrying about the final yarn. I can use it in weaving and it will be beautiful.  I had failed to remember that this is a bit arm muscle intensive and I tired out my right arm quite a bit.  But look at these results!
These will spin up into some beautiful yarn.  This is mostly wool but I think that a couple of the rovings that I had hand dyed were a combination of wool and silk.  That would account for some of the extra shine it has.

Posting will be spotty for a while as I settle into some type of routine.  Just know that I am doing well.
Comments are welcomed. I will reply when possible unless otherwise stated. Of course if you are a "No Reply Blogger"- I can not reply. Links in posts may be affiliate links for which I am compensated if you click through and purchase.

Tuesday, September 06, 2016

An Attempt at A Project

I wanted to make the Bendy Bag from the  "Zip It Up."class on Craftsy.   Tuesday probably wasn't the day to do it.  I did manage to get a finished project. Sure, it will be usable.  But, it is far from successful.  
The problem is that Mom is going to have cataract surgery on one eye Wednesday. So, I have had to run over four times a day since Sunday morning to put the eyedrops in for her.  It seems that every time I get started with something - well it is time to go again.  I got started on the Bendy bag after lunch.  I made a good start then looked at the clock and said "Oops, time to run!"  
Interruptions are not a good idea when you are doing something for the first time.  Add to that my poor choice of lining fabric -it crawled- and I just didn't do all that well.

Still, I am going to share my results with you - my blog readers.  I will wait until I have a successful one to post it on Craftsy.  Ha ha.  I am showing it from two slightly different angles.   But I am not showing the lining fabric.

As you can see, it doesn't look quite as neat as it should.  Where the fabric shifted on me, I had to adjust that seam at the bottom and that was NOT the best idea.  I was tired and I cut it crooked. So you can see that it doesn't sit prettily.   Oh well, it will be good for storing some odds and ends or charging cables.  I am sure the next one will be much better!

As for me, it is early to bed tonight, I have a day that starts early tomorrow.
Comments are welcomed. I will reply when possible unless otherwise stated. Of course if you are a "No Reply Blogger"- I can not reply. Links in posts may be affiliate links for which I am compensated if you click through and purchase.

Saturday, September 03, 2016

Saturday Project

One of my pieces of woven fabric "spoke" to me on Saturday.  This piece has been woven for quite a while but it just now decided what it wanted to be.  The warp is one that I hand dyed back in July 2015. I started weaving it that October.  Now, in September of the following year, it has become a lovely vest.
Shown with the front closed in a more formal manner.
Of course  it can also be worn in a looser more casual style.
And the back is just as pretty as the front.
There are lots of interesting "bits" in the weaving but there is one area that I dearly love. It shows best on the front panel when worn in the formal/closed manner. 
The Shadow weaving forms a diamond pattern in the lower center
So besides household things that needed done, this is what I did with my Saturday. 

If you are interested in taking classes at Craftsy, there is a nice sale this weekend with many of the classes priced at $19.99 or less.  The news release says "Through Sunday" so if you are interested, don't wait.  
Comments are welcomed. I will reply when possible unless otherwise stated. Of course if you are a "No Reply Blogger"- I can not reply. Links in posts may be affiliate links for which I am compensated if you click through and purchase.

Thursday, September 01, 2016

A Happy Quilt- Finished!

This quilt has been a while in the making, but I should get it turned in by the deadline. I have shown parts of the top before so it may look familiar.
I am happy to say that it is finished except for the labeling. I am still trying to determine what they want on the quilt label.

The front is bright and happy with hearts and rainbows of vivid color.  The wind decided to blow as soon as I started to take a photo - hence the binder clip on the lower right corner. I used the binder clip to weight it down a little.

The back is simpler and a bit scrappy.  I had one heart left over and it is on the back along with some other fabrics cobbled together for a scrappy backing. The top left of the picture had a very strong shadow on it. So some photo editing was done and you may see some "odd bits" where the shadow meets the sunlight.
 I hope this quilt goes to someone who truly loves and cherishes it.

Comments are welcomed. I will reply when possible unless otherwise stated. Of course if you are a "No Reply Blogger"- I can not reply. Links in posts may be affiliate links for which I am compensated if you click through and purchase.