Saturday, March 31, 2018

Playing with Repeats

Many of you probably know that printed fabric has repeats. Some of them are far more obvious than others. They are definitely more obvious on larger prints.  I saw blurb from CT Publishing about easy stacked four patch blocks.  Knowing the basic principle behind it, I decided to grab some fabrics and play.  Hmm.... I don't have a lot of fabrics that work well for this - I tend to like solids and blenders best.  Still, I found two and started cutting.

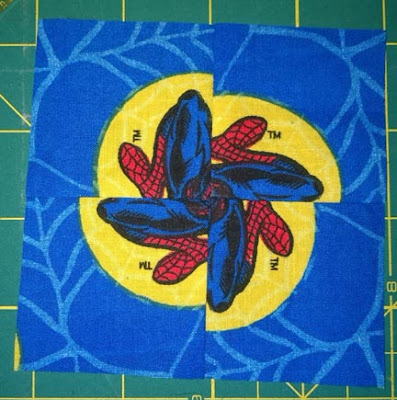
First I did a block using some Spider-man fabric (where on earth did I get that??? and why???)

Okay, I like the center but not the surrounding area.  Hmm, let me try the roses.
Originally the pieces were cut five inches square, but I couldn't find a pretty layout. So, I cut them into 2 1/2" pieces and pieced those.  I like them even though my cutting was slightly imperfect.  The designs still play well.  I trimmed them down to 4 inches.
Now, what to do with Spider-man?  I trimmed out a 4 inch block from the center.
I think that one is fun.  But there are some chunks left - what to do with them?
First I just put two together:
Not bad, but it isn't what I am doing so I didn't sew it. 
Then I saw this possibility so I laid it out for consideration.
I don't  have it exactly lined up- but I see that it will work.

Perhaps you want to see the original fabrics?  Here they are.

Have you ever played with repeats like this?  The first time I saw the concept was in a stack and whack kaleidoscope quilt at the first quilt show I ever attended.  This is a lot easier, I think.


Comments are welcomed. I will reply when possible unless otherwise stated. Of course if you are a "No Reply Blogger"- I can not reply. Links in posts may be affiliate links for which I am compensated if you click through and purchase.

Tuesday, March 27, 2018

Side Project

It has been a number of years since my Dad passed away. It was 2011 to be accurate.  Mom has held onto a lot of his clothes but is now ready to let more of them go.  One day while I was visiting, I noticed a large pillow in a chair that looked a bit shabby and discolored.  So three of his shirts were gathered to make a pillow front for the pillow.   Ahem, then they laid in a stack in my house for a few days  weeks.  Tuesday morning, I decided to stay in my PJs and sew a bit.  The shirts had been there long enough.  Four squares -each 12" by 12" - were cut from them and starched.  The cotton/poly squares were interfaced also.  Then they were sewn into a large four patch, nothing fancy, just a four patch.  I layered it with batting and straight line quilted the front for the pillow.

Then I used some upholstery/home dec fabric from my stash to make the back. I did the envelope method....and messed it up.  I ripped it apart and did it again.  I didn't realize what happened
The fabrics on the halves matched almost perfectly.  I can see the overlap, but I promise -that matching was just one of those small miracles that sometimes happen. I take no credit for that.
I see that the busyness of the fabric helps that illusion a bit also.

There are more shirts in the dryer that will cover the matching pillow - although it won't match when it is covered. The question now is "What will I back it with?"

While this post was sitting as a "draft"  I went right on and made the other cover.  The front:
The upper right corner uses the yoke of the shirt back turned sideways; while the lower right blue is part of the front and part of the back with a seam in the middle.
For the back, I used parts of two more shirts that were destined to be rags.
While the two pillows have enough in common to "go together" - they don't "match" per se. I like that better than "matchy/matchy." 

The other nice thing about these are that they will be used and will also serve as "comfortable memories" for Mom as well as my brother and me.

Comments are welcomed. I will reply when possible unless otherwise stated. Of course if you are a "No Reply Blogger"- I can not reply. Links in posts may be affiliate links for which I am compensated if you click through and purchase.

Monday, March 26, 2018

Forever in Blue Jeans

About a week ago - more or less - I saw an orphan that was being placed for adoption.  This is not an orphan child but rather an orphan project.  You see, there has been a movement to "adopt out" the quilty orphan projects that you are just "done with."   I think I put in for two orphans and got emails offering both to me.
Then I received the first box from Barb at Mountain Quiltworks.  She wrote in her post that " There are probably about 150 squares here. "  Ha!  I counted about  three hundred and fifteen. So I will probably be making more than one project.  These squares are 6" pieces of denim and twill.  So I started out making two rows of twelve squares.   A friend was visiting and said " That looks kind of plain - why don't you embellish it?"   I said, "It needs to be comfortable not fancy."  Then we talked a bit and decided that I should use my embroidery machine for more than a paperweight.  Except the squares don't fit in the smallest hoop.  Yes, it is a 4"by4" hoop, but that is embroidery area not actual size of the hoop.  I finally decided that I could hoop tearaway stabilizer and use gluestick to hold the squares to it. That works great!  I folded both stabilizer and fabric in fourths to make a placement line.  Several designs that I own but have never sewed out were put on a usb drive and put into use.

Some of them are single-run quilting designs and were "weak" looking.  I realized that I could sew it twice - and just nudge the placement control one tick to the right for a double thickness line.
It sews right next to the first sewing line and looks much more substantial.  If I were using it to quilt a piece, I would never do this.

Here are a bit of the sewn together rows. Do you see Sam fishing up there?  I am trying to randomly place the embroidered blocks so that it looks casual and fun.

Here are a couple of my favorite embroidered pieces.
I could not get a decent photo...but to the right of the sunflower is a music design.

I had decided to make this 12 by 12 blocks which will be a pretty big lap quilt.  I hope it is snug and comfy.  I am only adding fabric to the back as the denim will be heavy enough by itself.

At this point I have four rows sewn and a fifth row sewn into "twosies."  Once the rows are complete my plan is to just sew them onto the backing in a quilt-as-you-go manner and then finish the edges with binding or maybe just use extra backing as binding like my grandmother used to do.

Comments are welcomed. I will reply when possible unless otherwise stated. Of course if you are a "No Reply Blogger"- I can not reply. Links in posts may be affiliate links for which I am compensated if you click through and purchase.

Wednesday, March 21, 2018

Crumb Block Top Completed

It took a lot of pinning and sewing  and refilling a bobbin - they always seem run out on a long seam - but the Crumb Quilt top is complete.  After pressing the last seam, I took it outside to hang in the sun for a photoshoot.   Of course there was wind.
 But I managed to get a few shots anyway.  If you see the dirt on my car in the background - that is pollen.  We are having a rather early pollen season I think.  And in other photos you may see grass/weeds that haven't been dealt with - If the ground ever gets dry enough during what is apparently this Alabama monsoon, I will get that fixed.


Believe it or not this top was pressed but the humidity and the wind seemed to magically make the wrinkles reappear. 

Nevertheless, I love the bright colors and happy design - I also love that most of my points match thanks to a lot of pins.

Comments are welcomed. I will reply when possible unless otherwise stated. Of course if you are a "No Reply Blogger"- I can not reply. Links in posts may be affiliate links for which I am compensated if you click through and purchase.

Tuesday, March 20, 2018

Sewing the Rows - Crumb Blocks

A final decision was made for the background colors - except for the setting triangles- and the sewing has begun.
I chose to use a fat quarter pack of "30's Playtime Solids (2017)"  That I won from Melissa Corry at Happy Quilting in April of last year!


I did need to add a color to this. Since the red is intense I chose a color with more intensity to go with it.
I never could get the color to photograph correctly  but that is more toward teal and is a lovely color.
This is the layout that I chose to use.

I haven't decided on the setting triangles but the black looks really nice here, so I may choose to use black.  It does match the center square that I used in each block.
I have a picture of the rows sewn but the lighting is not the best.  I don't have a design wall, so it is just laid on the floor.
While it looks a bit "messy" here, I am sure it will be lovely. 

Today is my brother's birthday and I am the official family cake chef.  My Paternal Grandmother taught me to bake cakes when I was about 12 years old.   My brother requested a lemon cake.
I think it looks good enough to eat!   The yellow "balls" are LemonHeads candy because I always like to add a surprise of some kind.  The rest of the large "theater sized" box is wrapped as a bit of a gag gift.   Happy Birthday baby brother.

Comments are welcomed. I will reply when possible unless otherwise stated. Of course if you are a "No Reply Blogger"- I can not reply. Links in posts may be affiliate links for which I am compensated if you click through and purchase.

Sunday, March 18, 2018

64 Blocks and Decisions to be made

Sunday evening, after just a few minutes of making more crumb blocks, I decided to rest a bit.  Gathering all the crumb blocks I counted them to see just how close I had gotten.
Would you believe there are exactly 64 in that stack.  Yes, I stopped at just the right spot.  I need exactly 64.  Aren't our brains interesting?  I thought I had no clue how many I had made, but I was right on target.

So why is the scrap drawer still overflowing?
And I also have these pieces neatly laid out for working with:

And strips and pieces too

Sheesh!  Do the scraps multiply when you use them? I will have to fit some of those stacks back in the scrap drawer.  Wish me luck!

Now I have a decision to make.  What color or colors will I use for the background on my Crumb quilt?  This will require an expedition into the wild stash area  of the house to see which I may have in the required amounts.  If all else fails, I can just go "solid scrappy" and use two or more colors for the background.  According to Electric Quilt- depending on the width of the fabric it can take from 2 1/8 to 2 3/8 yards of fabric for the background. So for practical purposes, I will find 2 1/2 yards total for it.
I also have to decide on fabric for the cornerstones in the sashing. Hmmm.....time for that expedition to the wild stash jungle!
Talk to you good people soon, I hope.

Edited to add: The plan is in place and piecing started. You will see it in a day or two- or three.....
Comments are welcomed. I will reply when possible unless otherwise stated. Of course if you are a "No Reply Blogger"- I can not reply. Links in posts may be affiliate links for which I am compensated if you click through and purchase.

Saturday, March 17, 2018

How Gene Makes Crumb Blocks

There is no "wrong" method for making crumb blocks.  The only rule you need to follow is this: Be sure you have an adequate seam allowance. (just so it doesn't pull apart in use.) Also, spray starch and a hot iron are your friends! They help the blocks to press nice and flat.

But,  I have been asked how *I* do it.  So this picture heavy post will show you.

First I start with a pile of scraps and pieces.

(This photo mysteriously disappeared. Sorry)

From the pile I pick a piece to start with.  I have a chunk that is two strips already sewn together. So I am going to take a skinny strip that contrasts nicely and sew it across at an angle.
I don't really worry about edges being very straight.  After it is sewn I trim it off saving the rest for more blocks.  Then I press it open.
Notice that the blue strip is slightly curved on the bottom?  Not to worry. I just keep sewing.
Taking a piece that *mostly* fits, I cover the wider edge. (That is the back side of the bear fabric.)
I work on at least two blocks at a time so you will see pictures from both of them.
Sometimes there is an odd corner that doesn't meet evenly.
Again, I lay a piece diagonally across it and sew some more.
As long as the edge securely catches the seam there where the two pieces meet, it will be fine. After sewing, I cut off those triangle pieces and put them back in the scrap pile. Sometimes, if they are really small they go in the bin.
Occasionally I will check the size to see if I need to extend an edge.  This one was less than 5 inches.
That means - sew a piece on one of the edges.


Some of the extender will be trimmed away - but unless that piece is small - it goes back in the scrap pile.
Finally I arrive at a piece that is large enough to trim into my 5 inch block.
The ruler on the block lets me be sure it is big enough. I put my finger at the 5" corner and then look at every edge.  I also move the ruler to try for the most visually interesting block.
Then I start trimming.
You can see that I am trimming away pieced parts as well as a piece of the dark fabric.  Don't worry- that goes in another block.
Once trimmed, I have a few small trash scraps - AND five usable pieces in addition to my block.
You can see that the pieced part of the other block became part of the bear block - and the part that is trimmed away will be part of yet another block.

If you have orphan blocks, you can do the "sew a strip across" trick and change them up to make them less recognizable. Doing that speeds up the crumb block process and really can add pizzazz and sparkle to your scrappy wonderful quilt.
PS - you can do these in ANY size you want. So try it and have some fun. And visit A Left-Handed Quilter to read about The Crumb Block Challenge.

Another late addition to this post:  For Spray starch, I use a homemade formula that is roughly 3oz of the cheapest vodka you can buy -- this time cheaper is better,  I use Aristocrat brand.  Approx 24 ounces of distilled water is added to the 3 oz of vodka. That is all you really need, but I add several drops of essential oil for fragrance.  I like cinnamon, but lemon, peppermint, lavender or some other essential oil will work as well. Start with a few drops - you can add more but you don't want it to be overwhelming. This works like a certain other starch alternative that is very popular with quilters.

Comments are welcomed. I will reply when possible unless otherwise stated. Of course if you are a "No Reply Blogger"- I can not reply. Links in posts may be affiliate links for which I am compensated if you click through and purchase.

Friday, March 16, 2018

Even More

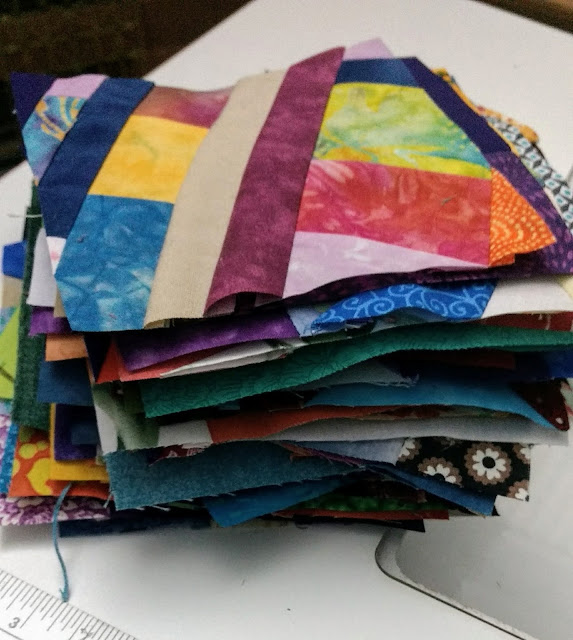
These crumb blocks are very addictive.  I am using up scraps and pieced bits that I just can't seem to toss in the bin.  Friday afternoon and evening I made ten more of these fun little blocks. There are no rules except to have an adequate seam allowance.   Sometimes I take a strip and place it diagonally across a pieced section, sew the rough quarter inch seam and them trim.  Then I decide if the trimmed piece goes back on the other side of the strip - or is used for another piece altogether.


When a "chunk" is large enough, I cut out a 5 inch square. (You can decide on the sizes YOU want to make yours.)  If the parts that are trimmed away are large enough to use, they go back in the piecing pile.  If they are too small, I put them in the bin.

What I love best about these is how random the piecing looks.

This batch of ten puts me over halfway to having enough of the crumb blocks for the setting I am using.  I think I will have to decide on background fabric soon.
Comments are welcomed. I will reply when possible unless otherwise stated. Of course if you are a "No Reply Blogger"- I can not reply. Links in posts may be affiliate links for which I am compensated if you click through and purchase.