Showing posts with label triangles. Show all posts

Sunday, January 06, 2019

String Along - A Top is Born

After sewing ninety of the 6 1/2 inch string blocks, it was time to decide on a layout and just go with it.  I really liked the Four-patch that I had auditioned with the four similar blocks. So, I decided to use it as part of the design.  It is the only part that is different from the diagonal layout of the quilt.

I really love the way it looks.  There are so many different fabrics with only a few that repeat in a fairly consistent manner.

One fabric that is only in the quilt once showed up in the perfect place.  I promise that I didn't play this at all.

Can you see the yellow with the spider in it to the right of the diamond?  It is like the spider is crawling to the "web" created by the diamond.  That made me grin a lot when I saw it.

*** Cool hint: Save those triangles that you trim off when doing corners....they are  perfect for this type of block!

Now I have two quilts that need quilted pretty soon.
Have a great week.
Comments are welcomed. I will reply when possible. Of course if you are a "No Reply Blogger"- I can not reply. Links in comments will result in the entire comment being deleted.

Monday, March 07, 2011

Scrap Busting

It is amazing how scraps build up when you are a quilter.  Some, rare quilters, are able to throw them away. I am not that type of quilter. Some quilters have bags of scraps hidden away for the "someday" when they will use them to make a scrap quilt. 
Of course they keep buying fabric and collecting yet more scraps. I have been that type of quilter lately.  Early in my quilting I used scraps. People gave me scraps.  Now I have bags of scraps. 


Don't get me wrong, scraps are good.Keep your scraps, but don't SAVE them, bust them!  When I realized that I had to cut extra pieces for the quilt along blocks that I made too short, I made a decision.  I decided to cut some scraps while I had my AccuQuilt GO! set up and the value die was working anyway. 


So, I ironed a couple of scraps and cut some 2.5" squares while I was cutting the half square triangles.  Then, while sewing the pieces for the quilt along block, I used the square to sew on, sew off.  I normally have been using little scraps as "Thread Rats" to keep the points from clogging up when I start a triangle.  


I finished the extra parts of the quilt along block. The iron was still set up, ready to go. The bag of scraps was right beside it.  I decided to iron the entire bag of scraps then cut them up. 


I was surprised at some of the sizes of the "scrap" pieces as I was ironing.  I got my GO! cutter and some dies and put them out. I set up a scrap busting shop.


I started cutting. I cut 2.5" squares and half square triangles.  I cut more half square triangles in 3.5", 4.5" and 6.5".   I cut some quarter square triangles that will make a 4" finished block.  I even cut a few 4.5" squares. 


Here are the finished stacks:

I sat watching a movie and sorted them by lights and darks. There are a LOT of pieces there.  I still have more bags of scraps that need busting.  I will sew the half and quarter square triangles into square blocks.  I will sew the squares into four patches or nine patches.  Eventually I will have a truly scrappy quilt made as "extras" that were sewed in between pieces of other projects.  I won't have to cut the thread, or use a thread rat when I need to take pieces to be ironed, I will just sew a couple of these together and leave it under the presser foot while I go iron.  Then when each one comes out it goes into a stack for that scrappy quilt.  
As an added bonus, those scrap bags will start to diminish. 

How fun is that?


Tuesday, March 01, 2011

Sick Day - On Point Blocks

I am almost never sick.  But a couple of weeks ago, I had a nasty cold.  Ugh.  That was no fun. 


((You can skip this section in purple if you are sensitive it may be "too much information"))


Today I woke up with a strange feeling - I was nauseous! I got up and headed to the bathroom,  I knelt down and did my impersonation of Linda Blair in "The Exorcist."   I thought that since we had a storm last night and the weather had changed again, that it was just sinus issues. So I got dressed and went to work.  I got to my desk and put my lunch in the cabinet. I did not have time to sit at my desk.  I had to run to the men's room and --well I had a different symptom - you figure it out.
So I went home for the day.  


I didn't accomplish a lot since I didn't want to stress myself. But I did do a little research on how to set a block on point.  You see I have this little piece that I worked on Sunday night and Monday night. (Sorry no picture yet.)  I want to enlarge it and then maybe add some borders to bring it to lap quilt size.  
What I found was that a whole lot of the math has been done for me (and for you if you need it) at Bonnie Hunter's Quiltville site.  There was one thing I didn't understand. She has "Corner Triangles" and "Side Triangles" listed. 


Okay, so maybe I am a bit dense. I did  a bit more research and found that what I need is Corner Triangles since I am only doing one block.   The Side Triangles are for when you are setting an entire quilt with on point blocks  and you need to fill in the edges to make it square.


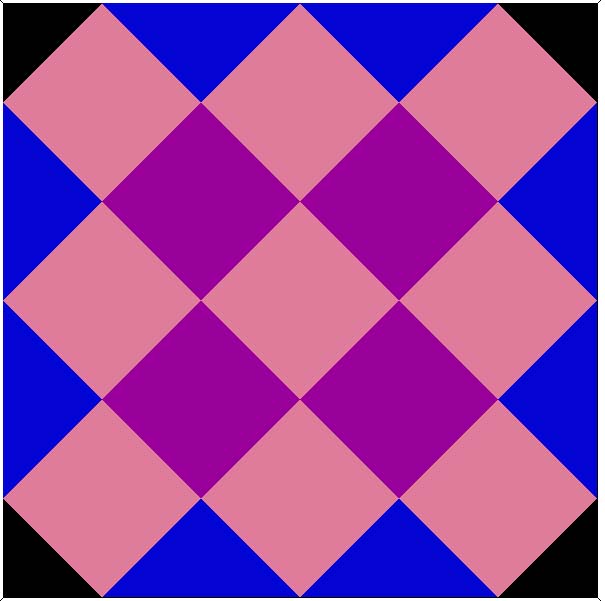
Here is a picture of a quilt on point layout for those of you who are visual thinkers. 


The Corner Triangles are black
The Side Triangles are blue. 


However, all I was doing was taking one big block to set on point. 
Like this:
Except the big block in mine is pieced. But those corner triangles were what I needed. 


My block is about 15 1/2 inches square, so looking at Bonnie's chart, I will cut two 11 7/8" squares and cut them diagonally for my triangles. 
That chart has sizes from 3" square up to 16" square.  I am really glad I found it.  I am sure I would have wasted a lot of fabric if I had winged it.  I thought that the 11 7/8" was wrong. Surely it would take more than that. So I checked it using a right triangle calculator on the web. I got the same answer. 
Now if you enjoy doing the math for yourself, here is the formula.
Size of finished block divided by 1.414 then add 7/8 inch to that total. or  X/1.414 + 0.875 (where X is the length of one edge of the block you are setting on point) 


Yeah, I will stick with Bonnie's chart.