Showing posts with label half square triangles. Show all posts

Saturday, November 16, 2019

Sunny Skies: Tool Time - November Island Batik Challenge

Welcome to my blog post for the November Island Batik Tool Time challenge.  Roughly half of the Island Batik Ambassadors are doing  "Tool Time" this month, while the alternate group is doing "A Piece Of...." to showcase new fabrics.
I have found that these challenges bring out the best in my quilting.  I love the rush of creating something new while fitting into the challenge theme.


If you saw my post way back in August, you know that I am using Triangles On A Roll as my tool for this challenge.  The top of this quilt was mostly done early, but then life interfered with getting it completed.  However, I did get it finished (and posted) before the end of November, so I am good. Ha ha.


I started by designing the quilt to use lots of half-square triangles - just so I could use the "tool" I had chosen for the challenge.  To use the  Triangles On A Roll  it is necessary to cut pieces of fabric just slightly bigger than the section of paper you are using.  I discovered that with these I only wanted it big enough to do twelve sets of triangles at most. If you can read the fine print on this photo you can tell that for four units, you will need two 10" squares.  Since I was using some squares from an Island Batik Stack of Sunny Side Up, this was perfect for me.

I also used some yardage. For those units I could use more than one section of four at a time.
** Late addition: It is on the instructions but I want to remind you that you should lower your stitch length to make it easier to tear away the paper.


It was challenging but also fun to sort out the color arrangement. I had worked that out prior to starting using another tool that I love: Electric Quilt 8.

I made lots of half square triangles, 96 if you are counting! I probably made a few extra that will show up in a scrap quilt later.  I also used the Accuquilt Go! cutter and a die from the Qube Companion set "Angles" for the inner border that completes the design.  Accuquilt gave each ambassador a cutter and Qube 8" set.  However,  I did purchase the "Angles" companion set as I saw the value in having it for designs I want to make.
There are 48 border units so it was a big help. The border units are made with the angle die "14" from the Qube 8" Corner Companion.  This die makes the sides of the Triangle in a Square block. When you join two of them, they create a 4" by 2" section.  That worked perfectly with my Triangles On a Roll units.
You can see the border units on the far left of the photo.
I used Hobbs Premium Cotton batting for this quilt as I expect it to be used and washed a lot. With this batting I can machine wash and dry the quilt with no worries. I love using Hobbs Batting.

The quilting thread is from Aurifil and was in my July box of goodies that were provided to me from Island Batik and partners.


It is a subtly variegated yellow to white.  It is so subtle that I originally thought it was just yellow.  I realized that it was variegated when I started winding bobbins for quilting.  It worked out fantastically on the quilt.


So now, how about some quilt photos?

Draped on an old fence
After two days of rain, it is amazing how beautiful that blue sky looks.

On the ground in a field

Sunny Skies on the porch steps under skies that are indeed sunny today. 

Full View, taken from the porch with the quilt laid on the ground


The Island Batik fabric, Hobbs batting, Aurifil thread, and the Accuquilt Go! cutter were given to me as an Island Batik Ambassador in consideration for promoting these brands while creating the challenge quilts.

I love using these fine products for creating glorious quilts and quilted items.

I hope you are finding a way to stay creative too. Remember, a few minutes each day will add up to great accomplishments if you are consistent.


I hope you have been following the Island Batik "A Piece Of...." Blog hop.  If not you can find the round up of week two HERE.  You should really be following as there are some wonderful giveaways involved.

Until Next Time,  
Stay Creative 


Comments are welcomed. I will reply when possible. Of course if you are a "No Reply Blogger"- I can not reply. Links in comments will result in the entire comment being deleted.

Monday, August 19, 2019

New Project, A Handy Tip and a Blog Hop Update

As I hate to be behind or late with anything,  I have started on my November Island batik project. I am making a blue and yellow quilt using the SunnySide Up collection along with some of the basics and foundations fabrics. I have made a lot of half square triangle blocks.  The stack below is forty of them.

I made these using Triangles on a Roll. When you are making lots of the same unit this is really fast.
Here is my handy tip: When I am working on a project and making pieces to put into blocks later, I use these cheap inexpensive plastic envelopes from the Dollar store.
It keeps all of my pieces together so they don't get lost in the clutter.  They will hold a lot more than you realize.  This one has 96 half square triangle blocks as well as 48 border sections.

The Blog Hop:
Here is Island Batik blog hop schedule for this week . A different Island Batik Spring 2019 collection is being featured each day. You should visit my fellow Ambassador’s blog hop stops every day to see what beauties have been created with this wonderful fabric.

Monday, August 19th - Petal Pushers

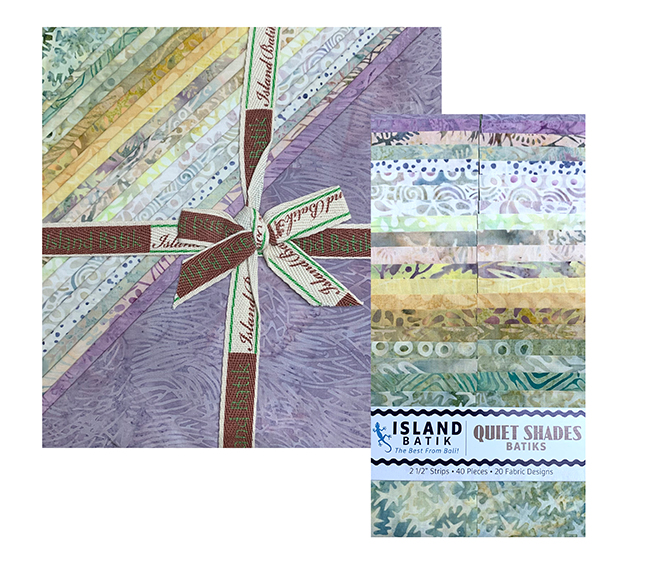
Tuesday, August 20th - Quiet Shades

Wednesday, August 21st - Seedlings


Also you can go to the Island Batik blog post for the end of week two and register for this weeks prize, a bundle of the lovely collection, Quiet Shades.
Until Next Time,  
Stay Creative 

Comments are welcomed. I will reply when possible. Of course if you are a "No Reply Blogger"- I can not reply. Links in comments will result in the entire comment being deleted.

Saturday, March 12, 2011

Scrappy HST become Stars

I have been having some fun today.  We started off with a trip to the grocery store. Since I am at a friend's house, it is a store I don't always get to shop at - it was fun.  I got a few things I can't get at my store. 


Then  we went to the Guatemalan store for a couple of items. I love shopping there. The store has no pretense and the staff is so friendly.  Then we had lunch at a Mexican restaurant that is always good. Items on the menu are not interpreted so it is always fun to go "I wonder what that is?"  The waitress is Latina but she was clearly raised in the USA.  I had to ask about a couple of items.  I got the Huarache. It was a plateful.   YUM!


Then back to the house for some real fun.  I got my plastic box of scraps from scrapbusting with my AccuQuilt GO! cutter(this was round two of scrapbusting.)  
I sewed all of these half-square triangles (HSTs) together. 


Then I sat down and used some of my scrappy HSTs and some 4 1/2" squares and made a scrappy star.  It looks wonky, not because it is, but rather because of the two green points that are medium value rather than dark.  


Won't these make a fun quilt?  I am loving it.  

Monday, March 07, 2011

Scrap Busting

It is amazing how scraps build up when you are a quilter.  Some, rare quilters, are able to throw them away. I am not that type of quilter. Some quilters have bags of scraps hidden away for the "someday" when they will use them to make a scrap quilt. 
Of course they keep buying fabric and collecting yet more scraps. I have been that type of quilter lately.  Early in my quilting I used scraps. People gave me scraps.  Now I have bags of scraps. 


Don't get me wrong, scraps are good.Keep your scraps, but don't SAVE them, bust them!  When I realized that I had to cut extra pieces for the quilt along blocks that I made too short, I made a decision.  I decided to cut some scraps while I had my AccuQuilt GO! set up and the value die was working anyway. 


So, I ironed a couple of scraps and cut some 2.5" squares while I was cutting the half square triangles.  Then, while sewing the pieces for the quilt along block, I used the square to sew on, sew off.  I normally have been using little scraps as "Thread Rats" to keep the points from clogging up when I start a triangle.  


I finished the extra parts of the quilt along block. The iron was still set up, ready to go. The bag of scraps was right beside it.  I decided to iron the entire bag of scraps then cut them up. 


I was surprised at some of the sizes of the "scrap" pieces as I was ironing.  I got my GO! cutter and some dies and put them out. I set up a scrap busting shop.


I started cutting. I cut 2.5" squares and half square triangles.  I cut more half square triangles in 3.5", 4.5" and 6.5".   I cut some quarter square triangles that will make a 4" finished block.  I even cut a few 4.5" squares. 


Here are the finished stacks:

I sat watching a movie and sorted them by lights and darks. There are a LOT of pieces there.  I still have more bags of scraps that need busting.  I will sew the half and quarter square triangles into square blocks.  I will sew the squares into four patches or nine patches.  Eventually I will have a truly scrappy quilt made as "extras" that were sewed in between pieces of other projects.  I won't have to cut the thread, or use a thread rat when I need to take pieces to be ironed, I will just sew a couple of these together and leave it under the presser foot while I go iron.  Then when each one comes out it goes into a stack for that scrappy quilt.  
As an added bonus, those scrap bags will start to diminish. 

How fun is that?


Saturday, August 29, 2009

Half Square Triangle Tutorial

I am going to be ambitious this morning and see if I can write my first tutorial. Here is a method to make half square triangles (HSTs) quick and easy. You use two squares of fabric, sew four seams, cut and press for EIGHT finished HSTs. I confess that I don't know the math to make the exact sizes. I used 10 inch squares and my squares are four and three-quarters inches. (If you make the larger you can trim them down. First cut your fabric squares. Mine are 10 inches. (layer cake - but check them, I had to trim a couple!) Layer two of the face to face. Mark diagonal lines - corner to corner with a pencil or pen, it won't show. Next mark lines across the middles. All of the lines should MEET AND CROSS in the middle. At this point I suggest pinning thru the edges at the side to side and top to bottom lines. ( you do NOT sew on those lines. So the pins will not be in the way.) Sew quarter inch seams using the diagonal lines as your guide. On each side of the line you should have a seam. That will be FOUR seams
Remove pins and iron it flat. Go to the cutting board. Using your ruler for a nice straight cut and following the lines cut your piece into squares first using those side to side and top to bottom lines. Each piece will have two diagonal seam lines.
Now cut each square on the diagonal lines. Chop of the corners. (or if you are hesitant, uncertain etc. you can cut the dog ears off AFTER pressing.) I am brave and chop away. Then just iron them open and you have EIGHT HSTs quick and easy.
When doing small HSTs I prefer to use Thangles (or triangles on a roll) but for larger ones, this is so simple. Let me know if you use this tutorial. And feel free to link to it on your blog if you want.