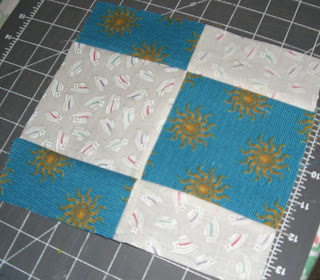
Now my dear quilters, I told you that I could do this block in five seams. Here is how you do it.
Cut four squares of equal size:
Sew them into two sets of two (That is seam one and seam two.)
Sew the twosies together (Seam 3 are you with me so far? That was the "easy part")
Now cut one side in half. (no, I am not choosing for you -- You have to do some of the work yourself -sheesh!)
Move the strip you cut to the other side of the block.
Line up your seams (fabrics right sides together) and sew it back on. (seam four) Are you getting excited yet?
Now you have to decide WHICH block will be the center. Cut the side with the OTHER full block in half.
Move the strip to the other side. Put fabrics right sides together and sew --YES this is seam FIVE!!!!
Iron your block nice and flat, trim off any wonky bits to make it nice and square. AHHH.... now wasn't that easy.
The truth is, I was trying to take a four patch and make something cool like the disappearing nine patch when I discovered this. Now you know why I didn't know the name of the block - and dear hearts, with all your help, I still don't know.
It is a "Puss in a corner, sheep fold, City block, variation on a nine patch" block! Ha ha. Call it whatever you want but do it the easy and fast way!
Cheers my dears!


20 comments:
Thanks Gene... Thats a really cool block... I'm gonna call it "The ol' Farts block" In honor of us ol' farts who quilt!!
I've never known the name of this block, but it's nice simple one that looks really great in a quilt.
Well...since you found such a FUN way to make this block, I am going to call it Gene-a-magic 4-Patch....since you took a 4-patch and....Presto/Change-o......we got a fun block that was easy to make and only required sewing 5 seams. So....to me GENE-A-MAGIC it is!!!
That was brilliant! Very quick and easy--oh & entertaining too, thanks Sharon.
Clever! Thanks for the info!!
Thanks!!!!!!!
for the tutorial..... just found your blog about a week ago......
love it,
xo
eva
Smiling!!!!
Clever...thanks for sharing whatever it is called :)
Ha that's cool!! Thanks!
I like Pat's name for the block! Thanks for the tutorial
Neat and quick block, thanks for the photos!
oh my, you are a genius. WOW, I'll be using this.
Love it! Thanks for sharing the trick!!
Gene, you are my hero!!!! Great job!
This is great. I wasn't quite sure where you were going after seam 3, but the AHA hit me. I can see much potential in this little block. Thanks!
Great tut, I can see lotsa stuff done with this one. Thanks, Gene!
What a cool block...I will definitely use it!
Thanks for the great tutorial!
Micki
Say Gene I agree with Pat. We now have a new
Gene block!! I have noticed that you have won a couple of things here lately. Good for You!! I am leaving all the giveaways up to everyone else. I will blog about them for the givers though.
Go check out my blog I have a new creation in my etsy shop, thanks to you.
What a great tutorial! Thanks for sharing! I'm calling it a Puss in the Corner but only because I think it sounds slightly dirty and I have the sense of humor of a twelve year old boy.
Wow! Interesting method. What a trip with seams. Lots of fun!
Post a Comment