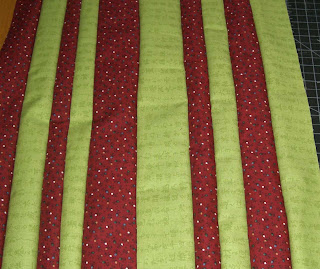
I had a lightbulb moment. So I developed this little tutorial for you.
I used only two colors of fabric, but you could use any multiple of two.
Fat Quarters will work great for this.
First take two pieces of fabric that are the same size and put them right sides together. (If you are using fat quarters you may need to trim just a bit to make them the same size - all fat quarters are NOT created equally.)
Take these to the sewing machine and sew the longer edge together.
The above photo shows the first seam sewn and ready to cut. You cut through both layers of fabric and you will have a two color strip set.Put that strip set aside for a moment.
Keep that edge that is under the ruler together, because you take that one right back to the sewing machine and sew again. Back to the cutting board and cut off another strip set. You can cut your strip sets all the same width or vary the widths for variety.
I like different sizes. A little voice in my head says "Vary the sizes in your art work. You want to have repetition with variety. It makes the piece more interesting for the viewer" That voice was my first art teacher.
Okay, now you have a couple of strip sets cut off AND your larger pieces. Take them all to the machine. The big pieces go first. Sew that long edge again. **note: I am chain piecing here* I leave the very end under the presser foot. The I put those two strip sets together, opposite colors facing each other, and sew them into one piece of four strips...but I leave the end under the foot again.
I snip the thread holding the larger pieces on there and go to the cutting board. I cut off another strip set. Take the big pieces and the strip set back to the machine.
(Have you noticed that you are getting some exercise too- Ha I am trying to make you all healthy!)
Sew the big pieces (which are getting smaller) yes-leave the end under the foot again, then snip off the strip set at the back and sew it to the 2-strip unit you cut last.
Repeat until the "big pieces" have been used up.
Ahhh! Now - have you noticed that we never pressed any seams? Here is how my piece looks at this point.
Now it is time to press those seams all one direction. Since no seams crossed it is not necessary to press before this.
Are you back from pressing? Good. Now we are ready to cut the strip sets into 'piano keys' or 'chinese coins'
Cut them the width you desire. I am doing five inches on these. My strip set is slightly over twenty inches so I will get four sets - perfect for my project (no I am not showing it yet!) Do you see that masking tape on the ruler? Sometimes I find it difficult to see the lines on the ruler so I use the tape to mark it. (that is the tip of the day!)
If you are making a chinese coins quilt you can use this method. Use several pairs of fabric colors and sew all the first seams- then cut all the first strip sets.Sew all the big pieces again, but then sew all the first strip sets together.
I hope this wasn't too confusing. It is really easy to do. And it is fast (especially when you don't stop to take pictures.) I found it much easier and faster than cutting a lot of strips and joining them one at a time.


9 comments:
Great idea, Gene. Thanks for sharing!
Great idea Gene! I like to make piano key borders (for now at least) and coin quilts are fun too.
Cool!! Thanks!
I love finding a simple way of doing things. Thanks for the great idea.
Love it, thanks!!
Actually, I have done it that way and it never occurred to me that others might NOT be doing it that way!!! I guess great minds think alike!!! LOL
Great Tutorial Gene :) I'll tell you that I made a quilt last winter similar to your method, but I never made the first cuts. I just sewed several seams down the "fabric sandwich" and after sewing several lines, then I went to the cutting mat and made the cuts, 1/4" away from each seam. It seems ridiculous when you do it, but it makes sense after you make the cuts. Super fast and really fun if you're just playing around like I was.
Thanks for the tut, I'd never have thought to do it that way!
Great tutorial Gene. I'm sure you've seen it before but Omnigrid makes a neon tape you can use that's easily removed from your rulers without leaving any sticky residue. And if you're doing different cuts on one project, they make it in a bunch of different colors.
http://www.amazon.com/Omnigrid-Glow-line-Highlighting-Shapes-Rulers/dp/B005573N16/ref=sr_1_fkmr0_2?s=arts-crafts&ie=UTF8&qid=1328645902&sr=1-2-fkmr0
Also, I've seen many use that painters tape too because it also leaves no sticky residue the way masking tape can.
Post a Comment