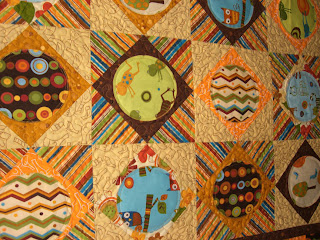
Do you have UFOs at your house? I have several. I remember that I had this one and it definitely needs to be finished for my big sale in November. This quilt was a quilt-along top in a Layer Cake quilt along. I worked as a designer and designed one of the blocks.
Tonight (after my day job!) I pulled out this top, some quilt back muslin and some Warm and White batting and got started. I pressed the muslin and the top first. Then I started layering. I used my infamous hair spray basting spray. But since this is a larger lap quilt, I also added some pin basting.
Here it is all layered and basted.
Don't you love that ziggy-zaggedy border? I used my Accuquilt GO and the parallelogram die and a matching sized triangle die to make it. Which block did I design? Look at the second row down -middle block. I think I have the pdf I wrote for that block if you want it.
Might take me a couple of days to find it though.
For the pin basting, I just used my sewing pins and some of those soft earplugs to anchor them so I don't stick myself.
Here is a closeup.
I don't know if you can see them - there are four in this picture but I can only see three. I got the purple ones because they were on sale - and they show up pretty well on most things. I put the pins in about every 12 inches. With the spray basting, I think that will be plenty.
For now it is rolled up and ready to be quilted.
Oh yes, that little art quilt I made - well I sold it the first day. I took it to show some co-workers and one of them bought it for her bedroom. She was all excited about it. I know it will have a great home.
So how many UFOs do you have? Or are you like me and totally uncertain, but know there are some?
Wednesday, August 31, 2011
Sunday, August 28, 2011
660 - Quilting, Binding and Dyeing
Let me start off by saying that this is my 660th post. I truly cannot believe that I have written that many blog posts. But that is what Blogger tells me.
I have had hits from all over the USA, Canada, Italy, Poland, Germany, Australia, the United Kingdom (England , Ireland and Wales that I know of), American Samoa, South Africa, India, the Netherlands, France and Spain. If your country wasn't listed PLEASE leave a comment and let me know. **edit** Thanks to Maree for reminding me that I get visitors (like Maree) from New Zealand.
I finally got my little art quilt quilted and bound.
This is shown draped over a chair back so it looks wonkier than it really is. I still need to add a hanging sleeve. (P.S. I love it! but it will go up for sale.)
I have resisted attempting to dye fabric because I thought it would be too messy and I just don't have a place to do it. But I had bought some "super muslin" which is thicker than regular muslin. I washed it with a small amount of detergent to remove any sizing. I was planning to use acrylic inks to dye it and thinned paint to stamp designs on it.
Enter the muse!
I saw some liquid Rit dye on the shelf when I was shopping. So I picked two bottles- purple and wine colors. I knew they would blend well and not make "muddy brown/gray."
I also got some cheap plastic containers to put the dye in when I immerse the fabric.
I did some wrapping and tying of the fabrics and these are my resulting fabrics.
I will be doing this some more. I will be buying more colors of dye also. Just what I needed (sigh) another hobby.
I also kept the Color Catcher sheets as I saw on someone's blog that she uses them in art quilts. The two I used in this are a lovely dark lavender I should have taken a picture!
Saturday, August 27, 2011
Office and Factory Fun
As I mentioned in my last post, I got an opportunity to fly out to Nebraska and visit AccuQuilt headquarters. I am sure some of you remember the Barn Quilt contest and unveiling. They still have the Winner and runner up displayed on the building.
The "bike" in the lower right belongs to Tim the Harley Quilter - CFO of AccuQuilt.
There are lots of quilts inside the office area. Just look:
There were more, but I didnt' get to take pictures of them all.
I met some nice people too. Carolyn and Tim were in the hallway.
Steve Nabity was smiling as he showed me the quilt he made. (look on the floor behind him - I do believe I see a GO! cutter. )
And outside I saw Lee Nakamoto and Tim - the Harley Quilter - someone (not me!) had left Tim a surprise on his bike. Lee apparently thought it was pretty funny!
It was....some lady left a lipstick kiss on his mirror. So he puckered up for an "onscreen kiss"
I don't know if you can see the lipstick in the mirror...but trust me it is there.
I had fun! I also saw inside the factory but I was too busy looking to take any pictures. Silly me!
Thursday, August 25, 2011
Nebraska, Birds and Flowers?
What a week this has been! I had an opportunity to fly to Nebraska on Monday. What is in Nebraska? you say. Well it happens to be home to a product I use a lot. The AccuQuilt company is based in Fremont, NE. So I got to take a tour of the company and met some wonderful people there. I met everyone from the secretaries, to customer service, to IT (information technology -aka computer) folks, to the CEO and CFO of the company and others. Today's post will not have pictures from that tour or even from the Nebraska trip. (Yes this part is a teaser for a future post.)
While I was gone I did get a new die for my Go! cutter. I got the cute little GO! bird. I told a dear friend about it and she asked if I would put fusible on some scraps and cut some birds for her. You bet I would!
I told you that they are cute! If you fold the fabric so that part is face up and part is face down, you get birds that face both directions.
So after I cut these I said, now what to do with the scraps. Good fabric, good fusible - I am NOT throwing it away.
Here are what the pieces looked like.
There are some nice pieces left. So I said "What die has smaller pieces that I can layer these over and get extra play pieces from?"
Oooh...the Daisy die is a sure winner for that.
Kinda ignore my sloppy outlining of the shapes on the daisy die.
I also had some purple batik scraps with fusible. So I cut these pieces.
Circles and petals - which may become something else altogether once I start playing fabric artist. Some of the petals are not perfect as the pieces didn't quite cover the shapes. Guess what- all leaves and petals in nature aren't perfect either!
There was one larger piece of blue left. But I saw possibilities if I didn't cut it with the die -so for now it looks like this. I drew some wobbly lines on it with the photo editor.
The black outline could be a head and torso. The aqua outline could be an urn or vase. So I will see if that plays into my plans when I start putting the "puzzles" together. I am leaving the option open.
There were some other small scraps too. I suppose most people would throw them in the trash. But I used some very small pieces on the last fused piece I did. So I am saving these:
I already see some little blue tree branches....
Reminder - stay open to creativity. Look for unexpected shapes that delight your eyes. Play! Create! Love life!
Oh yes...don't forget to sign up for AccuQuilt emails and get 22 free patterns. Click the picture below
Sunday, August 21, 2011
Start Me Up
The play with the fusible applique cat has sparked an idea. A while back, I read a book Simply Stunning Woven Quilts by Anna Faustino. I kept thinking that I would try the techniques in the book -but I never did.
Since the play sparked my "why not just try it" mode, I took some batik fabric and tried it my way. I did not reference the book at all since, although I own it, it wasn't close at hand.
I put fusible on two pieces of fabric, then did the cutting and weaving. Then I fused it all to a piece of cotton batting.
Wanna see? Of course you do.
Woven Batik Background |
This will be the start of a fun applique piece. I plan to redo the Silly Play Saturday cat design. However, I will make it a bit more fun and whimsical. Several people thought the yellow cloud was blonde hair - those comments inspired me. Thank you! Your comments mean more than you know at times. And you never know, I might do a giveaway based on comments made in the past!
Did you do anything fun this weekend? Oh, and what do you think of the woven background?
If you don't hear from me for a couple of days - fear not - something fun is going to be going on. (((grin))) I will tell you later!
Posted by
Gene Black
at
6:48 PM
15 comments:
Labels:
art,
cat,
fusible,
fusing fun,
play,
quilting,
weaving
Saturday, August 20, 2011
Silly Play Saturday - Lessons Learned
Sometimes it is great to just play. So for fun - to let my inner child play - I took some fusible web and a few pieces of scrap that I thought would probably never be used and played.
I fused the scraps to a piece of Wonder Under (double sided fusible) and let it cool. *Lesson1: it is easier to fuse a full piece of fabric than it is loose pieces.
Then I sat down with my scissors and started cutting. I tried to do a circle - not exactly round *Lesson 2: for perfect circles use the AccuQuilt GO! cutter and the circle die.
Hmm... this not so round circle reminds me of a cat - a particular storybook cat.
I cut more pieces and made more mistakes *Lesson 3: making mistakes is a part of learning.
I put together a silly storybook picture and took it (carefully) back to the ironing board. I fused it. See how silly:
The yellow cloud behind his head is just there to add contrast.
Laura Wasilowski suggests always using hand dyed fabric. I didn't have any in the scraps I was using. Had I had some for the background, here is what it may have looked like:
It would definitely have made an improvement. (and the yellow cloud would have been totally unnecessary!) Maybe I will keep this piece and try using paint and textile medium to "dye" the background.
Do you ever just play? If you do, good for you. If you don't, you should try it. It opens doors in your creative mind.
Fabric designs
Fabric designs, a photo by GeneBlack on Flickr.
Also please ask all your friends to vote.
Thanks
Friday, August 19, 2011
Summer Camp and Quilting
Have you ever been to summer camp? I remember going to a church summer camp as a child. We had lots of fun and met interesting people. So, for me, camp is a good memory.
If I said "Accuquilt, Fons & Porter and Fabric.com" what would you think of? Summer camp? Okay maybe not.
However, there is something fun coming happening starting today.
Those three companies are hosting Camp Quiltalong. Now that sounds like a camp I would like! And there are prizes available in the Camp Quiltalong Prize Giveaway.
So join in some campfire fun for a chance to win great prizes totaling over $1500! Fons & Porter, Fabric.com, and AccuQuilt have teamed up to provide us all with a huge giveaway on Facebook.
Simply “Like” these Facebook pages and gain access to all three sections of a secret code that unlock your chance to win! Follow the camp trail on the bottom of each sponsor’s page and it will take you to the next campground to retrieve the next section of code. Once you’ve captured all three pieces of the secret code, go to www.accuquilt.com/indianblocks and enter the full code to register to win! Your summer camping trip begins at AccuQuilt, so get GO!-ing at http://www.facebook.com/accuquilt?sk=wall#!/accuquilt?sk=app_10467688569
I have to tell you that I already "like" two of those three companies on FaceBook. Now I am off to "like" Fons and Porter (I didn't know they were on FaceBook) so I can get entered. I love prizes!
Let's go Camping!
Thursday, August 18, 2011
Faster and Easier
I cut all of these while watching part of a movie.
Don't think it looks like much?
Look again with the stack I cut the slow way.
The "little" stack in the front took over 30 minutes to cut with the rotary cutter- and I had to pay close attention. See how many more I cut with the AccuQuilt 2" square die. It cuts six at a time and up to six layers at a time.
Yes, there are almost 200 squares in the back stack. - I confess that I haven't counted the small stack. I need to add a few more color values, but I am well on my way to another watercolor project.
Now that is the way to GO!
Monday, August 15, 2011
Help! I need somebody, HELP!
Yes, that is a Beatle's song from my, ahem, childhood.
I need two kinds of help. For one of them, I am calling in the professional.
I started cutting some more 2" squares for doing more watercolor quilts like my "Monet Garden" that you have seen in stages. Fortunately, I won those 2" squares. But now that I am hooked on the technique, I have to cut them myself. I cut from scraps for about 20-30 minutes. (I wish I had timed it!) This is what I got from my work:
Yes that is all I got cut in that time. I do like precision cuts. So I decided to stop cutting the hard way. I sat at my computer and ordered the AccuQuilt GO! 2" square die. It will cut six squares at a time and up to six layers. That is 36 squares cut in a couple of minutes. Hmmm... Yes it is worth it to call in the professional. I will get the die in a few days and I can cut the squares quickly.
Now for the help I need from you, my wonderful readers. A while back one of my dear friends sent me a link to Connecting Threads. They had an open call for fabric designers. I have been wanting to design a line of fabric for quite some time now. I submitted several designs. Today (Monday the 15th) I got the email saying that voting is open. I checked and found three of my designs in the running. You can help me to win by going to vote for my designs at the website.
Here are my three designs:
I had two other designs that I submitted, which were not put in the running. My opinion is that those were better than these three.
The good news is that you can vote for all three of them if you wish. (I would love it if you did.)
The "bad" news is that there is some really good competition out there.
So as the Beatles sang, "won't you ple-e-ease - Help Me!" and vote for my designs.
I need two kinds of help. For one of them, I am calling in the professional.
I started cutting some more 2" squares for doing more watercolor quilts like my "Monet Garden" that you have seen in stages. Fortunately, I won those 2" squares. But now that I am hooked on the technique, I have to cut them myself. I cut from scraps for about 20-30 minutes. (I wish I had timed it!) This is what I got from my work:
Yes that is all I got cut in that time. I do like precision cuts. So I decided to stop cutting the hard way. I sat at my computer and ordered the AccuQuilt GO! 2" square die. It will cut six squares at a time and up to six layers. That is 36 squares cut in a couple of minutes. Hmmm... Yes it is worth it to call in the professional. I will get the die in a few days and I can cut the squares quickly.
Now for the help I need from you, my wonderful readers. A while back one of my dear friends sent me a link to Connecting Threads. They had an open call for fabric designers. I have been wanting to design a line of fabric for quite some time now. I submitted several designs. Today (Monday the 15th) I got the email saying that voting is open. I checked and found three of my designs in the running. You can help me to win by going to vote for my designs at the website.
Here are my three designs:
The good news is that you can vote for all three of them if you wish. (I would love it if you did.)
The "bad" news is that there is some really good competition out there.
So as the Beatles sang, "won't you ple-e-ease - Help Me!" and vote for my designs.
Flutter by my Butterflies
The most comments on the previous post said to add the butterflies. So I did some more fusible applique to make the butterflies. They seemed to get lost in the design more than I liked, so I went multimedia on this piece.
I took the piece to my painting area and got paint and fabric medium. I used the paint to change the color and tones of the butterflies. What you can't see in the picture is that I added some paint that shimmers and sparkles in with the colored paint. This will be a fun wall hanging.
Now, all I need to do is back it, quilt it and add a hanging sleeve.
I took the piece to my painting area and got paint and fabric medium. I used the paint to change the color and tones of the butterflies. What you can't see in the picture is that I added some paint that shimmers and sparkles in with the colored paint. This will be a fun wall hanging.
Monet's Garden with flowers and butterflies. |
Posted by
Gene Black
at
1:43 AM
10 comments:
Labels:
applique,
art,
flower,
fusible,
Go Cutter,
quilt,
wallhanging,
watercolor
Saturday, August 13, 2011
Adding Flowers to a Quilty Garden
On a previous post, I asked if I should add applique to the Monet's Quilt Garden project. Since the answers were not decisive, and I had this new GO! Daisy die, and since I had seen where Laura "Artfabrik" Wasilowski used the die creatively - well what else could I do? I couldn't resist the challenge. So I took the die and cut pieces.
I cut pieces from green for leaves and from a yellow to orange hand-dye fabric for petals. I also cut some small bias strips for stems freehand. Here is my creation:
(yes I did fusible applique!)
Aren't those little flowers adorable. You knew I wouldn't make daisies with the daisy die, didn't you?
New Question - do you think some butterflies or birds in the sky would add to it?
Tuesday, August 09, 2011
Another Jam
The figs are still producing so I haven't had time to do anything but make jam to use them up.
Yesterday evening I made some "orange marmalade" fig jam. For that I used orange jello and some added real orange flavoring. Oddly I only got four jars out of that batch.
Tonight I got more daring. I used lemon jello, the juice of two limes, some lemon flavoring and some powered ginger. So these will be lemon ginger fig jam. This made six jars and there was some left over that I put in a container to use right away.
Pictures:
Cooking it down |
Cooking it down |
Cooking it down |
Boiling water bath |
And finally:
All sealed up- Lemon Ginger Fig Jam
(and yes it is tasty! I had to "clean" the pan!)
Subscribe to:
Posts (Atom)