Tuesday, September 29, 2020

More EQ Playtime

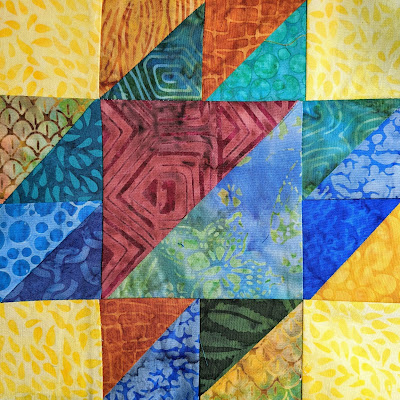
The medallion quilt,  that uses the same block design as my current quilt, kept playing in my brain.  I wanted to add rows to the top and bottom, but I didn't want to recreate the entire quilt.  As I was making a batch of yogurt, an idea popped in my head.   Why not use the borders option in a creative way?  
So I did.  
The way I did it was to add another set of borders. Then I changed the size of the side borders to "0" inches. I set the border option as blocks and adjusted the number of blocks to make them square-ish. 

This inspired me to try using the center block for the border blocks also.
These two options really add to the versatility of the design. I know that many quilters don't care to make square quilts as they are less useful.  I am one of those quilters. 

Finding a way to adapt this quilt makes me very happy.  Which version do you like best?


Until Next Time,  
Stay Creative 


Comments are welcomed. I will reply when possible. Of course if you are a "No Reply Blogger"- I can not reply. Links in comments will result in the entire comment being deleted.

Sunday, September 27, 2020

A Bit of Doodle

A small "failed" old painting start.  
A Uniball Signo pen.  
A set of gray to black markers.  
A little relaxing playtime. 

Mix together well with a soupçon of imagination.

Enjoy!


P.S.  The caulking is finished. It looks better than before.  I am happy with it. 

Until Next Time,  
Stay Creative 


Comments are welcomed. I will reply when possible. Of course if you are a "No Reply Blogger"- I can not reply. Links in comments will result in the entire comment being deleted.

Saturday, September 26, 2020

A Correction - and then Playtime

A Left-Handed Quilter kept telling me that one block in my layout was turned wrong.  I kept arguing - and then I saw it.  Doggoneit! She was right.   
I opened Electric Quilt and changed the block orientation so that it was what I originally intended. 

But as EQ was already open and running, I was tempted to play.  To be honest, my old bones are sore after the caulking work.  Sitting in this chair - quiet and still - it feels good. 

I made a new layout that is completely different.  I think of this one as a medallion type quilt. 


While the blocks are all almost the same, the center block has a solid center and uses purple. There are four blocks that do not use the blue cornerstones (they have yellow instead.)  I really like this one, but I doubt that I will actually make it.  With 8" finished blocks it comes in at about 50" square, I think.  To make it longer, it would be simple to make a couple of rows of 4 patch blocks  to put outside the purple borders on the top and bottom, then just extend the outer border.
If anyone wants to make it, it is all simple squares and half-square triangle units. All I ask is that you give me credit for the design and send me a picture of your finished quilt or quilt top. 

Until Next Time,  
Stay Creative 


Comments are welcomed. I will reply when possible. Of course if you are a "No Reply Blogger"- I can not reply. Links in comments will result in the entire comment being deleted.

Friday, September 25, 2020

Prep for Caulking

Whew! When I decided to caulk my tub,  I thought the hard part would be applying the caulk.  I did the front, where the frame for the shower doors connects first. Doing that, I found out that getting out the old caulk is probably the harder job.  Once that was out,  taping the area and applying the caulk was much easier.  The bathroom is a mess so there will be no photos of it.  

Next up I  started removing all the old caulk from rest of the tub.  It was much worse.  I had to take several breaks.  Then I found a place where the previous owner (ages ago) had fixed a hole - of course that broke off and I had to repair that again.   Now everything is done except taping the rest of it and applying the caulk to the rest of it.  This old man was too tired to finish it on Friday.  Sometime Saturday, I will do that part. Meanwhile, I will have to take a "sink bath" in the morning.  LOL, I haven't done that in years.  I will miss the hot shower in the morning.  

Here is some "eye candy" for you today.  Hopefully I will have some time to paint or doodle something new soon. 
This strange landscape with the moon reflecting a bit unnaturally is simply titled "Herewith." 

Oh yes, I did change the layout for the HST quilt I am working on.  Here is that also. I doubt you will see much difference, but I think it is more symmetrical now. 

(edit- I flipped the photo after A Left-Handed Quilter's comment)


Until Next Time,  
Stay Creative 


Comments are welcomed. I will reply when possible. Of course if you are a "No Reply Blogger"- I can not reply. Links in comments will result in the entire comment being deleted.

Thursday, September 24, 2020

Another Doodle

While I am making a few quilt blocks a day,  I am also doing other things.  Tomorrow, I hope to re-caulk my bathtub.  This will be a new experience for me.   But I watched some videos and read lots of "helpful hints."  Hopefully, I will be successful.  

Wednesday evening while winding down a bit,  I pulled out a watercolor background piece that I painted while doing laundry.  I can do that because there backgrounds are loose, free and totally unplanned.  The color says "use me now" and I do.  I love watching the colors mingle and form new colors in places while other places maintain color purity. 

Here is the doodle

The colors led me to create the  wonky "rectangular" frame. I just followed along. 
Then I saw the hat there so I drew it in.  Next thing I knew this man had walked 
into my painting.  I just let the muse keep suggesting things to try.
And I tried them, adding lines and circles and shapes until it got to this point. 
I may trim away part of the top, but that is undecided right now.  
I did go ahead and sign it because I am pretty sure I don't need to add anything else. 

I think I need to do some more backgrounds. I am really enjoying these doodles.

Until Next Time,  
Stay Creative 


Comments are welcomed. I will reply when possible. Of course if you are a "No Reply Blogger"- I can not reply. Links in comments will result in the entire comment being deleted.

Wednesday, September 23, 2020

Doodling on a Watercolor Start

I decided to stop weaving, sewing, and messing about on the computer for a while.  To give myself something to do, I took an "Art Break."   I had a couple of what I call "starts" that I had put some abstract color designs down with watercolor.  I took one of those and a black pen and started doodling over the colors.   

It was amazing how quickly I got into the fun of just playing on the piece with a black pen.  Then I grabbed a black brush pen and did some tweaking.  Suddenly, I didn't know what to do next. I stopped there and just looked at it for a while. 


I liked it like that but I wasn' thrilled with it.  Then after an "overnight reprieve,"  I decided to try cropping out some of the outer edges.  Ah, there it is!  Now it makes me happy.  I put it in small frame with a mat around it.  Here is the final result, although after this photo, I did remember to sign it before I finalized the framing. 
In this case, I think that cropping away the "extra" left the essential part, the essence, of the piece.  
It is abstract but it certainly doesn't feel "non-representational" - I just don't know exactly what it is.
Perhaps it is an angel on a precipice weeping into its wing. 


Until Next Time,  
Stay Creative 


Comments are welcomed. I will reply when possible. Of course if you are a "No Reply Blogger"- I can not reply. Links in comments will result in the entire comment being deleted.

Tuesday, September 22, 2020

Dyed and Gone to Heaven

A few days ago, I decided to make a warp for my loom,  using white and gray threads.  Most of you are thinking "white and gray?  That doesn't sound like Gene at all!"

And you would be correct.  But you see, I had a plan for that warp.  Once it was put together and securely tied, I took it to the dye chamber.  I mixed up three colors of dye and started.  The colors chosen- Chinese Red,  Golden Yellow, and Razzle Dazzle ( a red violet mixed dye.)  I also grabbed a couple of dishtowels and a discolored t-shirt.  (In case there was extra dye.)  First the three colors were applied to the warp, then the remaining dye went on the other three items.  Hmmm.... not enough dye to cover everything - time to punt!  I took the jar that I mixed the Razzle Dazzle dye in and added more of the soda ash water.  Then I grabbed the turquoise dye  and added some it it.  Turquoise is a pure dye color and I am pretty sure it is one of the components of the Razzle Dazzle.  Thus a safe bet to mix them. There was very little Razzle Dazzle left in the jar anyway.  

I finished adding dye solution to the other items and saw that I had leftover.  Hmmm....there is a bit of "blank space" on the warp yet - throw it in! 

I never expected the wonderful result I got with this warp.  When I rinsed the dye off in the first rinsing, I was amazed. Honestly I was afraid that beauty would not last  through the rinsing cycle.  But it did.  

Monday, as I was putting the (finally dry) warp on the loom, I was joyous.  Here is what I was seeing. 
Reds, yellows, oranges, blues purples, pinks, bits of green - a full rainbow - a plethora of colors.   I began to imagine the possibilities when I started weaving it.   

Once it was on the loom,  I chose a simple black thread to start the weaving.  (Quilters, take a moment - what happens when you use bright colors with a black background?)  Yes!  The colors pop even more!  This picture does NOT do it justice. 

It glows so much more than this photo can show.  It reminds me of photos I have seen of the Northern Lights, something I want to see one day in person.  Some of these cotton threads are mercerized which means that they take dye really well - AND- that they have a lovely shine.   
For right now, I am planning to weave in mostly dark colors that will accentuate that brilliance. 

A little further along and this section is making me happy too.

Meanwhile, the painted lady is stalled at this point:

And I did another little watercolor/doodle floral that is about 5 x 7 inches.


Until Next Time,  
Stay Creative 


Comments are welcomed. I will reply when possible. Of course if you are a "No Reply Blogger"- I can not reply. Links in comments will result in the entire comment being deleted.

Saturday, September 19, 2020

Paint Play

Someone asked to see the "mess" that I created with the watercolor.  So here is the disaster. It really is a mess. 
After painting the watercolor background, I used a gold watercolor paint that I made with a Jacquard gold powder and some gum arabic that I bought for use with watercolor.  Gum Arabic is the "glue" that holds watercolor pigment on the page.   However, my flowers are boring and dull even in gold. 

Here is a great tip. When you have made a complete mess, it is the perfect time to experiment.  Having watched videos where the artist doodles all over her watercolors, I thought "why not? I can't hurt this one."  I thought that at worst, it is a piece of paper that can go in the trash can. 

So I doodled.


It isn't great art, but it is a lot more fun now. And it is no longer destined for the trash can.  I can use it as the front of a card when an appropriate birthday rolls around

Until Next Time,  
Stay Creative 


Comments are welcomed. I will reply when possible. Of course if you are a "No Reply Blogger"- I can not reply. Links in comments will result in the entire comment being deleted.

Friday, September 18, 2020

The HST Quilt Plan

After sewing a lot of 2" finished half-square triangles,  I finally sat down with Electric Quilt and made a plan.   I decided to add some 4" finished half-square triangles to the mix as well as some 2" plain squares. 

Sometimes I get completely lost playing with the possibilities in Electric Quilt.  But I had seen a block that I liked. So I pulled that one up - and then - of course - I changed it.  I only changed it to make the design work out better.   
Here is my final design (maybe - always subject to change - ha ha.) 

Looking at it again, I am thinking.....I have a lot more 4" half-square triangles to sew.  The outer section was originally designed as pinwheel blocks, but changing the inner part to red really added a lot of pop to the design. 

Half of the center 4"  half-square triangles for the blocks are sewn.  And the first block is sewn also. 
My blocks will be more scrappy than the design show above because the small half-square triangles are made from a 2 1/2" strip package. 
I am thinking and hoping that it will look great when it is finished. 

But right now, I am going to play with some watercolor paint and see what interesting "mess" I can create with it. 

Until Next Time,  
Stay Creative 


Comments are welcomed. I will reply when possible. Of course if you are a "No Reply Blogger"- I can not reply. Links in comments will result in the entire comment being deleted.

Wednesday, September 16, 2020

The Painted Ladies

I had told you that I was going to paint a "new version" of the monochromatic watercolor sketch that I showed in the last post.   
My decision was to start with an acrylic version.  First let me say that it is certainly not finished.  But the idea is roughed in enough to show, I think.   I am feeling pretty good about her so far.  I may be using some non-traditional colors in this painting but that is my "wild artist" side showing through.  Here she is at this point.

She reminds me of someone - perhaps one of my cousins.  I still have a lot of work to get her face where I want it to be.  There is always a risk of messing it up completely since I am not a portrait painter.  But, this is just for fun, so I am going to continue.  

Several years ago, I did a very non-traditional "portrait."  There was no model to work from, just an idea in my head.  I used lots of unconventional color choices.  But I really liked the outcome.  I have her framed but I don't have her hanging in my house.  Maybe one day.....
Here she is for you to see. 

It so happens that she reminds me of Ann Wilson from the musical group Heart. Ann is the black-haired sister in the group and usually the lead vocalist.    
This was painted over an abstract background so there is some interesting patterning on her face.  That also accounts for some of the odd shifts in light in the painting.  I think it just makes it more interesting.  

Looking at both of them I see something interesting.  I apparently like pink hair and blue eyes. Ha ha.  But remember, the first one is still in progress, so that could all change on her. (but I promise I won't give her green eyebrows like the second one has.)

An order arrived in the mail today from "The ScissorMan" - aka Famore Cutlery.   As I was looking at the mail, I saw the back of the mailer.  
Such a simple thing - it is hand-written with a marker.  That is the delight of dealing with a small seller. It cost so little to do that, but the time and thought make it special.  More than "Thank You" -it says "we are glad you shopped with us. We hope you come back and tell all your friends."  
So I am telling all of you.  A few days ago they posted a discount code SHARP2020 on Facebook.  The owner of the company said that I can share that code with you. So go over to Famore Cutlery and treat yourself to something.  As Brint, the ScissorMan says "Stay Sharp." 


Until Next Time,  
Stay Creative 


Comments are welcomed. I will reply when possible. Of course if you are a "No Reply Blogger"- I can not reply. Links in comments will result in the entire comment being deleted.

Tuesday, September 15, 2020

More Watercolor

While I am still steadily piecing the half-square triangles, the photos of those don't make for an exciting post.   

The other thing I am diligently working on is painting with watercolor and watercolor pencils.  Since A Left-Handed Quilter posted that she was learning from the "General's Watercolor Pencil Kit" - I bought one of those kits also.  Here are the last two pieces that I worked.  
The purple flower looked harder to me than the tulip.  But it was first in the book.  So I did it first.  
The practice sheets have the outlines already drawn for you.  I think I would prefer to draw them in with the color I will be using so that they disappear.  But I am using the book as written. 
You may notice that I don't always color "inside the lines." 


The tulip was more of a lesson on developing tonal variations.  I am finding it a bit harder to do with the pencils. But I am getting there.  

Meanwhile, I watched a video  that showed how the artist was lifting out color on a "failed" painting to re-create it.   As I watched I got a bit excited.   In my print rack, I had just seen an old piece that I painted as a practice sketch in a watercolor class years ago.  Because we painted these very quickly and only to develop a feel for painting people, it was quite blotchy and had lots of hard lines.  There was also not a lot of delicate tonal properties. I pulled it out and played with lifting out some of the color and also using the technique to move some of the color around. I have no idea what color was originally used, so I can't just grab a tube of it and add more paint.  

It is still blotchy but I see a possibility of using it as a model for a new painting. 

I see lots of things that could stand correction, such as the lips. But I also see possibilities.  The big question is this: When I start painting the new portrait, what medium will I use?  Watercolor, watercolor pencils or perhaps acrylic?   

Time will tell.

Until Next Time,  
Stay Creative 


Comments are welcomed. I will reply when possible. Of course if you are a "No Reply Blogger"- I can not reply. Links in comments will result in the entire comment being deleted.

Monday, September 14, 2020

Some Quilt Piecing and some Painting Experiments

Saturday afternoon, I sewed a lot of half square triangles using the Thangles.  For those who are curious: No, I don't have a plan.  I am just sewing up a bunch and then I will play with ideas.  There are many ways to approach the creative process. 
Here are the first ones that have been pressed and had the papers removed. 

And then there is this stack, that I was working on when the phone started ringing. I had four phone calls from various people for various things.  So I left these sitting and did what needed done. They are still in this stack as I write this. 

Sunday morning was painting play time.  Painting something simple is a great time to meditate and just let go.   But first, let me mention that Saturday afternoon I had an idea.  What if?  What if I took a piece of the watercolor paper and put a layer of iridescent acrylic over it before I painted the watercolor flowers?  Would the paint even stick?  I painted the piece of paper and left it to dry overnight.  

Back to Sunday morning!  I got the watercolors and the pre-painted paper and sat down to play.  The paint acts very different on the painted surface (hint: it isn't fun!)  But I painted it anyway just to see. 
I suppose it is okay, but I don't love it. 

Then I thought "What if.... I painted the flowers with acrylic paint? How would that work?" You know I had to try it. 
It is much more difficult to keep those edges soft.  Also, the acrylic dries pretty quickly. The initial do will have a hard outline if you leave it for very long.  I managed to hide it pretty well on this one. But let me try again. 
I decided to put a dot and pull out the petal before adding another dot. It worked better but it is still almost impossible to get the edges as soft as you can with watercolor. 

This was a fun experiment.  These will at least be okay for the front of a card to send or give someone.

My rule of creativity is this:  Try it, if it doesn't work -fine you learned what doesn't work.  If it works, even better.  Failure is only true failure if you don't learn from it. 


Until Next Time,  
Stay Creative 


Comments are welcomed. I will reply when possible. Of course if you are a "No Reply Blogger"- I can not reply. Links in comments will result in the entire comment being deleted.

Saturday, September 12, 2020

A Little Quilt Piecing, A Little Painting

Since I have so many hobbies, projects, ideas, etc., I am trying to do a little of all of them.  When one skill lies fallow,  our proficiency starts to fade.  Sadly, since we are no longer doing our self-taught live Spanish class, I see regression in my Spanish skills.  (the common phrase "use it or lose it" comes to mind.

I pulled out some lovely Island Batik precut strips and some Thangles to play with. I found the Thangles in a drawer while I was looking for an art supply.  How did they get there???
Those fabric colors are so rich and happy.  I can use some extra happy.  For the Thangles, you need the strips to be 1/2" wider than the size of the triangles.  For the 2" triangles, the 2 1/2" strips are perfect.   And with batiks there is no wrong side of the fabric. 

I set up and started sewing the first strip.  Hmmm...this will be "start/stop" continuously.  I don't like that.  Quickly setting up three more sets, I started chain piecing them.
That is a much more efficient way of doing this.   Once I had several sets sewn, I started cutting them apart.  For this, I am using my scissors.  If the units were bigger I would use the rotary cutter for the horizontal lines,  but I can manage a straight two and a half inch cut.  But, you can always use your scissors for the seam line. The seam doesn't have to be exact because the unit takes care of that.
FYI, now is the time to cut off the one dog-ear from each unit.
The other is already gone thanks to the way these work up. 

But, speaking of seams, here is a lesson I learned.   When you are setting up the strips to sew, put the lighter fabric against the paper. Once you iron the seam open, it is much easier then to tear off the paper without disturbing the nice flat pressing you did.
As you can see, where the paper is against the light color and pressed to the dark,  all of the paper is exposed.  When the paper is against the dark fabric, the "tear line" is hiding in the seam. 

Now for the painting for today.  My friend at A Left-Handed Quilter, posted her method for doing the "easy water color flowers" with watercolor pencils.  I had to try it.

I suppose I should tell you that I used watercolor paint for the centers. It was just easier that way. But I love the way these came out.   For the "gold dots" I used a gold sharpie that I found while looking for a white pen. I found two white pens - completely dried out.  So the white is gouache paint (a type of watercolor that is not transparent.)
And I signed this with paint on a very small - size 0 - sable brush that I already had from years ago.


Until Next Time,  
Stay Creative 


Comments are welcomed. I will reply when possible. Of course if you are a "No Reply Blogger"- I can not reply. Links in comments will result in the entire comment being deleted.

Thursday, September 10, 2020

Non-Representational Watercolor

Of course some of you will say "abstract" instead of "non-representational."  But there is a slight difference.  A true abstract uses some real physical object as the beginnings and stretches or mutates the shapes to make it abstract.  For example think of some of the faces by Picasso. You can tell they are meant to be people but maybe both eyes are on one side of the face.  

Non-Representational does not have a basis in a real object.  Instead they are painted using some other construct. Sometimes, that is simply a design format.  Other times, it may be a play on a particular color. 

For this one I started with three colors as the basis of the painting.  As it progressed I added two more. 

The original three colors were blue, green and purple.  The bright pink and yellow ochre were added later because it seemed to need them. 

I have no idea what I will do with this.  It may just be what it is. Or I may do something else to it or with it.   In any case, I had fun.  And isn't that the point?
Until Next Time,  
Stay Creative 


Comments are welcomed. I will reply when possible. Of course if you are a "No Reply Blogger"- I can not reply. Links in comments will result in the entire comment being deleted.